Quantcast
Channel: Lee's Blog
Viewing all 75 articles
Browse latest View live

The TFS 2013 + Git API Disaster

$
0
0
Don't get me wrong, the addition of Git to TFS is huge, and it actually removes all of my previous complains about the platform.  Sadly, the API's for it aren't up to par yet, the documentation is poor, and the technology is so young that the Internet is completely silent on how to programmatically accomplish just about anything with it.


So after about 24 total hours of wasting time searching the internet, decompiling source, watching network traffic on Fiddler, and triggering builds I have some working code (and a bit of a rant) that I wanted to share to help fill out the Internet (because clearly it doesn't contain enough ranting; but at least this one has working code).

API #Fail


As my regular readers no doubt know I occupy my spare time running Siren of Shame, a build monitor, USB siren, and CI gamification engine. The software needs to work such that when a continuous integration build is triggered it needs to determine which check-in triggered the build and give that user credit for the check-in (or exude a little light hearted shame on failure).

For every other major CI server in the world this is pretty easy.  TFS 2013 + Git?  Not so much.  If it worked the way it should you could simply do this:

var query = _buildServer.CreateBuildDetailSpec(buildDefinitionUris);
query.MaxBuildsPerDefinition = 1;
query.Status = Microsoft.TeamFoundation.Build.Client.BuildStatus.All;
query.QueryOrder = BuildQueryOrder.FinishTimeDescending;
// this gets changesets (TFVC) as well as commits (Git)
query.InformationTypes = new[] { "AssociatedChangeset", "AssociatedCommit" };

var buildQueryResult = _buildServer.QueryBuilds(query);

var buildDetail = buildQueryResult.Builds[0];

var commits = buildDetail.Information.GetNodesByType("AssociatedCommit");

And it wouldn't even require a second web request to get the triggering commit.

Sadly, the above only works for completed builds.  In-progress builds return nothing in AssociatedCommit().

That's the older, strongly typed API that requires referencing Microsoft.TeamFoundation.Build.Client.dll (which you can find in the GAC).  With TFS 2013, there is now also a TFS Web API.  Sadly even the equivalent new Web API methods have the same limitation. For example if build 5 were in progress then this:

GET http://myserver:8080/defaultcollection/project/_apis/build/builds/5/details?api-version=1.0&types=AssociatedCommit&types=AssociatedChangeset

Wouldn't return the associated commit until it completed.

So, for in-progress builds you're stuck doing a second query.

More API #Fail


Ideally at this point you would use the powerful and convenient QueryHistory() method.  Using it looks something like this:

var workspaceServerMappings = _buildDefinition.Workspace.Mappings
    .Where(m => m.MappingType != WorkspaceMappingType.Cloak)
    .Select(m => m.ServerItem);
var workspaceMappingServerUrl = workspaceMappingServerMappings[0];
// p.s. GetService() is a dumb way to get services, why not just make
//     it dynamic, it’s just as undiscoverable

var
versionControlServer = _tfsTeamProjectCollection.GetService<VersionControlServer>();
// notice the workspace server mapping url is a parameter. This facilitates onne web call
var
changesets = versionControlServer.QueryHistory(workspaceMappingServerUrl,
    version: VersionSpec.Latest,
    deletionId: 0,
    recursion: RecursionType.Full,
    user: null,
    versionFrom: null,
    versionTo: VersionSpec.Latest,
    maxCount: 1,
    includeChanges: true,
    slotMode: false,

    includeDownloadInfo: true);

Sadly this only works for changesets; in other words traditional Team Foundation Version Control (TFVC) checkins.  It doesn't work for Git, despite that what we want to accomplish is so very, very similar (i.e. couldn't we just throw in an overload that asks for the branch you're querying against?).

But Wait, There's More


As far as I can tell there is only one remaining option.  It's the new TFS Rest API.

There are two ways to use it.  The documentation says to use an HttpClient, but there's also a nice convenience wrapper that you can get by adding a reference to Microsoft.TeamFoundation.SourceControl.WebApi.dll, which you can find in the GAC.  Using this approach if you write something like this:

var vssCredentials = newVssCredentials(newWindowsCredential(_networkCredential));
GitHttpClient
client = newGitHttpClient(projectCollectionUri, vssCredentials)

// unnecessary web request #1: get the list of all repositories to get our repository id (guid)
var repositories = await client.GetRepositoriesAsync();

// sadly the workspace server mapping in the build definition barely resembles the repository Name, thus the EndsWith()
var
repository = repositories.FirstOrDefault(i => workspaceMappingServerUrl.EndsWith(i.Name));
var repositoryId = repository.Id;

// unnecessary web request #2: the workspace server mapping told us which server path triggered the build, but it #FAIL’ed to tell us which branch, so we have to scan them all!!!
var
branches = await client.GetBranchRefsAsync(repositoryId);

List<GitCommitRef> latestCommitForEachBranch = newList<GitCommitRef>();
foreach (var branchRef in branches)
{
    // branchRef.Name = e.g. 'refs/heads/master', but GetBranchStatisticsAsync() needs just 'master'
    var branchName = branchRef.Name.Split('/').Last();
    // Ack! Unnecessary web requests #3 through (number of branches + 2)!!!
    // p.s. repositoryId.ToString()? Can we please be consistent with data types!?
    var gitBranchStats = await client.GetBranchStatisticsAsync(repositoryId.ToString(), branchName);
    latestCommitForEachBranch.Add(gitBranchStats.Commit);
}

var lastCheckinAcrossAllBranches = latestCommitForEachBranch.Aggregate((i, j) => i.Author.Date > j.Author.Date ? i : j);

I've documented everything I hate about this in comments, but the most important point is this: The workspace mapping API for build definitions (which says which folder(s) trigger the build) fails to include a branch property.  This is true even for the Web API's.  For instance:

http://tfsserver:8080/tfs/DefaultCollection/_apis/build/definitions/1?api=1.0

Fails to tell us anything about the workspace mappings.  This API omission forces you to query all branches, which requests lots of web requests.  Specifically it requires the number of pushed branches plus two web requests in order to find the latest check-in across all branches.  This could be insanely expensive, and it might not even be correct in some circumstances.

Is There No Better Way?


As nice as the strongly typed API approach sounds, it turns out to be missing a number of API's that you can get to if you use a WebClient to request them manually.  Specifically if you use the web API directly you can issue a single request against the commits endpoint to get the latest commit across all branches.

Sadly, the authentication via WebClient is a bit tricky and is dependent upon whether you are using a locally hosted TFS or Visual Studio Online.  For this reason you're better off with some helper methods:

///

/// This method handles requests to the TFS api + authentication
///

publicasyncTask ExecuteGetHttpClientRequest(string relativeUrl, Func<dynamic, T> action)
{
    using (var webClient = GetRestWebClient())
    {
        string fullUrl = Uri + relativeUrl;
        var resultString = await webClient.DownloadStringTaskAsync(fullUrl);
        dynamic deserializedResult = JsonConvert.DeserializeObject(resultString);
        return action(deserializedResult.value);
    }
}

publicWebClient GetRestWebClient()
{
    var webClient = newWebClient();
    if (MyTfsServer.IsHostedTfs)
    {
        SetBasicAuthCredentials(webClient);
    }
    else
    {
        SetNetworkCredentials(webClient);
    }
    webClient.Headers.Add(HttpRequestHeader.ContentType, "application/json; charset=utf-8");
    return webClient;
}

///

/// Using basic auth via network headers should be unnecessary, but with hosted TFS the NetworkCredential method
/// just doesn't work.  Watch it in Fiddler and it just isn't adding the Authentication header at all.
///

///
privatevoid SetBasicAuthCredentials(WebClient webClient)
{
    var authenticationHeader = GetBasicAuthHeader();
    webClient.Headers.Add(authenticationHeader);
}
publicNameValueCollection GetBasicAuthHeader()
{
    conststring userName = "username";
    conststring password = "password";
    string usernamePassword = Convert.ToBase64String(System.Text.Encoding.ASCII.GetBytes(string.Format("{0}:{1}", userName, password)));
    returnnewNameValueCollection
    {
        {"Authorization", "basic" + usernamePassword}
    };
}
privatevoid SetNetworkCredentials(WebClient webClient)
{
    var networkCredentials = newNetworkCredential("username", "password");
    webClient.UseDefaultCredentials = networkCredentials == null;
    if (networkCredentials != null)
    {
        webClient.Credentials = networkCredentials;
    }
}
Wow.  That's a lot of boilerplate setup code.  Now to actually use it to retrieve check-in information associated with a build:
// Get all repositories so we can find the id of the one that matches our workspace server mapping
var repositoryId = await _myTfsProject.ProjectCollection.ExecuteGetHttpClientRequest<Guid?>("/_apis/git/repositories", repositories =>
{
    foreach (var workspaceMappingServerUrl in workspaceMappingServerUrls)
    {
        foreach (var repository in repositories)
        {
            string repositoryName = repository.name;
            if (workspaceMappingServerUrl.EndsWith(repositoryName))
            {
                return repository.id;
            }
        }
    }
    returnnull;
});
// now get commits for the repository id we just retrieved.  This will get the most recent across all branches, which is usually good enough
var getCommitsUrl = "/_apis/git/repositories/" + repositoryId + "/commits?top=1";
var commit = await _myTfsProject.ProjectCollection.ExecuteGetHttpClientRequest(getCommitsUrl, commits =>
{
    var comment = commits[0].comment;
    var author = commits[0].author.name;
    returnnewCheckinInfo
    {
        Comment = comment,
        Committer = author
    };
});
return commit;
Is this absolutely terrible?  Perhaps not  But it is a lot of code to do something that used to be quite simple with TFVC and is quite simple with all other build servers (or at least those I have experience with, specifically: Hudson, Jenkins, Team City, Bamboo, CruiseControl, and Travis).

Summary

So that's my story and I'm sticking to it.  If any readers find a better approach please post in the comments, send me a note at @lprichar, issue a pull request against my CheckinInfoGetterService.cs where you can find the full source for this article, and/or comment on this SO article where I originally started this terrible journey.  Hopefully this will save someone else some time -- if not in the solution, perhaps in the following advice: if you value your time avoid the TFS Git API.

A Surprise Synchronization Context Gotcha

$
0
0
I got into an interesting argument conversation with a co worker last week about whether async/ await was multi-threaded.  He thought I was bonkers for suggesting it was not multi-threaded.  So I did some research.

First off, obviously if you're if you're doing async/await it's probably because you want some multithreaded behavior like network IO or file IO where some other thread does some work for you while freeing your UI thread to handle UI stuff (or in the case of IIS, releasing your thread to handle other incoming requests, thus giving you better throughput).  So my co-worker was right that 99% of the time async/await will probably involve multiple threads.

However, if async/await were multi-threaded by it's very nature, then it should be impossible to write a program using async/await that was single-threaded.  So let's try to write a method that we can prove is single-threaded that also uses async/await.  How about this:

publicasyncvoid HandleClickEvent()
{
    awaitTask.Yield();
    j = 1;
    while (j != 0)
    {
        if (j == -1) j++;
        j++;
    }
    awaitTask.Yield();
}

It took some work to come up with an infinite loop that looked normal to the compiler, but that's what the while loop is doing.  If async/await were multi-threaded, then we might think that the UI thread would hit the first Task.Yield and spawn off a new thread.  Then the infinite loop would be run on a new thread and the UI would work great, right?

If we actually run that code in a Windows Store app the UI freezes.  Why?  Because, according to MSDN:

The async and await keywords don't cause additional threads to be created. Async methods don't require multithreading because an async method doesn't run on its own thread. The method runs on the current synchronization context and uses time on the thread only when the method is active. You can use Task.Run to move CPU-bound work to a background thread, but a background thread doesn't help with a process that's just waiting for results to become available.
So when I claimed async/await wasn't multi-threaded I was thinking of that.  What's basically happening is that the UI thread is a message pump that processes events, and when you await within the UI thread's synchronization context you yield control to the UI thread's message pump, which allows it to process UI events and such.  When your awaited call returns it throws an event back to the UI thread's message pump and the UI thread gets back to your method when it's done with anything else it's working on.

But after some research I realized that I didn't know nearly enough about synchronization contexts and so I spent the morning reading about them.  After a lot of research I finally found someone that has a great description of how all this works under the covers and if you get the chance I highly recommend reading C# MVP Jerome Laban's awesome series C# 5.0 Async Tips and Tricks.

In particular one thing I learned is that if you start a new Task, you throw away the UI thread's synchronization context.  If you await when there is no synchronization context, then by default WinRt will give you some random thread from the thread pool, which may be different after each await.  In other words if you do this:

publicasyncTask RefreshAvailableAssignments()
{
    awaitTask.Run(async () =>
    {
        Debug.WriteLine(Environment.CurrentManagedThreadId);
        awaitTask.Yield();
        Debug.WriteLine(Environment.CurrentManagedThreadId);
    });

}

You will (usually) get a different thread after the yield than you did before it.  That can lead to trouble if you aren't careful and aren't aware of it.  It can be especially dangerous if you're deep in the guts of something and you aren't 100% sure of whether you are being called from the UI thread or from some other thread.  It can be particularly bad if someone after you decides to put your code into a Task.Run and you were dependent upon the UI thread's synchronization context without being aware of it.  Nasty, huh?

It makes me like more and more the idea introduced in the post by Jason Gorman entitled Can Restrictive Coding Standards Make Us More Productive? where he describes ways of discouraging team members from starting new threads (or Tasks on my project since WinRt doesn't give us Thread's) unless there is a really good reason for doing so.

It goes back to a most excellent statement my co-worker made:
Async/await is very powerful, but we all knows what comes with great power.
So that was fun.  I look forward to having lots more constructive arguments conversations like this one in the future.  :)

An illustrated Gude to Parameter Passing in JavaScript

$
0
0
I thought it would be fun to do a back-to-basics kind of post on the JavaScript language and base it on my second most popular blog post of all time Parameter passing in C#.

In other words this post will present some JavaScript brain teasers around parameter passing and visually illustrate the solutions.

Since JavaScript doesn't have the ref or out keywords like C# we'll just be looking at:

  • Primitive Values
  • Reference Values
  • Strings (Immutable Values)
  • Passing Primitives
  • Passing References

Primitive Values


Starting simple, what's the result of the following, and why?

var i = 5;
var j = i;
j = 10;
alert(i);

Let's take it line by line.  On the first line we declare a variable i and assign it the value 5.  5 is a value of type 'number', and number is a one of a handful of primitive types including undefined, null, boolean, and string.

On the second line we declare a new variable j and assign it the value held by the variable i.  If we think of variables as small containers (boxes) that can only contain primitives or references, then we can picture the first two lines of code like this:


If JavaScript were pass by reference then j might contain a pointer to i.  But because JavaScript is pass by value for primitives the second line copies the value in i into the box for j (copying is illustrated with the blue line).

Consequently when we assign j the value 10, it doesn't affect what's in the box for i. 


Thus the answer to alert(i) is 5.

Reference Values

So what is the result of the following, and why?

var i = { a: 5 };
var j = i;
i.a = 10;
alert(j.a);

In this example we declare a variable i and assign an object to it.  Consequently i contains a reference value.  Reference values are essentially pointers to objects (which are in turn aggregations of properties).  In a language like C# they'd be like a pointer on the stack to an object on the heap (although technically JavaScript doesn't have a stack or a heap).

So on line two we then instantiate a variable j and assign to it the value that's in i. Illustrating the pointer as an arrow we end up with this:


If JavaScript were pure pass by value then j might have contained a complete copy of the object.  But JavaScript, like Java, Python, Ruby, and C# is technically call by sharing, which means that for reference values we treat the pointer as pass by value, and thus the object it points to as pass by reference.

Consequently when we assign anything to j.a we follow the pointer to the shared object, and get this:


And that's why alert(j.a) returns 10.

Strings (Immutable Values)


How about this:

var s1 = 'hello';
var s2 = s1;
s2 = 'world';
alert(s1);

In C# strings are immutable reference types.  In JavaScript, however, they're just primitive values, which are all immutable.  So it's kind of a trick question and this turns out to be identical to our first example.


Thus alert(s1) is simply 'hello'.

Passing Primitive Values


Let's expand what we've learned about primitives to functions:

function Change(j) {
    j = 10;
}
var i = 5;
Change(i);
alert(i);

If you guessed that this is almost identical to our first example you're absolutely right.  Illustrating it roughly how the interpreter would see it would result in this:


Thus alert(i) is 5.

Passing Reference Values


Finally we can explore how reference values get passed with something like this:

function Change(j) {
    j.a = 10;
}
var i = { a: 5 };
Change(i);
alert(i.a);

If you're thinking this is nearly identical to our second example, you're right.  Illustrating it roughly how the interpreter would see it would result in this:


Thus alert(i.a) gets us 10.

Double Bonus Points


You're tied up in double overtime with one second left on the clock:

function Change(j) {
    j = { a: 10 };
}

var i = { a: 5 };
Change(i);
alert(i.a);

Go ahead, hit F12 .... nothing but net! ... and the crowd goes wild!

Hope you had fun reading this and hopefully learned something new.  Please post in the comments or hit me up on twitter if something doesn't look right.

Increase Maturity: Start a Sprint Closeout Checklist

$
0
0
If a sprint closeout checklist sounds excessively pedantic, consider this: how effective are you at resolving retrospective issues? If you aren't using a closeout checklist, the then it's not as well as you think.

This is because there's a special class of retrospective item that you can only reliably close by addressing it on a recurring basis.


New Year's Resolution? Lies, all lies.


For instance, suppose during your regular retrospective developers raise the issue that they don't know when to mark stories complete because they don't contain enough detail. Or, this problem could manifest itself as testers frequently rejecting vaguely written stories to the chagrin of developers.

In either case you could address the issue by promising to write stories with more detail or (better) to include acceptance criteria. Sounds great, the retrospecitve ends, everyone is happy since things will be much better going forward.

Only they won't. This solution is a mistake. Like most New Years resolutions, promises "to do better" are a lie. Promises like the above last for a sprint, maybe two. However, as time elapses and/or as stress increases, we forget our promises. We revert.

In the example above consider a customer verbally mentioning a new feature they want to you in a hallway. You quickly capture the need as you run off to another meeting with the intent to fill in the details later. An hour and four emergencies later you've already forgotten. The mistake wasn't breaking the promise, it was making it in the first place.

(Lists) to the Rescue


So how do we truly solve this issue? The answer is by adjusting our close-out process. Sprint close out is the perfect time to address issues like this because we can block out time to correct problems introduced during those hectic periods. Furthermore it's much easier to take a step back to focus on quality when you're not sprinting.

But if our processes are purely based on some static, published processes that isn't customized to our team and circumstances, or is based on the way we did things the last time, then we will lack the means to consistently and reliably adjust our processes over time. We need a different tool.

One such tool is a closeout checklist. The list may start as simple as listing the meetings from a traditional scrum process:

  • Perform Sprint Review
  • Perform Sprint Planning
  • Perform Sprint Retrospective

But over time (more specifically after retrospectives) we can add items onto this list thus customizing it to the specific needs of our team.

In the case of the example above we can add an item prior to Sprint Planning such as "Clarify New Stories". We can keep the list simple or move it to a spreadsheet with columns like responsible team members (i.e. just the scrum master, develoeprs only, whole team), implementation details, due date, or date completed.

Sample Checklist Items


If this still sounds a little vague here are some sample retrospective items that I've gathered from my career and how one might adjust a closeout checklist to address the underlying issue:

IssueResolution
Post-production, stories are taking longer than expectedIf they failed to take data migration into account, try adding an "identify migration issues" task to the checklist. Possibly limit it to more experienced developers to keep the meeting short.
The CI server takes too long to buildIf there are lengthy UI automation or performance tests, consider moving them out of the continuous integration cycle into a nightly build. Then add a "check status of acceptance tests" task to the checklist. Don't close the sprint unless they are all passing.
Too many orphan branches in the source control serverAdd a "delete orphan branches" task to the checklist, maybe assign it a specific person.
Lack of adherance to coding conventionsIn Code Reviews: A Sane Approach I argue for a per-sprint code review. The checklist would be the perfect place to ensure this consistently happens.
Code Coverage is LowAdd a task to "Publish code coverage numbers" and include the delta from the previous sprint. Sometimes increasing visibility is enough to remedy issues like these.
Effort estimation takes too longIf eliminating it altogether isn't an option, try adding "auto-point defects to 1, no discussion allowed" in details of "sprint review"
Developer databases out of syncYou could solve the problem once, or better yet add "re-baseline databases with production" task to the checklist to ensure it doesn't happen again.

Summary


So while a closeout checklist may sound pedantic at first it can be an excellent tool in your tool belt. If you give it a try, you may find that such a list can increase your maturity while becoming the linchpin that holds all of your processes together and ensuring that continous process improvement happens for your team today and far into the future.

So what checklist items would you add to the list above? Feel free to post in the comments or ping me on twitter.

.Net on Mac for the OS X n00b without Mono via Visual Studio Code

$
0
0
Those who know me could have placed large sums of money on me being the last person in the world to get a Mac.  I love C#, Visual Studio, even Windows 8, and in general most things that Microsoft puts out

Before I lose half my audience: last week I broke down and picked up a 13" MacBook Pro.  I even brought it with me as my primary PC during this week's Microsoft Build conference.

Fortunately, today, thanks to some amazing work from the folks at Microsoft I successfully brought over some C# love from the Windows world and successfully got .Net running on OS X without paying $1,000 for a Xamarin License.

I'll get to the step-by-step instructions for how to build .Net on OS X with the newly announced Visual Studio Code and a lot of command line foo.  But first a little background.

Where Did Things Go So Terribly Wrong?


I've actually been using a Mac for the last three months at work.  With extreme displeasure I was given and expected to be productive with a Macbook Pro on a large 'all-JavaScript-all-the-time' project.  Despite cursing OS X daily, nay hourly, I eventually grew to become marginally productive in it.

But when I moved on from my project and I needed to return the the company MacBook, I wasn't quite ready to return to my Hackintosh ways on my current side project (a Siren of Shame Mac client).  So to the astonishment of all who know me I picked up a reasonably priced MacBook Pro.

But a funny thing happened.  After using Yosemite for a while I realized the new OS addressed several of my biggest complaints from the previous work-provided Mavericks OS (no OneNote, and crappy multi-monitor support).  I also discovered BetterSnapTool which is a must-have if you're accustomed to Windows.

So when I needed a primary computer to take with me to the Microsoft Build the MacBook was a natural choice for it's fantastic form factor and superior battery life.  And at this point I have to admit this little thing is growing on me (I'm even writing this article on it now).

Visual Studio For Mac?!

So I may not do it myself any time soon, but I can see why someone might want to live on a Mac but still code Visual Studio and C#.  And I guess Microsoft realizes that too!  To date there have been some options.  Mono has always been one, although it's not always 100% compatible with the .Net framework, and for a hefty price Xamarin can get you a nice Cocoa UI with C#.

But recently Microsoft announced that ASP.Net 5 would run natively on Linux and Mac (via kestrel).  And then yesterday Microsoft announced a new cross platform IDE known as "Visual Studio Code".  Since I had the Mac and some time I figured I'd give running .Net natively without Mono using Visual Studio Code a try.  Turns out it was super easy and only took about 15 minutes.

Touching Story Bro, Show Me The Code


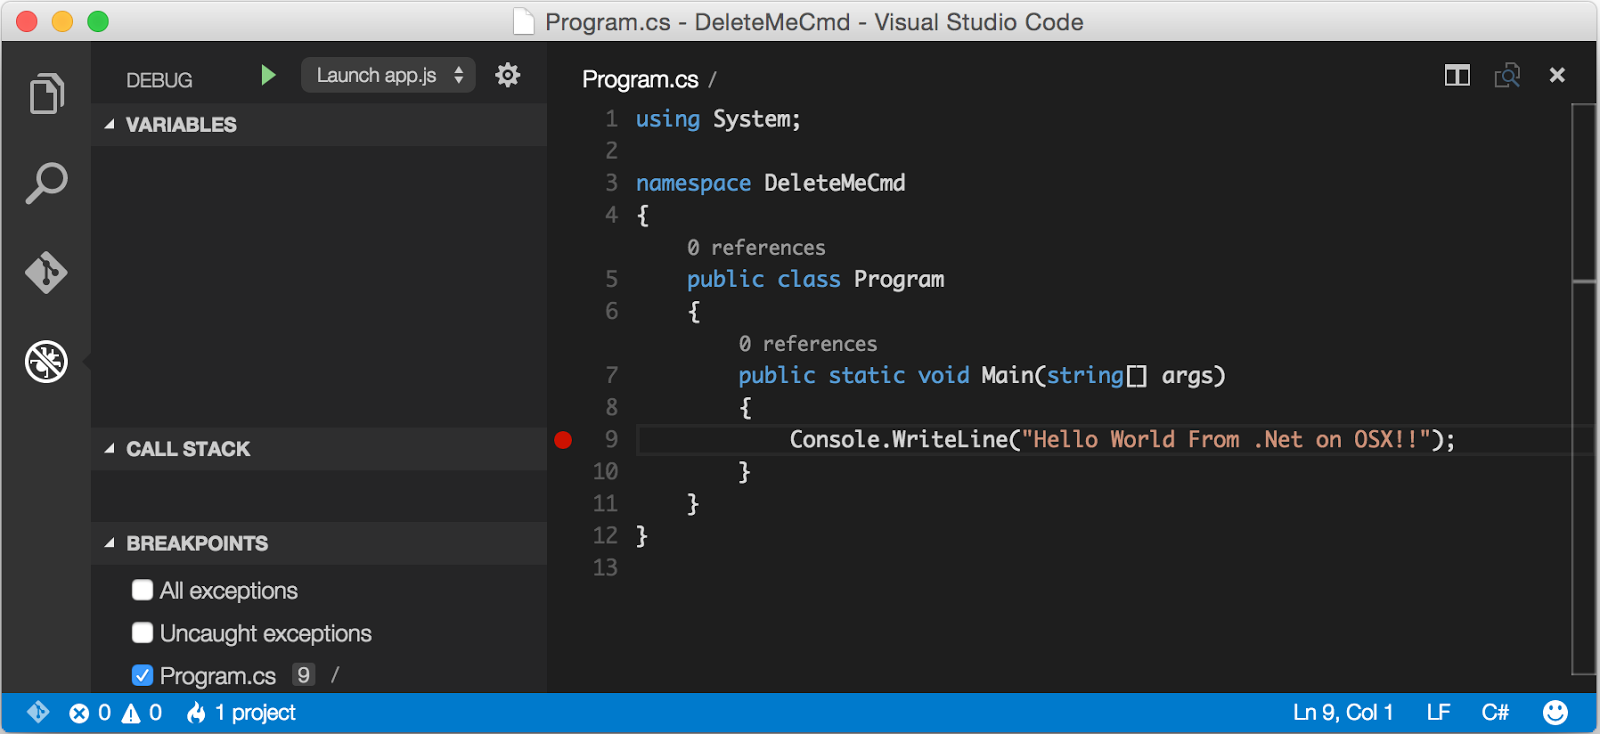
To do it first off download and install the Visual Studio Code IDE they announced today.  Don't get your hopes up, it really doesn't hold a candle to Visual Studio or even Xamarin Studio for that matter just yet.  The important thing is it's super fast and lightweight, it runs on Windows, Mac, and Linux, and presumably Microsoft is going to grow this thing into something awesome.


Next, install the ".Net for Mac and Linux" otherwise known as the .Net Execution Environment (DNX).  To do that first install homebrew, which is like Chocolatey for PC's.  It makes installing and uninstalling apps super easy.  To get it run the following from a terminal to:


ruby -e "$(curl -fsSL https://raw.githubusercontent.com/Homebrew/install/master/install)"

Next download and install the .Net Verison Manager (DNVM) via Homebrew, which will automatically install DNX:
brew tap aspnet/dnx
brew update  
brew install dnvm
If that worked you should be able to run DNVM by doing

source dnvm.sh
dnvm
 
Which should get you something like this:


Yeoman


In Visual Studio when you File -> New Project, you get a ton of project types to choose from that start you down the path of success with a lot of boilerplate code.  That doesn't happen on a Mac with Visual Studio Code (it doesn't even have a File -> New Project option), but fortunately the Yeoman project will accomplish the same thing.

To install Yeoman, first install node if you haven't already:
brew install node
Then install Yeoman
npm install -g yo
Next, you need to install the .Net templates from the OmniSharp/generator-aspnet project.  To do that:
npm install -g generator-aspnet
At this point you're finally ready to do the equivalent of File -> New Project.  Change directories to you dev directory (e.g. cd ~/dev) and then
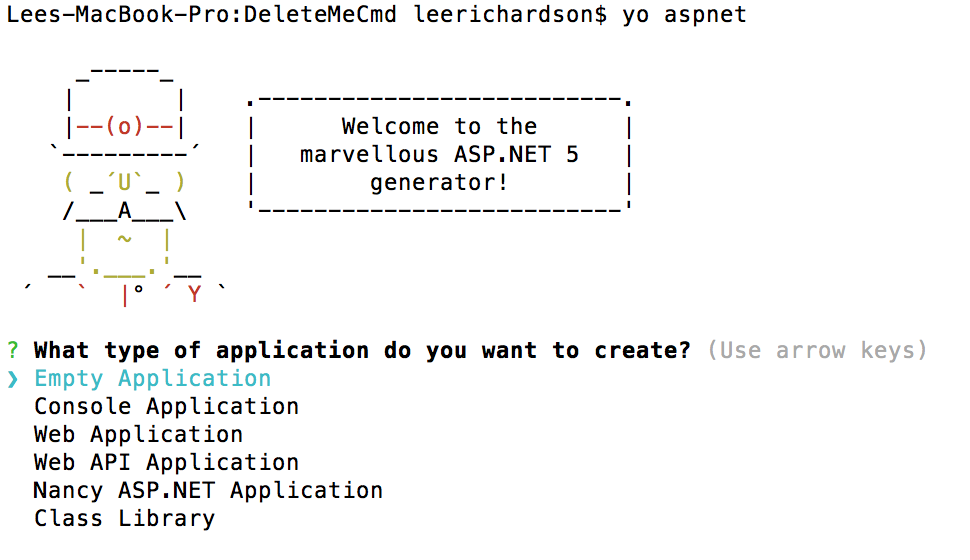
yo aspnet
It will guide you through a wizard and then generate you a hello world app.


If you select a Console App you can run it by simply doing:
dnx . run
And if you're lucky you'll get something like this:

At this point if you open up Visual Studio Code you're liable to get a lot of errors and a brief message like "There Are Unresolved Dependencies From '/Project.Json' Please Execute the restore command." If this happens run:


dnu restore
To download the project's dependencies.  And you should be good to go.


Modifying this process for an ASP.Net project is only slightly more involved as you need to set up kestrel.

Conclusion


If you find yourself with on OSX either because you love the ecosystem, because it was forced on you, or perhaps like me you find yourself maybe kinda liking it just a little, yet you also love the C# language and those awesome features you can't get anywhere else like LINQ, and async/await then there's some good news.  With a little extra work and thanks to some amazing work from Microsoft it's now possible to have your cake and eat it too.

Please post in the comments or hit me up on twitter if you found this post useful or if, more likely, I got something wrong.

Xamarin: 5 Reasons I'd Do It Again In a Hearbeat

$
0
0
Pretty darn nice.  That about sums up how I feel regarding Xamarin development after working with it for the last six months.  I'd choose it again in a heartbeat despite having built pure native apps for every major platform and having plenty of experience building mobile friendly websites with JavaScript.  Here's why:

1. Xamarin Forms


Don't listen to the detractors.  When our team started I heeded the rumors that Xamarin Forms isn't ready for anything more than settings pages.  We heeded the advice and started with mostly MvvmCross and Interface Builder story boards.

But the more Xamarin Forms pages we built, the more we loved it.  We eventually went back and replaced every single platform specific UI page with a cross-platform Xamarin Forms version that rendered fully native controls.  The two-way databinding, native support for the MVVM design pattern, and easy to understand (for me) XAML were just icing on the cake.

It wasn't perfect.  We occasionally ran into hiccups with controls that failed to offer the UI customization we wanted.  But once we mastered Custom Renderers we were able to accomplish pretty much anything UI-wise.  Animations, completely custom pages, and dynamic rendered controls, all quite doable once you're up to speed.

With Xamarin Forms we got a fully native look and feel for our app while achieving 76.3% code reuse (most of which was the important stuff), plus an easy out if the abstraction failed us.  Fantastic.

2. Code Sharing


Not what you're thinking.  Sharing code between iOS and Android is obvious.  We used Portable Class Libraries to share code between our iOS and Android and our server-side web application.

For one thing sharing our models was huge.  That made strongly typed json serialization/deserialization a breeze.  But it got even better with the "free unit tests" our compiler gave us.  Rename a field on mobile?  Zing: immediate compilation error server-side.  Nice.

Once we got in the swing of things we started sharing enums between Entity Framework ORM and database on the server-side, the cross platform models, our SQLite database, and our mobile code.  Then we started sharing utility methods, validation, and even miscellaneous code like cryptography.  Yes, the crazy-smart folks at Xamarin even ported the .Net framework's cryptography libraries to iOS and Android, thus allowing the exact same logic for encryption/decryption everywhere, how cool is that!

While we used TypeScript for the web front-end, I suppose one could extend code sharing absolutely everywhere by using Script Sharp.  That would be pretty insane.

3. C#


C# is a dream.  I'm probably biased, but to me the language is downright beautiful.  There's Expression Trees, a feature I have yet to see in any other language.  And LINQ is amazing.  But async/await takes the cake.  It's the prettiest technique I've ever seen for freeing up the UI thread in mobile or desktop apps or releasing your web server's thread to handle other requests all while keeping your code readable. Async/await is arguably worth Xamarin's price of admission.

var animation1 = AnimateLayout(CategoryAttributes);
var animation2 = AnimateLayout(TemplateAttributes);
awaitTask.WhenAll(animation1, animation2);
// ui thread is free. FREE! FREE!!!!
DoStuffAfterAnimations(); // <- *UI thread* picks back up here, after all of ^ & when it finishes other UIish stuff!

"await Task.WhenAll()"?  Be still my beating heart.

Somewhat related is using Visual Studio plus ReSharper to build iOS and Android apps.  My only hesitation is it took about 10 seconds from the time I hit F5 on the PC to the time I was debugging (with breakpoints and stuff, mind you) on Mac Emulator or an iOS device.  The pro's of this great IDE setup outweighed those cons for me personally, but many undoubtedly will prefer Xamarin Studio (or obviously a Cordova/PhoneGap based solution with its super-fast dev feedback cycles).

The biggest win here, however is that the rest of my team had lots of C# experience, minimal JavaScript experience, and no ObjectiveC experience.  Xamarin was a slam dunk for our situation.

4. Native Library Interop


Interop wasn't exactly easy with Xamarin, but it was doable, and for a cross platform solution that's a differentiator.  As I'll describe it's also essential to know that it's possible so that if (when) part of the Xamarin abstraction fails you you can stop cursing the framework and carry on with your life.

The main reason we needed interop initially was our requirement for an expensive physical RFID reader hardware device thingy (that's a technical term) that came with its own proprietary Bluetooth based protocol and set of libraries.  If it were a C library we could use normal P/Invoke semantics to call in.  However, since it was an Objective-C API, we needed an iOS Binding Project.

Basically we defined a bunch of C# Interfaces with Attributes that told Xamarin how to map to the Objective C API's. At compile time Xamarin code generated an implementation to call the API's.  While Xamarin's Objective Sharpie saved some time by building out some of the many interfaces we needed, it was still a pretty manual process.  Basically Objective-C Protocols map poorly to C# Interfaces and some fiddling is involved.

Only once did we need interop because of a Xamarin failing.  We needed a dynamic tone generator and despite having audio playback capability (even MIDI libraries) we couldn't get to the lowest level audio API's we needed (you know, the ones when you need to access sine and cosine and stuff).

Fortunately, interop can solve any problem if you're desperate enough.  The good news is we only needed it once, and for a pretty obscure case.  Otherwise Xamarin's mapping of the .Net Framework worked perfectly and gave us everything we needed.

5. Minimize Hardware Costs


Warning: my last reason for choosing Xamarin again in a heartbeat will probably apply to 0.001% of readers:

My team mostly has PC's (nice, fast, expensive ones, but PC's nonetheless).  Mac's are expensive.  Building iOS apps requires a Mac.  Handing out an extra Mac, even an Air, to all developers on our team for a six month project is a silly expense.

The latest Xamarin Build Host will allow multiple PC's to pair with it.  One iMac purchase later and we're good to go.  Well, in theory.  Technically that version hadn't come out when we started, so we actually gave lots of money to Apple.  But it sounds like a super awesome feature to thwart Apple from receiving lots of money (..oh wait).

Summary


A good platform is one that boosts your productivity, allows you to share more and write less code, has great documentation and community support, and gives allowances for its own potential failings.  Xamarin has all of this and more.

I'm really looking forward to the opportunity to use it again.  Give it a try, I bet you will too.

Garmin vs Microsoft Band 2: Lifechanging? Maybe.

$
0
0
While the Garmin Forerunner leveled up my running, I can honestly say the Garmin Vivofit (a Fitbit competitor) changed my life.

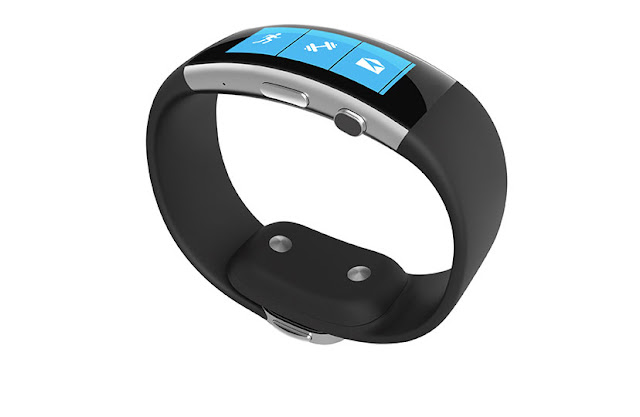
So shouldn't a Microsoft Band 2, with well over twice the number of sensors of both Garmin devices combined be twice as disruptive?  One can dream.

Sensor
ForeRunner
Vivofit
Microsoft Band 2
Heart Rate Monitor
With Strap
Yes
3-Axis Accelerometer
With foot pod
Yes
Yes
Gyrometer
Yes
Yes
GPS
Yes
Yes
Microphone
Yes
Ambient light sensor
Yes
Galvanic skin response sensors
Yes
UV Sensor
Yes
Skin temperature sensor
Yes
Capacitive sensor
Yes
Barometer
Yes

Seriously Bro, Life Changing?

Prior to the Vivofit I would exercise once, maybe twice a week.  Often as not I'd skip entirely.  After a 40-50 minute run I'd feel good, but hit a wall well before day's end.  24-48 hours later I'd be in pain.  It was just infrequent enough to risk injury, which occurred to me several times a year.

The Vivofit changed all that.  Inspired (or perhaps compelled) to reach that magic 10,000 steps a day number that's supposed to be so beneficial I was forced to run for 20 minutes nearly every weekday (in addition to climbing more stairs, taking a lunchtime walks, etc).  Forced, because without the daily run there is simply no other way for someone who's job and primary hobby has them sitting for 12 hours a day to make 10,000.


The difference between short, daily exercise and infrequent, intense exercise is dramatic.  My body started waking up early with ease, in anticipation of its daily run.  I felt more alert and quick at work.  I needed less sleep, presumably due to higher quality sleep.  And despite running more, I rarely got sore.  These benefits persist to today, and I haven't suffered an injury in over a year.

I've also lost weight (a good thing).  Below are my weights for the last year.  They may not appear dramatic, but keep in mind I got the Vivofit in January and I didn't change my diet.  I wasn't trying to lose weight.  The loss came naturally as my competitiveness and type A personality combined with the data I was getting from that little device.

Date
Weight
Fat %
10/16/2014
185.6
22.8
10/30/2014
186.0
23.3
11/20/2014
185.8
23.6
1/2/2015
187.2
22.3
1/13/2015
186.4
22.7
1/30/2015
184.2
22.5
2/12/2015
185.2
22.2
2/27/2015
183.4
21.1
3/7/2015
184.8
22.7
3/19/2015
182.4
21.2
3/26/2015
182.2
21.7
4/10/2015
183.0
22.5
4/16/2015
181.2
21.7
4/23/2015
179.8
21.5
5/15/2015
180.2
20.6
5/28/2015
179.8
19.9
8/20/2015
181.0
20.9
9/19/2015
182.2
22.2
9/30/2015
181.2
21.3
10/8/2015
181.8
21.7
10/15/2015
182.0
21.5
10/23/2015
180.8
21.4
10/29/2015
179.6
20.5

p.s. my doctor says I should be in the low 170's.  I'll get around to trying to lose weight at some point.  Tomorrow sounds good.

If you're questioning the life-changing potential of a pedometer, you're absolutely right to.  My wife, whose personality is roughly the opposite of mine, got a Vivofit at about the same time and a year later she rarely wears hers.  But if you you're a programmer like me or just love data, you may find similar inspiration.

Pedomo-Fail

If a silly little $70 device can make such a big difference, imagine what $250 band with sensors out the wazoo can do.


Unfortunately, my primary experience with the Band can be summed up as follows:

In economics and decision theory, loss aversion refers to people's tendency to strongly prefer avoiding losses than acquiring gains. Most studies suggest that losses are twice as powerful, psychologically, as gains.

Loss, what loss?  It turns out the Microsoft Band is a miserable pedometer.  Every single day it steals an average of 3,533 steps from me.  I know this because I wore both the Vivofit and Band for over a week.

Day
VivoFit
Band 2
Loss
% Loss
Runs
11/14/2015
19,834
     12,626
7,208
36%
1
11/15/2015
12,941
     13,230
-289*
-2%
0
11/16/2015
12,877
        9,494
3,383
26%
1
11/17/2015
13,099
        9,376
3,723
28%
1
11/18/2015
12,077
        6,716
5,361
44%
1
11/19/2015
10,032
        7,326
2,706
27%
0
11/20/2015
14,055
     11,016
3,039
22%
1
11/21/2015
7,468
        3,846
3,622
49%
0
11/22/2015
12,419
        9,374
3,045
25%
0

* The 15th I mowed the lawn. The Band wouldn't track at all.  I put it in my pocket as suggested on the Microsoft Band forums, but then it seemed to double-count steps.  Sigh.

Chart showing Band losing steps

So why do I judge the Band inaccurate instead of the Vivofit?

Because I've watched as the Band fails to count steps while I'm not swinging my arms fully, or perhaps walking too slowly.  For instance if I'm carrying a coffee, looking at my phone, or slowly walking the sniffing dog while holding a morning paper (I know, what's that?), then it under counts.  It succeeds when my hands are in my pockets, but on numerous occasions I've seen it just zone out.  It certainly fails miserably when mowing the lawn.  There's even an extensive thread on missing steps on the Microsoft Band forums.

And how do I know that the Vivofit isn't over-counting?  Perhaps it does a little.  I have seen it give up a few steps while doing mundane things like washing my hands, but in general it grants nothing for driving, random arm movements, or trying to cheat (not that I'd do that).

Why does a little under counting even matter?  Because I am no longer consistently getting 10,000 steps with my 10,000+ steps worth of effort.  It means the same competitive part of my brain that was motivated to run daily feels it's being cheated.  It's stupid, I know, because I'm getting just as much exercise and being just as healthy.  But I simply don't feel as healthy if I fail to hit 10,000.  I've lost something: meaningless though it may be.  And it will take a substantial amount of of bells, whistles, and fancy sensors to compensate for my feeling of loss.  Fortunately, the band is excellent in about every other area.  I suppose it's enough to make up for my loss aversion.

Running with Garmin Stinks

While the Band isn't a great replacement for the Vivofit, it's an excellent replacement for the ForeRunner 405CX.  It tracks both outdoor, GPS-based runs, and indoor accelerometer-based treadmill runs accurately.  And if you're outdoors you don't even need to bring your phone, unlike certain Apple fitness products.

Nov 16 Treadmill Run
Stat
ForeRunner
Band
Pace
9:01
9:12
Calories
251
313
Distance
2.22
2.17
Avg HR
166
159
Max HR
175
180
Nov 14 Outdoor Run
Stat
ForeRunner
Band
Pace
8:38
8:32
Calories
661
448
Distance
4.54
4.61
Avg HR
167
170
Max HR
188
183
UV Exposure
16m

What makes me love the Band as a running device more than anything else is the Garmin's heart rate monitor stinks.  Literally.


I love heart rate data.  It lets me know that I'm working too hard at the beginning of a run, or not hard enough in the middle.  But that strap.  It feels akward, it looks like a bra strap through a damp shirt, and no amount of washing seems to remove that stank.  Granted some of the newer ForeRunner's are strapless, but throwing away the ForeRunner 405 for the Band was an absolute pleasure thanks to the Band's in-watch optical heart rate monitor.

Everything Else

I've spilled too many words already.  Let me quickly cover everything else:

Alarm Clock
Love it.  Having an alarm clock that watches your heart rate and wakes you up to 30 minutes early based on your natural sleep cycles is very nice.  Even if you turn off the smart alarm, having a quiet alarm that doesn't wake your partner is an awesome feature.

Stopwatch / timer
Love it.  Having a timer that quietly vibrates when it time runs out is wonderful in general.  It's a particularly nice way to end meditation, or notify that your coffee's ready no matter where you are in the house.

Clasp
Love it.  I like the looks of the Band, but the clasp is particularly well designed.  The Vivofit would pop off my wrist about once a week.  The Band easily tightens or loosens with one hand, feels solid, and looks nice.

Step goal buzzer
Like.  The ability to set my own step goal (which you can't do with Vivofit) helps compensate for under-counting steps.  I just set my goal for 7,000 steps and pretend it's 10,000.  The watch vibrates when I hit my goal.  I feel a bit like pavlov's dog, but it's motivational nonetheless.

Stairs counter
Like.  Watching that number go up as you ascend stairs when you could have taken the elevator is kinda nice, particularly since walking up is harder but grants no additional steps.

Sleep monitor
Like.  Seeing the quality of my sleep immediately when I wake up helps me to link my actions during the day (caffeine intake) to sleep efficiency.

Workouts
Like.  Vibration alerts when it's time to switch from sprinting to jogging and back again during a pre-programmed interval workouts is nice.

Phone/e-mail integration
Like.  Seems like a gimmick until you catch an important call or e-mail that you might have missed while you were heads down coding up a storm with headphones on.  Fortunately, you can make it buzz for only a short VIP list.

Open Data
Like.  While Garmin makes it hard to access your data, Microsoft makes it easy.  Band allows you to sync to all three of the most popular mobile phones OS's and to easily share to a variety of popular sites like RunKeeper and to easily export all your data to CSV.

Microsoft Health App
Dislike.  The phone app works, but it barely show any data.  You have to view the Microsoft Health web site for that, and it isn't mobile friendly.  Fortunately the site is great if you aren't mobile.  It makes the mass of data easy to comprehend and navigate, unlike Garmin's.

Battery life
Sucks.  I knew going in that battery life would be miserable compared to the Vivofit's 1 year battery life.  The Band 2 can go 48 hours without a charge.  That's actually great for the form factor and capabilities, but I would be much happier if Microsoft could break the laws of physics and make it last a weekend.  Buy an extra charger for the office, you'll need it.

UV Sensor
Gimmick.  I'll apply sunscreen before going to the beach, thanks.

Starbucks app
Gimmick.  Saves no time over the phone, and often doesn't read well.

Summary

Is the Band the device for you?  Honestly I almost returned mine.  Pedomofail bothered me that much.  But I'm over it.  It's fairly consistent at least.  And unlike an Apple Watch, for instance, the Band has all the sensors it will ever need.  Theoretically it's only one firmware update away from being perfect.  As you read this, perhaps it already is.

But $350 isn't cheap.  If you don't know whether step data will motivate you: get a cheap Fitbit or Vivofit.  As for me, I'm actually growing to love the device, despite its shortcomings.  I think I'll keep it.

Xamarin vs Ionic: A Mobile, Cross Platform, Shootout

$
0
0
Ever faced with choosing among competing frameworks; needing to make a decision you/your customer won't regret?  If those frameworks are for building cross-platform mobile apps and are Xamarin and Ionic, hopefully this article will help.

The background is I had the somewhat rare pleasure of working on these competing frameworks on back-to-back projects recently.  Project #1 used Xamarin (and Xamarin Forms more specifically), the C# based framework for building fully native, cross platform apps.

Project #2 used Ionic, the Angular.js, Cordova/PhoneGap, HTML, and JavaScript based framework for building apps that look and act native, but are technically running in an embedded browser.

And what if I had to recommend one?  I'd probably want to think about a customer's budget, desired end product, and timeline.  I'd consider development speed, ramp up time, and maintainability.  Basically I'd evaluate based on the following six criteria:

1. Price: Ionic++


The single most obvious framework differentiator is price. Ionic's free price tag may seem like a no brainer.  However, $1,000 per developer per year for Xamarin is quite doable for most companies, especially if there is a compelling enough reason. Two very compelling reasons are:

  • We only have .Net developers; and
  • Our architecture is already exclusively .Net

If these bullets apply to you, then the price is likely justified, and the Xamarin choice obvious. However, if you have a mix of talent and technologies, then free is hard to beat.

2. End Product: Xamarin++


Your customers won't be able to pinpoint exactly why they prefer your competitor's fully native app, but you're more likely to lose in the end

Surprise: an HTML-based app, however well styled, will never look, feel, and perform like a native app.

How different is the Ionic look and feel? If you stick to the default controls and don't overly customize, I guarantee your users won't notice. However, faced with a choice your customers won't be able to pinpoint exactly why they prefer your competitor's fully native app, but you're more likely to lose in the end.

We were lucky enough to have a full-time design professional provide assistance on the Ionic project, and several of his (fairly time consuming) suggestions would not have been an issue if we'd gone with Xamarin.  Furthermore, the UI always felt a little laggy, even with theoretically GPU accelerated CSS3 transitions.

Simply put if you want the best, fastest, most authentic experience for your users, Xamarin is the clear winner.

3. Development Speed: Ionic++


If you need to get an app out the door yesterday, Ionic is your friend.

Development speed differs between the frameworks in two main aspects.  First is the amount of time from writing a line of code to seeing results. For Xamarin, pushing out code to an iOS device required several seconds of compilation plus 10 to 15 seconds of deploy time.  Ouch.

By comparison Ionic with a ripple emulator provided zero-compilation, sub-second feedback times. This feature alone significantly increased development speed.  Perhaps more importantly the fast feedback cycles actually made coding more fun.

The second development speed difference was in UI debugging.  Ripple plus Chrome tools makes debugging the UI in Ionic amazingly easy.  With Xamarin you have a very limited ability to figure out why an element is rendered exactly where it is at runtime, let alone tweak its attributes. In short Ripple + Chrome Tools makes UI work significantly easier in Ionic.

Overall, Ionic was a significantly better development experience.  If you need to get an app out the door yesterday, Ionic is your friend.

4. Maintainability: Xamarin++


This where I rag on JavaScript, right?  Well, before I start, I have to admit I made three architectural decisions off the bat that made working with a JavaScript app more palatable to someone with my background and um, well biases, frankly.

TypeScript


As much as I appreciate JavaScript, I value refactoring, a great IDE experience, and the free unit tests that a compiler provides. TypeScript gave us all that goodness back, and with it the possibility of working with a large codebase and/or a larger, more diverse team. Without TypeScript I personally could not recommend Ionic for anything beyond fairly simple or a single developer mobile app.

Visual Studio + ReSharper


You thought Visual Studio and Resharper were just for .Net apps? Wrong, they helped us immensely with things like Bower and NPM package management, code navigation, refactorings, and great static analysis, plus a full-on fantastic debugging experience like you'd expect from a .Net app. Microsoft thoroughly surprised (dare I say delighted) us by providing a fantastic IDE for a historically non-Microsoft tech stack.

Wallaby.js


Our app had a fairly complicated core engine and with it a lot of unit tests. Wallaby allowed us to run our unit tests continuously, as we typed, before we saved even. Everyone on the team knew instantly if they had broken a test, and it kept code coverage at the fore-front of everyone's mind. Karma would have been ok I guess, but Wallaby made working exclusively in JavaScript/TypeScript enjoyable.

Overall Maintainability


While these three decisions made our JavaScript application more maintainable, refactorable, and less prone to incurring technical debt; Xamarin continues to feel more maintainable.  There's no way around that Angular is extremely heavy on magic strings.  My co-workers and I simply felt less scared of creating obscure bugs while modifying each other's code or refactoring existing code when we had a real compiler double checking 95% of our work.

5. Unit Testing Experience: Conflicted


A good framework needs a great unit testing experience if you're going to bake quality into your app.  Unfortunately, as great as Wallaby is, even with Karma, I could not figure out how to breakpoint debug and inspect variables from within a unit test.  With Xamarin, on the other hand, unit testing is a first class citizen.  It's easy and powerful and with nCrunch, feedback is nearly as fast as with Wallaby.

Why conflicted?  Because I love this:

// describe + it blocks offers a hard to match level of expressiveness
describe('when you calculate dimension effects for a question', () => {
  // notice this generic helper function relevant to most/all of the tests
  var makeDimensionEffects = () => { ... };

  // nested describe -> I LOVE THIS
  describe('with a transformation', () => {
    // this 2nd helper is relevant to only nested tests
    var makeQuestionWithTransformation =  = () => { ... };

    it('should error gracefully if blah blah blah', () => {
      expect('actual').toBe('expected');
    });
  });
});

Even with SpecFlow, of which I am a huge fan, .Net fails to offer the same power, flexibility, and expressiveness.

6. Ramp Up Time: Xamarin++


The amount of ramp-up time obviously depends on your background.  However, with Xamarin it was just a little easier to fall into the pit of success.  Architecturally speaking, we made a wide variety of mistakes in Ionic that made things very messy for us later (notice how I switch to the third person when it's something bad that happened, sneaky, huh?).  Those mistakes mostly manifested themselves as poor memory management, although we screwed up our ngCache data structures too resulting in poor performance under load.

Now one might argue it's easy to mess up memory management with any new framework.  In Angular, however, upon which Ionic is based, it seems to be especially easy to create leaks.  By the time we finished our Minimum Viable Product and realized all of the anti-patterns we'd implemented we had a real mess to recover from.

Conversely, we had only one major memory issue with our Xamarin MVP, and we cleaned it up without issue.  Obviously if you have anyone on your team with prior Angular experience that mitigates this concern, but if not and you're choosing Ionic, consider yourself forewarned.

Summary


So what if I had to recommend a framework today?  Obviously the safe (and correct) answer is: it depends.  It depends on the team, the existing architecture, who's maintaining the app, the budget and timeline, and a host of other concerns.

However, just to be provocative I'll avoid the safe answer.

For me: I value quality over speed.  Just because you can build something with free tooling (#1), do it faster and have more fun doing it (#3); that's no substitute for building an authentic, top notch, responsive mobile UI (#2) on a clean, refactorable code base (#4) that will be ready for market when it hits first release (#6).

But perhaps time to market is more important for you.  Every circumstance is different.  Hopefully this has helped shed some light on what decision will be right in your case.


Getting Started With Windows IoT And Raspberry PI 3

$
0
0
This is the first post in a series exploring Windows IoT on Raspberry Pi 3.  In this post I'll cover the what and the why of Windows IoT, then show how to install it on a Raspberry Pi 3 and finally how to deploy a first app to it.


What Is This Thing?

Windows IoT is a version of Windows 10 designed for small form factor, low cost, Internet connected devices.  It currently works on four devices (three boards):

  • Raspberry Pi 2 (Broadcom BCM2835 )
  • Raspberry Pi 3 (Broadcom BCM2837)
  • Arrow DragonBoard 410c (Qualcomm Snapdragon)
  • MinnowBoard MAX (Intel Atom)

It has three versions.  IoT Core is free and is the one most people will care about.  It runs on x86 and ARM devices up to 256 Meg of RAM and/or 2 Gig of storage.  It has no shell (e.g. no start menu) and so when running a mouse and keyboard on an LCD feels like a single app version of Windows.

IoT Enterprise and Mobile Enterprise, aren't free.  They're more for ATM or Point of Sale scenarios.  IoT Mobile Enterprise works on devices up to 1 Gig RAM and 8 Gig storage and uses a "modern shell" like a windows phone.  IoT Enterprise additionally work on x64 and larger devices and uses a "desktop shell" like traditional Windows 10.

Windows, Seriously?


There are a lot of options if you're looking to build a device that interacts with the real world. Arduino, for instance, is a fantastic choice if there's a chance you'll ever mass produce your thing, since you can find ATMEL chips that cost less than $2 and the ecosystem and set of libraries is huge. Also your thing will run faster (realtime even) without the overhead of an operating system.

However, if your thing will require:

  • Multitasking (e.g. serving up web pages),
  • Running USB peripherals,
  • Displaying on an LCD screen, or
  • Connecting to the Internet

Then one of the boards listed above may be a better choice.  But why not just run Linux?

Security is one benefit.  For one thing you get automatic updates to help patch future vulnerabilities.  There's also Native UEFI , which helps protect against malware at the firmware and driver level.  There's Trusted Platform Module (TPM) support, which helps move cryptography operations to the hardware level.  Identity protection and access control may be important if you're running a kiosk that multiple people could log on to.  And there's even support for BitLocker and Enterprise Data Protection if things like encryption at rest, auditing, or remote device wiping matter to you.

For another thing Windows IoT makes it easy to connect with other devices and services.  You can, for example easily and securely connect to Azure IoT Hub which can theoretically aggregate data from millions of devices in realtime.  It also has built in support AllJoyn, which is a way of connecting to other IoT devices.

But one of the biggest benefits is the Windows ecosystem.  You build apps for it with Visual Studio, which is top notch IDE.  You can port existing Win32 or .Net applications to Windows IoT far more easily than to Linux.  You get remote desktop.  You can write in C#, Python, JavaScript, or Arduino C, and even embed Arduino libraries.  If you have experience building .Net apps, then the learning curve is extremely low.  And finally if you want your app to additionally target large screens, tablets, phones, and even XBox, then Windows IoT is your only option, because Windows IoT is designed to run Universal Windows Platform apps.

Device Setup


If you don't already have a Raspberry Pi 3, pick up one of the many good kits that includes an adequate power supply (outputs at least 1 Amp, 2 is better), a fast Micro SD card, and perhaps a case.

Once you have a device you'll need to set it up with the Windows IoT operating system.  As of this writing, the official release is Build 10586, December 2015.  Unfortunately, this version doesn't work with Raspberry Pi 3.  Consequently, you'll need the Insider Preview of Windows IoT.

To set a new Raspberry Pi 3 device follow the Insider Preview Setup Instructions.  You'll download an image (Build 14295 supports remote desktop) and use the IoT Dashboard app to flash the image to an SD card.


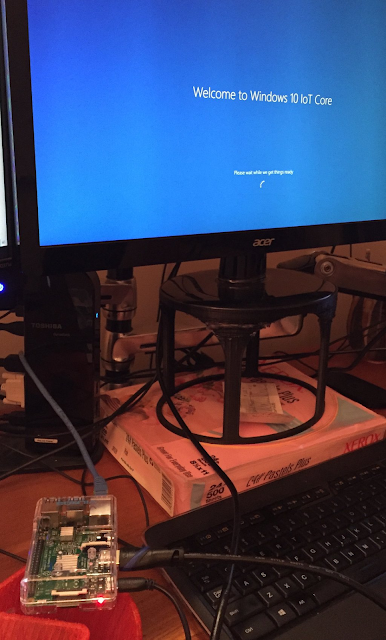
Now you can put the SD Card into your Raspberry Pi, plug an HDMI cable into a monitor, and attach power via micro USB.  If all goes well you should see Windows loading up.


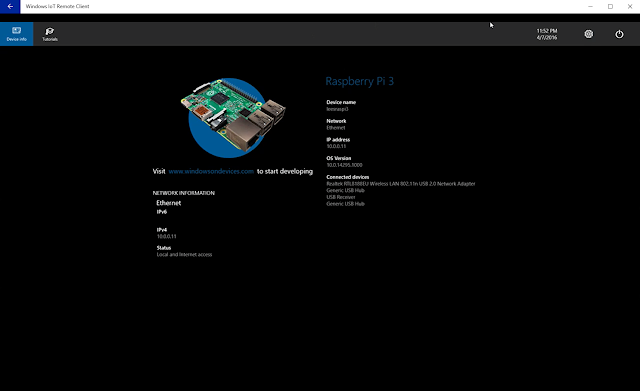
Once it's loaded up it will start the default app, which provides a place for basic device configuration.


Before you can go much further you need to set up Internet access.  You can do that most easily via  Ethernet cable or approved WiFi device (careful, the list isn't big), and power it on.

But wait, doesn't Raspberry Pi 3 have build-in WiFi?  Unfortunately, that isn't supported in the current build.  Hopefully it will be in there soon.

Once you have the device on the network you'll have a much more robust set of options for accessing it.  You can, for instance, get in through PowerShell.

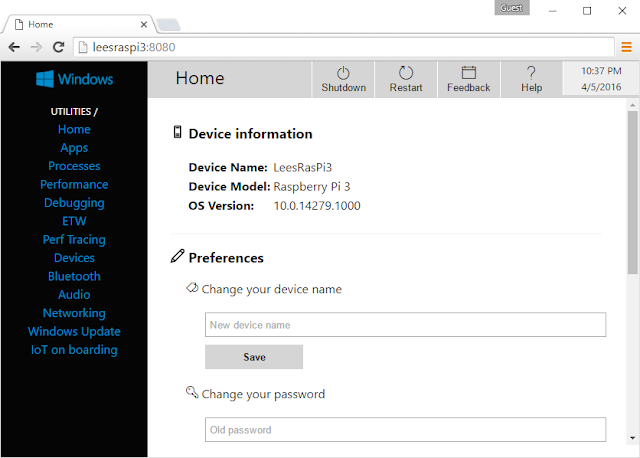
Or better, when you go to Devices in the IoT Dashboard app, your device should be listed.  If you click the web link you can access the snazzy web browser interface.  This might be a good time to change the device name and password.


Build Environment Setup


Great, now you've got an Internet connected mini PC with no software.  To write apps for it you'll need to set up a "real" PC with Visual Studio.

To set up your PC to build apps for Windows IoT you need Visual Studio 2015 Update 1 or better (any edition).  Be careful, when doing so you need to select the "Universal Windows App Development Tools" feature or else you'll get the ever helpful

Error: this template attempted to load component assembly 
'Microsoft.VisualStudio.Universal.TemplateWizards, Version=14.0.0.0, 
Culture=neutral, PublicKeyToken=b03f5f7f11d50a3a'. For more information 
on this problem and how to enable this template, please see documentation 
on Customizing Project Templates.

Next, install the Windows IoT Core Project Templates.  Restart Visual Studio.

Finally, enable developer mode to enable installing store apps via Settings, Updates & Security -> For Developers -> Developer mode

Hello World


To create a hello world app:

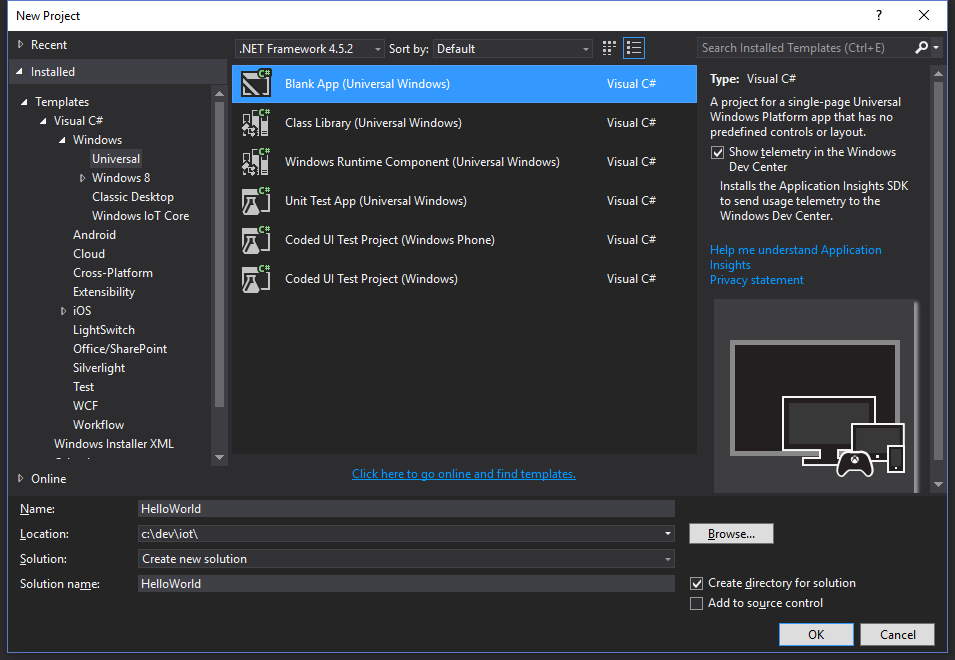
  1. File -> New -> Project
  2. Blank App (Universal Windows)

    1-NewProject.png


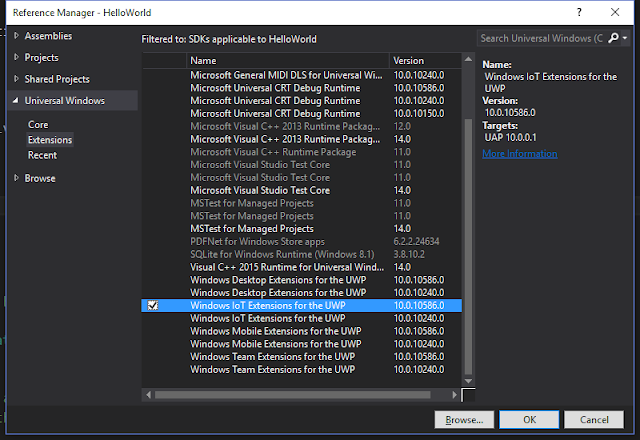
  3. Add a reference to the Windows IoT extension SDK

  4. Update MainPage.xaml with some XAML like

    <TextBlock HorizontalAlignment="Center" VerticalAlignment="Center">Hello World</TextBlock>

  5. Under solution Platform Select: Arm
  6. For Device Configuration Select Remote Machine


  7. In the resulting dialog type the name of your device


  8. Hit F5!
Once you've done that try putting a button on the screen, setting breakpoints, inspecting variables.  You'll find it's the exact same experience you've come to love in other Visual Studio projects, just in a small, inexpensive form factor.

Summary


This post has covered the what and why of Windows IoT as well as how to configure a Raspberry Pi 3 for Windows IoT and deploy a very simple application to it.  The next post in the series will cover how to control pins, and how to run a simple motor.


Lee_-71-square-150px.jpgLee Richardson is a senior software developer at Inferno Red with a passion for .Net development, open source software, continuous integration, building cross platform mobile apps, and hardware hacking. In his spare time he runs Siren of Shame.  He has been consulting in the Washington DC area for over 17 years.  Keep up with him @lprichar.
How to Fade an LED with PWM in Windows IoT

$
0
0
Motors, dimmable LED's, speakers, multi-color LED's and a variety of other components have a requirement that's easy for an Arduino, but that turns out to be a little tricky in Windows IoT.  This is the second article in a series exploring Windows IoT on a Raspberry Pi.  In this post we'll describe PWM, discuss how to perform simple binary GPIO manipulation, and then dig into configuring a device to fade an LED using Pulse Width Modulation (PWM).

Pulse Width What?

Microcontrollers such as Arduino and System on Chip (SoC) devices such as Raspberry Pi can technically only output one of exactly two voltages on their General Purpose I/O (GPIO) pins: either 0 or 3.3 volts.  The problem is that many components such as speakers or multi-color LED's require not two, but a whole range of voltages.
Microcontrollers or SoC devices typically fulfill the requirement by switching a pin on and off so fast as to give the appearance to most components as being between the min and max.  For instance to get ~3.0 volts you keep the duty cycle, or the proportion of time the pin is at High at 90%.  This process is known as Pulse Width Modulation or PWM.  
The following diagram from Wikipedia is a beautiful illustration of how to accomplish a sine wave using PWM.  Hooking this output up to a speaker would produce a decent sounding continuous tone.
The problem is that PWM can be tricky for devices with non-realtime operating systems, because an OS can't just pause it's pin switching process to do a garbage collection or preemptively give some other process CPU time. Consequently, until recently Microsoft required you to get an external board if you wanted to output variable voltages in its fledgling Windows 10 IoT operating system.
However, as of version 10.0.10586.0 there is a way. That way is called Lightning Providers, but getting it working is a little tricky, and the documentation is scattered and doesn't work out of the box.

Binary GPIO

Before we get into how to do PWM, this series has yet to touch on regular binary GPIO manipulation.  Fortunately it's fairly simple and well documented.  Assuming you've got a hello world Windows IoT app, you can turn a pin high and then low like this:
gpioController = await GpioController.GetDefaultAsync();
if (gpioController == null)
{
    StatusMessage.Text = "There is no GPIO controller on this device.";
    return;
}
_pin = gpioController.OpenPin(22);
_pin.SetDriveMode(GpioPinDriveMode.Output);
_pin.Write(GpioPinValue.High);
await Task.Delay(500);
_pin.Write(GpioPinValue.Low);

Seems simple enough, it flashes an pin (and perhaps an attached LED) High for a half a second.  But there are a couple of things to note.  
First GpioController is in Windows.Devices.Gpio, and it's only available when you reference Windows IoT Extensions for the UWP.

Second, GpioController.GetDefaultAsync() may return null if we're running this Universal Windows Platform project on a regular PC, or a phone, or an XBox.  That's something to guard against.
Third, the pin 22 was (arbitrarily) picked from one of the Pi's available GPIO pins using the following diagram:

In other words, the above code will flash the 8th pin down on the left-hand side (aka the 15th pin).  
Quick word of warning: if you test this out with an LED, make sure you get the polarity right, since LED's are not omnidirectional.

PWM

There are five steps to get PWM working.

1. Latest Bits

First, ensure you have the latest version of Windows IoT.  Technically you only need the current public release of Windows IoT, aka Build 10586, December 2015.  However, I tested this on the Pi 3, and since it's supposed to be 60% faster, your Pi 2 results may vary.  For this reason I'm recommending you install the Insider Preview of Windows IoT, which I showed how to set up in the last post.

2. Lightning Driver

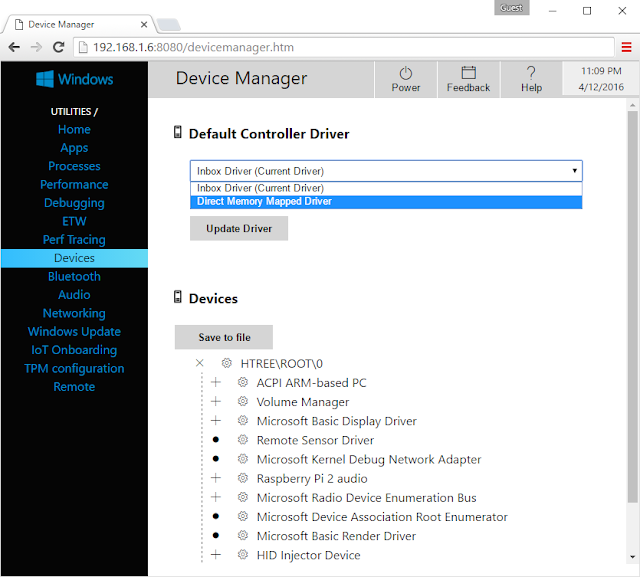
Second, you need to install the Lightning Direct Memory Mapped driver.  Lightning is a new driver that provides a variety of additional capabilities including device and remote board PWM support.  It's still in beta, and consequently there's a warning when you select it: "This option will reduce Windows security in exchange for performance using an in development driver". 
To do change drivers:
  1. Navigate to the configuration url for your device (e.g. http://LeesRasPi3:8080/).  
  2. Select Devices
  3. Under Default Controller Driver, select "Direct Memory Mapped Driver"


  4. Reboot your device when prompted

 Lightning SDK

Third, you'll need to reference the Lightning SDK.  According to the documentation, you just reference via NuGet.  Unfortunately, this doesn't work as of v1.0.3-alpha.  I had to download the Microsoft.IoT.Lightning.Providers C++ source, add the Microsoft.Iot.Lightning.Providers.vcxproj project to my solution, and then make a project reference.  
Incidentally, I contacted some folks at Microsoft, and they said a new nuget will be published shortly with binaries that will fix this issue.

4. Permissions

Next, Lightning providers require additional manifest permissions.  To grant them you'll need to edit the Package.appxmanifest file of your UWP app and add the following bits inside capabilities at the end of the document:
<iot:CapabilityName="lowLevelDevices" />
<DeviceCapabilityName="109b86ad-f53d-4b76-aa5f-821e2ddf2141"/>
And then add the iot namespace to the Package element at the top of the document and iot to IgnorableNamespaces: 
<Package
  xmlns="http://schemas.microsoft.com/appx/manifest/foundation/windows10"
  xmlns:mp="http://schemas.microsoft.com/appx/2014/phone/manifest"
  xmlns:uap="http://schemas.microsoft.com/appx/manifest/uap/windows10"
  xmlns:iot="http://schemas.microsoft.com/appx/manifest/iot/windows10"
  IgnorableNamespaces="uap mp iot">

5. PWM Code

Finally, we're ready for some code.  One nice thing is that we can keep all of our existing binary GPIO code, plus allow the device to use either driver by simply adding the following line:
if (LightningProvider.IsLightningEnabled)
{
    LowLevelDevicesController.DefaultProvider = LightningProvider.GetAggregateProvider();
}
But, to get full on-device PWM functionality we'll need something like this:
if (LightningProvider.IsLightningEnabled) {
  LowLevelDevicesController.DefaultProvider = LightningProvider.GetAggregateProvider();
  var pwmControllers = await PwmController.GetControllersAsync(LightningPwmProvider.GetPwmProvider());
  var pwmController = pwmControllers[1]; // use the on-device controller
  pwmController.SetDesiredFrequency(50); // try to match 50Hz
  _pin = pwmController.OpenPin(22);
  _pin.SetActiveDutyCyclePercentage(.25);
  _pin.Start();
}
The first couple of lines set up the lightning driver and PWM provider using the on-device controller (as opposed to a dedicated PWM board, which you could attach to get better performance).   It then requests a leisurely 50Hz frequency speed.
Finally it opens pin 22 and sets the duty cycle to 25%.  
And that's it!  With a scrollbar and a few extra lines of code you'll be able to get something like this: 


Source Code

The complete code for this project is available on the WindowsIotPwmExample github project.

Summary

In this article we've covered what Pulse Width Modulation is, how to use Windows IoT to write binary-states to GPIO pins, and finally how to generate variable voltages using PWM.  Keep an eye out for the next article in the series on how to turn a Raspberry Pi into an information radiator.

    4 Xamarin Misconceptions Debunked (aka What Even Is Xamarin)

    $
    0
    0
    This article explains what Xamarin is, the basics of how it works, and dispels four common misconceptions.
    When Mary Jo Foley and Paul Thurott attempted and failed to describe Xamarin on Windows Weekly a couple of months ago, I grumbled about pundits not performing due research and moved on.  But when even Scott Hanselman (who I worshipgreatly admire) mischaracterized it on his most recent podcast, I realized there is sufficient confusion within our industry that additional clarification is needed.
    Thus this post that attempts to dispel 4 common Xamarin Misconceptions and hopefully shed some light on what even is Xamarin.

    Misconception #1: Xamarin UI's Require XAML


    This was stated by a guest during Hanselman's recent podcast. The misconception is quite understandable given the popularity of Xamarin Forms and it's XAML-based UI abstraction layer.  However, a traditional (non-Forms) Xamarin solution involves no XAML whatsoever. With traditional Xamarin you write your UI multiple times -- once for every platform. On Android you write your UI in traditional .axml XML files. For iOS you write your UI using StoryBoards, .xib files, or manually in code by manipulating UIView's (ideally with EasyLayout) in a class that derives from UIViewController.
    If traditional Xamarin sounds like a lot of work, keep in mind that writing fully native apps typically requires building two completely separate apps in two completely different languages with no code sharing ever. Which leads us to the next misconception:

    Misconception #2: Sharing Code is Hard with Xamarin


    My company was brought in recently to help a customer that had implemented a traditional Xamarin solution without any code sharing. They made the mistake of fully implementing an Android app first, and then once complete implementing a Xamarin iOS app by copy-pasting much of the same C# into the iOS app.
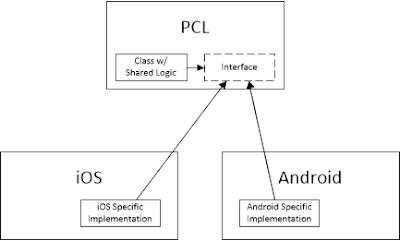
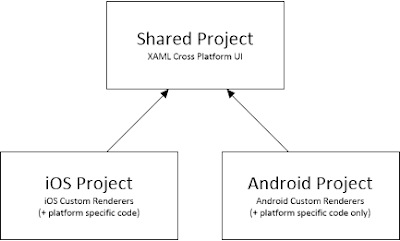
    Sharing code isn't difficult with Xamarin, but the trap they fell into was not designing for it up-front. If they had spent a little more time architecting, or (better) written their Android and an iOS apps simultaneously, they would have likely ended up with Xamarin's recommended architecture:

    All of their common logic would have been in a Shared Project implemented as either a Portable Class Library (PCL) that targeted iOS and Android (and Silverlight/Windows Phone), or as a Shared Project.
    With either of these code sharing approaches there exists the problem of mixing shared code with platform specific code. The PCL approach solves the problem by having shared code call into interfaces or abstract classes defined in the PCL, and some form of dependency injection swaps in platform-specific concrete implementations at runtime.


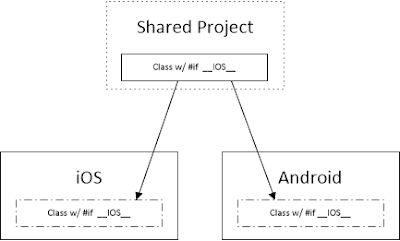
    On the other hand the Shared Project approach solves the problem with #ifdef compiler directives. It does this because shared projects don't produce a separate DLL. Instead, they essentially inject Symbolic Links from the Shared Project's C# files into each of the platform specific projects. That means any line of code written in a shared project is also written in the iOS and android projects.


    There are plenty of people with strong opinions on which approach is better (e.g. Miguel De Icaza, co-founder of Xamarin, is pro Shared Project) but at the end of the day neither code sharing approach is hard, as long as you plan for it up-front.

    Misconception #3: Xamarin Isn't Native

    The topic of which cross platform mobile solutions are truly native seems to generate confusion. In his recent podcast Scott Hanselman implied that Xamarin produces the same non-native UI as Ionic. He is correct that Xamarin's HTML-based cross platform competitors such as Cordova PhoneGap, Ionic, and React Native are not and will never be fully native because they run in an embedded browser. Because of that their performance and user experience will never equal that of native apps written in Objective C, Swift, or Java.
    However, Xamarin is different from the HTML based cross platform apps in that it is always 100% native. If you've read this far then you'll understand that a traditional Xamarin solution that uses StoryBoards and .axml will necessarily be fully native. However, Xamarin Forms is fully native too.
    Xamarin Forms allows you to define user interface once, in XAML, and then Xamarin renders that XAML into fully native controls. For instance if you write an  then Xamarin Forms renders it as a UITextField in iOS and a EditText in Android.

    The skeptical reader will undoubtedly think this sounds too good to be true, that one couldn't possibly make a decent native experience with this. While it's true that the Xamarin Forms abstraction falls short quickly for more sophisticated UI's, the framework accounts for this with Custom Renderers.
    Custom Renderers allow the creation of new XAML elements or customization of existing Xamarin Forms elements in the platform specific projects. This solution ends up providing a fantastic level of flexibility. Unless you want a pixel perfect, or highly customized platform specific solution where you'd have more code in custom renderers than in XAML, Xamarin Forms is a great option -- but either way you'll end up with a fully native user experience.

    Misconception #4: Xamarin Is Slow

    People often seem surprised that a Xamarin based solution could perform as well as an app written in a native language. Perhaps this is because of a misconception that .Net apps on Windows typically run slower than C or C++ based ones that manage their own memory and don't require the Common Language Runtime (the Windows virtual machine that manages memory, does garbage collection, handles threads and performs just-in-time compilation).
    While Xamarin apps still require a version of the CLR (aka the Mono Runtime), just like on Windows that doesn't mean slower.  The CLR may mean larger binaries (particularly for iOS apps that require Ahead-Of-Time rather than Just-In-Time compilation), but surprisingly Xamarin can actually run faster than native language based apps!
    Last year Harry Cheung, one of the original Google engineers, measured the performance of a wide range of mobile platforms and came up with these amazing results:
    If you get the chance you should read the updated article as well as his original one.

    Summary

    Hopefully this article has helped to clarify some of what Xamarin is and how Xamarin works.  Please post in the comments if there are any additional areas that could use clarification.

    Git: Rebase VS Merge

    $
    0
    0
    Distributed version control (git): Check.
    Feature branches: Check.
    Rebasing: Ugh, serioiusly.

    On multiple projects I've attempted to introduce the concept of rebasing commits.  It rarely goes well (at first).  The initial reaction tends to be reluctance and confusion.  Reluctance, because it adds complexity and appears to give nothing back.  Confusion, because doing it wrong, and intertwangling feature branches in particular, turns out to be way too easy.
    This is the first post in a series that covers how and why to make a clean commit history.  In this post I'll cover the history of merging, the difference between merging and rebasing, and the golden rule of rebasing.

    In subsequent posts I'll cover the benefits of rebasing, cover common pitfalls, and provide several concrete workflow tips you can implement today to leave your project with a simple, clean, and linear source history with the ability to easily track down newly introduced issues.

    The Good Old Days

    Remember Source Safe and CVS?  Those were the good old days.  You'd simply check out files you were working on, and no one else could touch them.  No merge conflicts, ever.  It just worked, right?
    That was great - right up until someone went on vaction and left a ton of files checked out, leaving the entire team unable to work.  Oh yea, not so great.
    But remember subversion?  Those were the good old days.   Optimistic concurrency to the rescue.  Multiple people could work on the same file and 90% of the time it just worked.  And branching was super easy.
    Subversion was great.  Right up until you had to merge branches.  Then it was time switch projects, and ASAP.  Merging was always a complete disaster.  Maybe subversion wasn't so great after all.
    Git has revolutionized source control, first and foremost by making branching and merging easy.  Distributed version control systems (DVCS) like git allow us to work on features independently, and defer integrating with the rest of the team until the time is right.  Since we can commit locally, we can use small, frequent commits, thus allowing us to break complex features into smallier pieces and allowing our commit history to tell a story.
    However, with git, while merging may be much easier than it once was - we still have to choose between two approaches.

    To Merge or Not, That is the Question

    The easiest option, and what most do by default is git merge.  Say you've started feature.awesomeness and committed "B" and "D" to it.  Except meanwhile back on develop someone committed "C".  
    pre-merge.png
    No big deal, you merge develop into feature.awesomeness with git merge develop and give it a nice descriptive commit message like "Merge branch 'develop' into feature.awesomeness".
    merge-commit1.png
    That last commit, a merge commit, is a necessary side-effect, and a teltale sign, of merging.  You'll end up with one of these sketchy looking commits each time you want to integrate with (pull from) another branch.
    When the feature is done you can merge it back to develop with git checkout develop and git merge feature.awesomeness. And thanks to the magic of fast-forward you won't have a second commit in develop.
    post-merge.png
    While there the extra merge commit may be aesthetically unpleasing, and the lines branching and merging in the diagram a little noisy; this merge approach is easy, it's clear what happened, the commits maintain their chronology (A, B, C, D).

    Marty McFly: "Yeah, well, history is gonna change"

    The alternative is rebasing.  With this technique, you replay all of your local commits on top of another branch (usually develop or master).  This essentially deletes your original commits and does them again in the same order.  The other branch becomes the new "base".  So In the scenario above you'd do git rebase develop and end up with:
    rebase1.png
    Pretty.  Clean.  You can pull from develop as many times as you want, and you'll never get extra commits.
    If you're done, you switch back to develop and with a quick git merge and a free fast-forward you get:
    rebase2.png
    Notice that the commits are no longer chronological (A, C, B, D rather than A, B, C, D) and that B and D both have the same commit time, 21:07.  Duplicate checkin times are the teltale sign of rebasing.    
    Sounds just as easy as merging, looks clean, but rebasing can be dangerous.

    Golden Rule of Rebasing

    Since rebasing changes history, the most important rule is never to rebase after you're pushed to a remote branch.  Or, more subtly, never rebase if someone might be using using your remote branch (e.g. pure backups are ok).  The reasoning: if you've changed history, you can only push again with a git push -force, and forcing the push will overwrite remote history, making a mess for anyone needing to reconcile your old commits with your new ones.
    An important corollary to the golden rule of rebasing is that if you push your local feature branch to origin but don't merge it to origin/develop, you are (usually) giving up the opportunity to rebase ever again on that branch.  In other words, if you want the benefits of rebasing (generally) refrain from pushing until you're ready to merge it back.
    For example imagine you have a local unpushed branch like this:
    goldenruleB1.png
    Now you'd like to share your commit B with the world.  However, you aren't quite ready to merge it back to develop yet, and so you push without merging:
    goldenruleB2.png
    This may look fine, but you've just lost your ability to rebase.  This can be verified by examining the case where someone subsequently makes a change back on develop (C) while you have unpushed local changes (D):
    goldenruleB3.png
    Now if you rebase, you'll rewrite B, and that will result in a two commits called B, one locally and one on the server in origin/feature.awesomeness:
    goldenruleB4.png
    In this case git push -force can sometimes help, but it can also open a whole other can of worms.  The best option is to maintain the ability to rebase isby not pushing until it's absolutely necessary.

    Conclusion

    Hopefully you've learned a little about the history of merging, what merge commits are, how rebasing can elimiate merge commits, and a little of how to avoid rebasing trouble.  
    But what if you're working on a large feature and you want to share it with another branch, but not merge back yet?  Are the benefits of rebasing really worth it?  This post has been more about tactics.  We'll cover strategy in subsequent posts.

    Benefits Of Git Rebase

    $
    0
    0
    In the first article in this series (Git: Rebase vs Merge) I covered the tactics of rebasing.  I discussed what merge commits are, and how to avoid them with rebasing.  In this post I'll cover the benefits of rebasing, including how its use speeds up finding hard to track down bugs via git blame and git bisect.

    Is Rebase Really Worth It?


    I worked on one large project that discouraged rebasing a while ago.  In short, this was the result:


    The repository was insanely complicated to look at with gitk (or SourceTree in this case).  Trying to understand what was going on across the program was virtually impossible.
    The recalcitrant developer (hey, someone forced me to learn these stupid SAT words, might as well inflict them on others), at this point, might simply respond: "So what?  As long as my stuff works." And perhaps it's true, just like the old joke:
    Patient: Doctor, it hurts whenever I do this.
    Doctor: Don't do that.

    Merge Commits: Ugly, Painful, or Both?


    But even if someone never looked at the repo with gitk, or a fancy git GUI, in the project above roughly 50% of all commits were merge commits!
    That meant 50% of the history of the project was useless noise distributed like a shotgun blast into the true history.  Furthermore, some of those merge commits hid sneaky little bugs introduced when merge conflicts were poorly resolved.  
    Granted, 50 percent may be high for most projects.  The actual number depends on how many developers, how often they commit, and how often they merge.  For example if developers pull from develop daily, a given project will get one merge commit per developer per day.  If developers commit 3 times per day (seems kind of average from my observations), then 25% of commits will be merge commits.
    The recalcitrant developer (stupid SAT) might again at this point respond: "25% of commits are merges, so what?  Just don't look at the commit history!  And if forced to, just ignore the merge commits!"
    However, there are two specific cases where a messy history may yet affect a fast and loose, merge happy team.

    Don't Blame Git!


    Have you ever looked at a file and wondered who wrote a particular line of crap?  In my case 99% of the time that person is me.  But never mind that.  The tool for this job is clearly git blame.
    The command git blame (or git annotate for the more more politically correct) will annotate every line of a particular file with its last commit.  Apart from finding who wrote something, it's also an essential tool for discovering why something was done the way it was when spelunking through larger, or especially older, codebases.
    However, merge commits obfuscate git blame.  If an associated commit message is simply "merged develop into feature.awesome" and the developer is no longer around to ask, then we have to go through additional effort to track down history.

    For instance, in the example above line 3 "c" was actually created by commit C (b49c7b1), but git blame incorrectly shows the merge commit (d9400d4) as the author.

    Git Bisect For The Win!

    The second scenario in which merge commits complicate history is in tracking a bug that someone introduced, typically, within the last few days.  One could manually checkout every commit between the good commit and the bad commit, or simply use git bisect.  
    Git bisect is wonderful for automating the process of finding a commit.  It allows you to specify the last known good commit, and the last known bad commit, and then it performs a binary search of all the commits in between to discover the bad commit as quickly as possible.
    Regardless of whether you search manually, or use git bisect, life gets hard as soon as you try to juggle many branches with lots of merge commits.  The automated approach makes navigating many merged branches easier, but either way if you have a fully merge-based project, you are now required to take an additional 25-50% steps.   If each step takes time to build or deploy, these extra steps can quickly add up (trust me, I've had to do this a lot).
    For instance consider the following project with three feature branches, seven real commits, and five merge commits.
    gitbisect2.png
    Now pretend that you've come in on Monday morning to discover that after committing D on Friday, some developers over the weekend committed E and F, and suddenly there's a hard to track down bug.  Git bisect will solve it for you like this: 
    Lee@lee-xps MINGW64 /c/Temp/deletemegit (feature.awesomeness)
    $ git bisect start
    Lee@lee-xps MINGW64 /c/Temp/deletemegit (feature.awesomeness|BISECTING)
    $ git bisect good 880e84a
    Lee@lee-xps MINGW64 /c/Temp/deletemegit (feature.awesomeness|BISECTING)
    $ git bisect bad be49c0d
    Bisecting: 5 revisions left to test after this (roughly 3 steps)
    [d9400d4c62807046f8ea235170e681b3e8952200] Merge branch 'develop' into feature.awesomeness
    Lee@lee-xps MINGW64 /c/Temp/deletemegit ((d9400d4...)|BISECTING)
    $ git bisect good
    Bisecting: 2 revisions left to test after this (roughly 2 steps)
    [96cf2877d16183cccce1f822d72626d331b582ef] Merge branch 'develop' into feature.awesomeness
    Lee@lee-xps MINGW64 /c/Temp/deletemegit ((96cf287...)|BISECTING)
    $ git bisect bad
    Bisecting: 0 revisions left to test after this (roughly 1 step)
    [190dadb1046822fc169193e86484a19e3543b783] Merge branch 'feature.2' into develop
    Lee@lee-xps MINGW64 /c/Temp/deletemegit ((190dadb...)|BISECTING)
    $ git bisect bad
    Bisecting: 0 revisions left to test after this (roughly 0 steps)
    [ef4a5532ace6075aead0850f088322f98e7afbf1] E
    Lee@lee-xps MINGW64 /c/Temp/deletemegit ((ef4a553...)|BISECTING)
    $ git bisect bad
    ef4a5532ace6075aead0850f088322f98e7afbf1 is the first bad commit
    commit ef4a5532ace6075aead0850f088322f98e7afbf1
    Author: Lee Richardson
    Date:   Mon Sep 5 21:56:07 2016 -0400
        E
    :000000 100644 0000000000000000000000000000000000000000 d8263ee9860594d2806b0dfd1bfd17528b0ba2a4 A      2.txt
    Lee@lee-xps MINGW64 /c/Temp/deletemegit ((ef4a553...)|BISECTING)
    $ git bisect reset
    Previous HEAD position was ef4a553... E
    Switched to branch 'feature.awesomeness'
    Your branch is based on 'origin/feature.awesomeness', but the upstream is gone.
      (use "git branch --unset-upstream" to fixup)
    Lee@lee-xps MINGW64 /c/Temp/deletemegit (feature.awesomeness)

    Beautiful!  Commit E was the culprit.  The only problem: three of the four steps wouldn't have been needed if the team had been rebasing.

    Summary


    If your project is still small, and you haven't had to use git blame or git bisect yet, you may not find these arguments compelling.  However, if this is the case I suspect you may also  not find much value in unit testing either.  Unit testing and rebasing both require extra up-front work in order to build quality into your work and set your future self up for success.
    More worried about immediate deadlines than your future self?  Consider the developer who will replace you when you leave.  Not worried about her?  Consider your customer at some future point in time when they're attempting to spelunk through your code.  Unless this is a throwaway project, the chances are good that a little extra effort learning a new technique today could save yourself, other developers, and possible a future employer considerable time and energy.  Not a bad investment.

    Introducing EasyLayout.Droid For Simpler Xamarin Android Layouts

    $
    0
    0
    If you've done much Xamarin iOS work you're probably run into Frank Krueger's awesome framework, EasyLayout, that makes manually coded auto layout's considerably easier to read and maintain.

    If you've ever wanted the same type of functionality for Xamarin Android either for consistency or ease of cross platform code sharing, now you can with EasyLayout.Droid.


    What Is EasyLayout?


    The original EasyLayout takes Xamarin iOS code like this:

    _passwordField.AddConstraint(NSLayoutConstraint.Create(
        _passwordField, NSLayoutAttribute.Top, NSLayoutRelation.Equal,
        _usernameTextField, NSLayoutAttribute.Bottom, 1f, 20f));
    _passwordField.AddConstraint(NSLayoutConstraint.Create(
        _passwordField, NSLayoutAttribute.CenterX, NSLayoutRelation.Equal,
        View, NSLayoutAttribute.CenterX, 1f, 0f));

    And turns it into this:

    View.ConstrainLayout(() =>
        _passwordField.Frame.Top == _usernameTextField.Frame.Bottom + 20 &&
        _passwordField.Frame.GetCenterX() == View.Frame.GetCenterX()
        );

    If you're on a team, or storyboards just aren't your thing it's a lifesaver!


    What's Wrong with Android .axml?


    Android's axml files are ok, but on large projects they take a long time to generate, and they make it hard to share layout information cross platform.  But if you try to code Android by hand, you quickly discover the same type of verbosity that Xamarin iOS had.  Enter EasyLayout.Droid.

    Example 1 - Parent Align


    If you want to align an image to the edges of the frame you used to do this:

    var layoutParams = new RelativeLayout.LayoutParams(
        ViewGroup.LayoutParams.MatchParent,
        ViewGroup.LayoutParams.MatchParent);
    layoutParams.AddRule(LayoutRules.AlignParentTop);
    layoutParams.AddRule(LayoutRules.AlignParentBottom);
    layoutParams.AddRule(LayoutRules.AlignParentRight);
    layoutParams.AddRule(LayoutRules.AlignParentLeft);
    _image.LayoutParams = layoutParams;

    Now you can do this:

    relativeLayout.ConstrainLayout(() =>
        _image.Top == relativeLayout.Top
        && _image.Right == relativeLayout.Right
        && _image.Left == relativeLayout.Left
        && _image.Bottom == relativeLayout.Bottom
        );

    There's no need to set LayoutParams at all.  If they don't exist EasyLayout.Droid will add them, if they do EasyLayout.Droid will append to them.  And if you don't add them it will take care of choosing LayoutParams.MatchParent or WrapContent.

    Example 2 - Relative Alignment and Constants


    If you wanted to align an image 20 dp under another image and center align it to the parent you used to do this:

    var layoutParams = new RelativeLayout.LayoutParams(
        ViewGroup.LayoutParams.WrapContent,
        ViewGroup.LayoutParams.WrapContent);
    layoutParams.AddRule(LayoutRules.CenterHorizontal);
    layoutParams.AddRule(LayoutRules.AlignBottom, image1.Id);
    layoutParams.TopMargin = DpToPx(20);
    _image2.LayoutParams = layoutParams;


    There's a couple of gotchas.  

    1. If you set the TopMargin to 20, then Android assumes you mean pixels not device independent pixels.  To fix that you need to remember to call a function like DpToPx().  
    2. Your relative view (image1) needs to have an Id.  If you forget to set it there's no error, it just does strange layout things.

    EasyLayout.Droid replaces the code above with:

    relativeLayout.ConstrainLayout(() =>
        _image2.Top == _image1.Bottom + 20
        && _image2.GetCenterX() == relativeLayout.GetCenterX()
        );


    That's less code, and it's easier to read, plus there's some other small benefits: 

    1. If you forget to add an Id to _image1, EasyLayout.Droid will throw a helpful runtime error.  
    2. EasyLayout.Droid always assumes every number is in Dp, so it automatically converts all literals for you.

    Incidentally, GetCenterX() is one of a couple of new extension methods along with GetCenterY() and GetCenter().

    Example 3 - Constants


    Constants weren't difficult to work with previously, but for completeness they used to work like this:

    var layoutParams = new RelativeLayout.LayoutParams(
        DpToPx(50),
        DpToPx(ViewModel.SomeHeight);
    _image2.LayoutParams = layoutParams;


    With EasyLayout.Droid you can do this:

    relativeLayout.ConstrainLayout(() =>
        _image.Width == 50
        && _image.Height == ViewModel.SomeHeight.ToConst()
        );


    As mentioned previously 50 will be assumed to be in dp and will be auto-converted to pixels.  Also arbitrary properties such as SomeHeight will need the .ToConst() extension method applied in order to tell EasyLayout.Droid that they should be treated as constants.

    Limitations


    Android relative layouts are far from a replacement for iOS's auto layout.  To that end you cannot do the following operations that EasyLayout could:

    • Constraining Heights or Widths to be equal to the Heights or Widths of other elements
    • Using >= or <= signs to indicate GreaterThanOrEqual or LessThanOrEqual type constraints
    • Multiplication of elements (e.g. _image2.Width == _image1.Width * .25f)

    Installation


    If you want to add this to your project you can either install via NuGet (safer):

    Install-Package EasyLayout.Droid

    or if you think it's perfect as-is (you don't want updates) you can copy EasyLayoutDroid.cs into your source.  Next using EasyLayout.Droid and you're good to go.

    Conclusion


    Hope this helps make someone's Xamarin Android day a little better.  The code is MIT licensed.  If you have any questions please contact me on twitter.


    Kill AXML - Programmatic ListViews in Xamarin Android

    $
    0
    0
    Displaying list data in Android using a custom layout is traditionally accomplished by inflating an AXML file for each row of data.  However, in my article introducing EasyLayout.Droid I made the case that AXML files slow development speed and decrease cross platform re-usability.

    In this article, I'll show how to build custom Android ListView's 100% programmatically, and hopefully I'll convince you that the results are cleaner, more modular, and more maintainable.


    Misguided Guidance?


    Displaying a list of data in Android with one of the built-in row views, such as SimpleListItem1 for a single line of text or ActivityListItem for text plus an image, is well documented and fairly straightforward.

    But to display list data using a custom layout, the Xamarin documentation makes it sound like you're best off using an AXML file:

    The four built-in row views are very simple. To display more complex layouts (such as a list of emails, or tweets, or contact info) a custom view is required. Custom views are generally declared as AXML files in the Resources/Layout directory and then loaded using their resource Id by a custom adapter. The view can contain any number of display classes (such as TextViews, ImageViews and other controls) with custom colors, fonts and layout.

    Then later in the documentation it sounds like you're required to use an AXML file:

    Another AXML layout file is required to contain the custom layout for each row that will appear in the list view.

    In fact, not only are AXML files optional, but if you follow the guidance in the documentation you'll end up with code that isn't SOLID.

    All Other Ground is Sinking Sand


    The documentation includes the following example that illustrates the best practice of view recycling, whereby an AXML file is only inflated when absolutely necessary (i.e. view == null), and the rest of the time the view is reused and subviews are extracted and updated.

    publicoverrideView GetView(int position, View convertView, ViewGroup parent)
    {
        var item = items[position];
        View view = convertView;
        if (view == null) // no view to re-use, create new
            view = context.LayoutInflater.Inflate(
                Resource.Layout.CustomView, null);
        view.FindViewById<TextView>(Resource.Id.Text1)
            .Text = item.Heading;
        view.FindViewById<TextView>(Resource.Id.Text2)
            .Text = item.SubHeading;
        view.FindViewById<ImageView>(Resource.Id.Image)
            .SetImageResource(item.ImageResourceId);
        return view;

    }

    I have a couple of problems with this code:

    1. Where would you add an event subscription if the view required a button?
    2. Where would you initialize the font size, font family, or color of a text view if you wanted to share the code between iOS and Android?
    3. How would you handle making subtle changes to the UI based on the type of item?

    The correct answer to #1 and #2 is that all one-time setup code belongs inside the if statement.  If, for example, you were to put an event subscription along-side the FindViewById statements you would be in for a nasty surprise if you tapped the button after scrolling up and down the list a few times (let alone how and when would you unsubscribe).

    The correct answer to #3 is that you'd have to put an additional if block outside of the 1st if statement, and in the process, violate the Open/Closed principle of SOLID.

    The example also violates the Single Responsibility principle of SOLID in that it combines setup code that occurs infrequently and view recycling code that occurs quite frequently.  

    So, while the code above looks innocuous enough, it encourages you down a bad path whereby you're liable to violate several tenants of SOLID. 

    A World Without XML


    I'm proposing keeping the view recycling -- except, instead of inflating the view from AXML, you'll instantiate a custom view.  Then, instead of pulling sub-views out of the inflated view and updating them with FindViewById() you'll just ask the view to update itself:

    publicoverrideView GetView(int position, View view, ViewGroup parent)
    {
        var productRowView = view asProductRowView ??
            newProductRowView(_context);
        var product = _items[position];
        productRowView.Update(product);
        return productRowView;

    }

    GetView() is now shorter and much cleaner because it has fewer responsibilities -- mostly determining when to instantiate a new view (not how to do it) or when to update a view (and not how to do that).

    We've moved all remaining logic into a dedicated class called, in this example, ProductRowView.  Infrequent, one-time setup code is now the responsibility of ProductRowView's constructor, and frequent view recycling code is the responsibility of the Update() method.

    Plus, we could now easily subclass ProductRowView if we had different display needs for different types of products (it's more SOLID).

    I suspect Uncle Bob Martin would be very happy with this change.

    Where's the Beef?


    ProductRowView now looks fairly similar to any 100% programmatic custom view.  One difference is it inherits from RelativeLayout, so you can (optionally) use EasyLayout's .ConstrainLayout() call.

    publicclassProductRowView : RelativeLayout
    {
        privateTextView _titleText;
        privateTextView _dollarText;
        privateTextView _amountText;

        public ProductRowView(Context context) : base(context)
        {
            SetViewProperties();
            AddViews();
            ConstrainLayout(this);
        }

        privatevoid SetViewProperties()
        {
            var height = ViewUtils.DpToPx(Context, 40);
            var width = ViewGroup.LayoutParams.MatchParent;
            LayoutParameters = newViewGroup.LayoutParams(width, height);
        }

        privatevoid AddViews()
        {
            _titleText = this.Add<TextView>();
            _dollarText = AddDollarText(this);
            _amountText = this.Add<TextView>();
        }

        privatestaticTextView AddDollarText(ViewGroup parent)
        {
            var dollarText = parent.Add<TextView>();
            dollarText.Text = "$";
            dollarText.TextSize = 8;
            return dollarText;
        }

        privatevoid ConstrainLayout(RelativeLayout relativeLayout)
        {
            relativeLayout.ConstrainLayout(() =>
                _titleText.Left == this.Left + 20
                && _titleText.Top == this.Top + 10
                && _titleText.Bottom == this.Bottom - 20

                && _amountText.Right == this.Right - 20
                && _amountText.Top == this.Top + 10
                && _amountText.Bottom == this.Bottom - 20

                && _dollarText.Right == _amountText.Left
                && _dollarText.Top == _amountText.Top
            );
        }

        publicvoid Update(Product product)
        {
            _titleText.Text = product.Title;
            _amountText.Text = product.Amount.ToString("0.00");
        }

    }


    The result looks like this:


    To help with long-term maintainability I've organized this into three high-level methods:

    • SetViewProperties() 
    • AddViews(); and
    • ConstrainLayout()


    Also, I've tried to keep one line per view instantiation in AddViews().  For example, AddDollarText() is a method that is solely responsible for instantiating a single view.

    This small method approach may appear at first glance to be more work than worth.  However, I would highly encourage this approach because I've found that if you aren't careful when creating a new 100% code-based view, over time it will become long and gnarly with methods spanning hundreds of lines.

    Does this approach actually seem cleaner?  Consider the following questions:

    • If you wanted to extract the color of the amount label into a cross platform variable, where would you initialize that color?  
    • How would you handle buttons with event subscriptions?
    • What if you needed to display an OutOfStockProduct using a completely different style of dollar and amount labels (subtype the view maybe)?

    I hope you'll agree the answers are generally more obvious, that the design has more flexibility, and that this sets future maintainers up for success.

    Summary


    Hopefully this helps with how to build list-based UI's on Android without the AXML.  You can see the full example on github in ViewProductsActivity.cs.

    I hope you'll consider taking the technique for a spin and deciding for yourself if your next Android project would be better without the AXML.

    Six Disastrous Mistakes for Cross-Platform Mobile Projects

    $
    0
    0
    "I'm starting a cross-platform mobile project.  What problems should my team solve before we begin?"

    What an enlightened question, I thought.

    The individual standing next to me at a local developer conference had a software architecture background.  He clearly understood that laying a solid foundation at the outset of a project can either spell success, or result in project delays, massive technical debt, and quagmires for even rudimentary tasks.

    As a consultant of nearly two decades I've seen all too well the results of poor project planning.  After 36 individual projects, eight of which were mobile, four of which were cross-platform mobile, I felt comfortable answering the gentleman's question with plenty of first-hand knowledge to back it up.

    This post answers the question of what problems a mobile team should consider at project outset.  It's expressed in real world mistakes and the resulting consequences as I've witnessed them.


    1. Overemphasize One Platform


    One customer I knew built out a Xamarin Android app, then at some point copy-pasted 90% of the C# codebase into an iOS project.  Zero code reuse.

    It was a cute trick (not really).  It was also a disaster.

    Getting cross-platform architecture right is tricky.  And until you've built out every feature for both platforms you will not discover the weaknesses in your cross-platform architecture.  The longer you go before fixing those architectural weakness, the more time consuming and messy the solution will become, if it comes at all.

    Regardless of whether you, your team, or your product owner prefers one platform over another, do your project a favor and don't call any task done until it has been built out for all platforms.

    2. Specialize in a Platform


    On several projects I've seen "the iOS dev" write a screen for iOS and later "the Android dev" write the same screen again for Android.  The result is usually code duplication, limited code reuse, and, since each developer must get up to speed on and then solve issues specific to that screen, two times the amount of effort!

    Done right, building a mobile app for multiple platforms should be only slightly more effort than for one.  Maximize your investment in cross-platform development by encouraging developers to address the same problem on all platforms before moving on to the next task.

    3. Work at The Wrong Level of Abstraction


    On two mobile projects now I've witnessed firsthand the results of working at too low a level of abstraction.  Think going Xamarin without either Xamarin.Forms or an MVVM Framework like MvvmCross.  Think choosing PhoneGap/Cordova without something like Ionic.  

    The fail starts when a developer faces a common problem for which the framework doesn't account (like marshalling to the main thread from cross-platform code, dependency injection, or messaging between view models).  The developer manually implements a solution that has been solved many times over more generally by more robust frameworks.  Not a great use of time, but not terrible -- except it gets worse.

    Later, a second developer faces the same problem.  Not knowing of the 1st solution, they re-implemented it again, this time slightly differently.  Add code duplication to the sin of wasted effort.

    Later yet, a third developer facing the problem discovers the 1st solution.  However, being under a tight deadline they copy-paste it and make a couple of changes rather than taking the time to abstract it out the way a good framework would have to begin with.  Add creating a maintenance disaster to the list of sins.

    Keeping a low-level framework may sound lightweight, agile, and freeing from an individual contributor's perspective, but in my experience, it hurts the project in the long run.  Eventually it creates a fractured, bloated, technical debt laden codebase that the project will probably never recover from.  Plus, code written in month one will look drastically different from code written in month six, thus exacerbating the maintenance headache.

    For this reason, choosing a high-level framework at the outset, even one that may seem opinionated and bloated at first, is more likely to ensure a project's long term success.

    4. Postpone Cross-Platform Navigation


    Navigation has been problematic for every cross-platform project upon which I've worked, even when working at the correct level of abstraction.  A good framework goes a long way, but regardless be sure make sure you address the following topics:


    • Ensure navigation occurs in the ViewModel, or wherever shared code lives
    • Write at least one unit test that asserts a navigation has occurred, to confirm it's abstracted out correctly (and watch The Deep Synergy Between Testability and Good Design by Michael Feathers)
    • Account for sending parameters to destination pages as well as returning parameters from them
    • Consider modal dialogs, including whether they block until dismissed (they should)
    • Figure out how navigating to a cached page (such as a tab view) affects the page lifecycle
    • Determine how to navigate back via the API, how to modify the back stack, and how using the back stack will affect the page lifecycle

    5. Ignore Logging


    I once worked on a project where a developer had explicitly removed all logging.  He felt it was a performance problem.  The result: the app might have been infinitesimally faster, but diagnosing issues in the field was nearly impossible.  

    Even if you have a stack trace, you simply cannot solve harder problems like race conditions without good logging.  On mobile projects you can defer log persistence, but at the very least write an API with various log levels within the first week of starting a new project, and make sure everyone uses it.

    6. Defer Back-End Work


    A few years ago, I was brought in to work on a mobile project where 90% of the UI had been built out.  I was tasked with implementing data persistence.  No big deal, right?  Except retrofitting a SQLite database with offline support, server API's, a server database, and synchronization logic was a gargantuan effort.  The customer couldn't figure out why the project was taking so long to complete.  They'd essentially been sold a nice-looking car with no engine.

    This may sound extreme, but in my experience most mobile projects forget until the end to account for a variety of hidden, back end issues including:


    • Offline support (tested not just on launch, but wherever network failure may occur)
    • Data synchronization (e.g. data concurrency)
    • Progressive page loading (which is essential when considering)
    • Slow network conditions
    • Authentication and authorization
    • Loading animations (can cause a lot of problems if not done correctly)
    • Testing with lots of data (e.g. View Recycling is implemented and works correctly for all lists)
    • Ignoring memory management (e.g. unsubscribing from all events)

    Bonus Mistakes


    I excluded the following candidate mistakes because they aren't quite as critical to solve up front, but they're worth mentioning in passing:


    • Not unit testing
    • Not explicitly identifying all target devices and OS versions
    • Not routinely testing on physical devices
    • Leaving animations till last
    • Not solving Web API versioning (i.e. how to address breaking changes) 
    • Not having consistent, scalable, naming conventions (e.g. 'View/[area]/LoginViewController.cs')
    • Developing without realistic data
    • Ignoring how data migrations will work on subsequent deploys

    Conclusion


    Hopefully you've found something on this list will jump start your next mobile project to long term success.  Or, if you have a classic mistake to share that I've missed, please write in the comments, or hit me up on Twitter @lprichar.

    Introducing ELXF: A UI Framework for Concise, Maintainable & Fast Programmatic UI's for Xamarin.Forms

    $
    0
    0
    ELXF is a new Xamarin.Forms UI framework that allows you to tap into the 2X speed increase possible with RelativeLayouts, while granting concise UI code, extra power, and improved maintainability.

    Today I’m happy to announce a new UI framework for Xamarin.Forms. It’s called EasyLayout.Forms (ELXF) and is an alternative to XAML and to programmatic nested view creation. It's goals are:
      1. Maximize UI performance by reducing excess render cycles associated with traditional view nesting
      2. Increase maintainability and readability by removing ceremony and keeping layout code concise
      3. Simplify usage of RelativeLayout while increasing its power and abstracting away its quirks

      In this post I’ll briefly explain what it is, then get into why we need a new UI framework in the context of each of the above three goals. I'll finish with limitations, some history, and how to get started.

      What Is ELXF?


      EasyLayout.Forms (ELXF) is a C# Domain Specific Language that allows you to define the relationships between children in a RelativeLayout. For example to position one element 50px below another in XAML you would normally do this:

      <RelativeLayout>
          <Label
              RelativeLayout.XConstraint="{ConstraintExpression Type=RelativeToView, Property=X, ElementName=MainLabel, Constant=0}"
              RelativeLayout.YConstraint="{ConstraintExpression Type=RelativeToView, Property=Y, ElementName=MainLabel, Constant=50}"
              RelativeLayout.WidthConstraint="{ConstraintExpression Type=RelativeToView, Property=Width, ElementName=MainLabel}"
              RelativeLayout.HeightConstraint="{ConstraintExpression Type=RelativeToView, Property=Height, ElementName=MainLabel}"
              Text="RelativeLabel"
              />
      </RelativeLayout>

      With ELXF you can do the same thing like this:

      _relativeLayout.ConstrainLayout(() =>
          _relativeLabel.Bounds.Top == _mainLabel.Bounds.Top + 50 &&
          _relativeLabel.Bounds.Left == _mainLabel.Bounds.Left &&
          _relativeLabel.Bounds.Width == _mainLabel.Bounds.Width &&
          _relativeLabel.Bounds.Height == _mainLabel.Bounds.Height)

      There's a handy self-documenting page that summerizes all of the options on github in LayoutExamplePage.cs.


      But what's wrong with the regular way of doing layouts? Why do we need a new framework?

      Maximize Performance


      Today, regardless of whether you choose to layout UI with XAML or programmatically, the path of least resistance is to create nested view layouts with several levels of StackLayout’s, Grid’s, TableView’s, and custom views.

      This creates a performance problem that Michael Ridland explains extremely well in his article Hacking the Xamarin.Forms Layout System for Fun and Profit. It’s worth reading the article a couple of times if you haven’t, but here is one of his key points:

      A child of a stacklayout will always cause a full layout cycle, there’s no way a StackLayout can short circuit this cycle.

      The solution is described on the Xamarin.Forms documentation on ListView performance:

      AbsoluteLayout has the potential to perform layouts without a single measure call. This makes it very powerful for performance. If AbsoluteLayout cannot be used, consider RelativeLayout.

      To better illustrate the problem and its solution I created two Xamarin Forms pages, one using view nesting, and one using a RelativeLayout with ELXF. The page simply shows some products (from Northwind) and you can tap one of them to select and then confirm the choice.


      The nested view version goes four levels deep on the header and three levels deep in the ListView.


      This may look complicated in a single image, but I honestly feel this is fairly typical if not actually simpler than what a real-world app might do.

      To compare the performance, I counted the number of measure and draw cycles for each label after performing the same set of steps on each version of the page (scroll, select 3 products, update text in all labels 3 times aka click calculator button 4 times). I then gave a score to each label based on roughly how expensive it was to draw, and set colors to show a heat map.

      Here's the traditional page:


      And here’s the RelativeLayout with ELXF version:


      The numbers in parenthesis are the number of measure operations and the number of draw operations. As you can see the 2nd one is roughly twice as fast.

      If you want to check these out yourself* the main pages are at: TraditionalPerformancePage.xaml and ElxfPerformancePage.cs and the custom views are in the Controls folder. There's a lot more to this topic such as the importance of fully constraining your views that I'll save for a later post.

      For now we've confirmed the Xamarin documentation and know RelativeLayout’s generally outperform nested views. But why not just use RelativeLayout’s in XAML or programmatically?

      * fyi there's currently an issue in Xamarin.Android 7.3.1 for Visual Studio users that causes RelativeLayouts in ListViews to load extremely slowly on Android. The current workaround is to build from a Mac.

      Increase Maintainability


      Consider the following example in XAML:

      <RelativeLayout>
          <Label BackgroundColor="Aqua"
              Text="Main Label"
              x:Name="MainLabel"
              RelativeLayout.XConstraint="{ConstraintExpression Type=RelativeToParent, Property=X, Constant=10}"
              RelativeLayout.YConstraint="{ConstraintExpression Type=RelativeToParent, Property=Y, Constant=10}"
              RelativeLayout.WidthConstraint="{ConstraintExpression Type=Constant, Constant=100}"
              RelativeLayout.HeightConstraint="{ConstraintExpression Type=Constant, Constant=40}"
              />
          <Label BackgroundColor="OrangeRed"
              RelativeLayout.XConstraint="{ConstraintExpression Type=RelativeToView, Property=X, ElementName=MainLabel, Constant=110}"
              RelativeLayout.YConstraint="{ConstraintExpression Type=RelativeToView, Property=Y, ElementName=MainLabel, Constant=50}"
              RelativeLayout.WidthConstraint="{ConstraintExpression Type=RelativeToView, Property=Width, ElementName=MainLabel}"
              RelativeLayout.HeightConstraint="{ConstraintExpression Type=RelativeToView, Property=Height, ElementName=MainLabel}"
              Text="RelativeLabel"
              />
      </RelativeLayout>


      This renders two labels like this:


      I don’t know about you, but I find that code very hard to read. The ELXF version of that looks like this:

      relativeLayout.ConstrainLayout(() =>
          _mainLabel.Bounds.Top == relativeLayout.Bounds.Top + 10 &&
          _mainLabel.Bounds.Left == relativeLayout.Bounds.Left + 10 &&
          _mainLabel.Bounds.Width == 150 &&
          _mainLabel.Bounds.Height == 40 &&

          _relativeLabel.Bounds.Top == _mainLabel.Bounds.Bottom + 10 &&
          _relativeLabel.Bounds.Left == _mainLabel.Bounds.Right + 10 &&
          _relativeLabel.Bounds.Width == _mainLabel.Bounds.Width &&
          _relativeLabel.Bounds.Height == _mainLabel.Bounds.Width
      )

      It’s concise, powerful, and the syntax is always verified by the compiler. It also fixes a duplication problem in that XAML example. Can you spot the issue?

      Simplify RelativeLayout


      While Xamarin.Forms RelativeLayout’s aren’t exactly broken, they are far less powerful than iOS’s Autolayout or even Android’s RelativeLayout with it's fairly extensive set of LayoutParams. The good news is Xamarin realizes this and have plans to introduce a more powerful version in Xamarin.Forms 3. The problem today, however, is that they essentially only allow you to control the top left pixel.

      For example if you look again at the XAML above you’ll see that to align RelativeLabel to the right of MainLabel we had to add 110 (the width of MainLabel plus a margin) to RelativeLabel’s X. What we really want is an attribute like RelativeLayout.RightEdgeConstraint instead of the RelativeLayout.XConstraint attribute.

      As it stands if we ever change MainLabel’s width, we must remember to increment RelativeLabel’s XConstraint. That's the kind of duplication that hides bugs and complicates maintainability. However, even without ELXS we can do a little better.

      If we write this in code it looks like this:

      relativeLayout.Children.Add(mainLabel,
          Constraint.RelativeToParent(rl => rl.X + 10),
          Constraint.RelativeToParent(rl => rl.Y + 10),
          Constraint.Constant(100),
          Constraint.Constant(40)
          );

      relativeLayout.Children.Add(relativeLabel,
          Constraint.RelativeToView(mainLabel, (rl, v) => v.X + v.Width + 10),
          Constraint.RelativeToView(mainLabel, (rl, v) => v.Y + v.Height + 10),
          Constraint.RelativeToView(mainLabel, (rl, v) => v.Width),
          Constraint.RelativeToView(mainLabel, (rl, v) => v.Height)
          );


      Better, right? RelativeLayouts in code have more power. So maybe we don't need a new framework after-all.

      Except, even if you don't agree that the ELXS version of

      _relativeLabel.Bounds.Left == _mainLabel.Bounds.Right + 10

      is easier on the eyes than

      Constraint.RelativeToView(mainLabel, (rl, v) => v.X + v.Width + 10)

      the code-behind version still has serious limitations when it comes to Centering elements.

      The Centering Problem


      Suppose we want to center-align a 3rd view under the 2nd one. If we attempt something like this:

      relativeLayout.Children.Add(centerLabel,
          Constraint.RelativeToView(relativeLabel,
              (rl, v) => v.X + (v.Width * .5f) – (centerLabel.Width * .5f)),
          Constraint.RelativeToView(relativeLabel,
              (rl, v) => v.Y + v.Height)
          );


      We’ll discover that it renders like this:


      Why didn’t CenterLabel pull further left? It’s because when the XConstraint lambda was evaluated, 'centerLabel' hadn’t been rendered yet. A non-rendered view gives a Width or Height of -1. The solution, documented nicely in this StackOverflow post, is this:

      Size GetSize(VisualElement ve, RelativeLayout rl) =>
          ve.Measure(rl.Width, rl.Height).Request;

      relativeLayout.Children.Add(centerLabel,
          Constraint.RelativeToView(relativeLabel,
              (rl, v) => v.X + (v.Width * .5f) - (GetSize(centerLabel, rl).Width * .5f)),
          Constraint.RelativeToView(relativeLabel,
              (rl, v) => v.Y + v.Height + 10)
          );

      That GetSize() local function (some C# 7 sugar) solves the problem by calculating what the width of centerLabel will be after it’s rendered. That renders nicely like this:


      While that works, perhaps you’ll agree that it's difficult to discern intent among all that math. A complex page with a lot of this style code is liable to hide bugs and obfuscate intent.

      Worse, it’s not always this easy. What if we want CenterLabel to have a width relative to MainLabel. If we do this:
      relativeLayout.Children.Add(centerLabel,
          Constraint.RelativeToView(relativeLabel,
              (rl, v) => v.X + (v.Width * .5f) - (GetSize(centerLabel, rl).Width / 2)),
          Constraint.RelativeToView(relativeLabel,
              (rl, v) => v.Y + v.Height + 10),
          Constraint.RelativeToView(mainLabel,
              (rl, v) => v.Width)
          );

      We end up with this:


      The problem is our GetSize() method is calculating the width of the label prior to any RelativeLayout width constraints.

      This is the point at which we’re stuck with the solution of hard-coding (duplicating) MainLabel’s width.

      ELXF to the Rescue


      EasyLayout.Forms can solve the centering problem. It translates LINQ expressions into Children.Add() calls with the correct parameters, it incorporates calls to a GetSize() type function when necessary, and in many cases it can solve the GetCenter() problem from above by searching back through prior LINQ expressions to determine what height or width the current element should be.
      The final solution turns into this:


      relativeLayout.ConstrainLayout(() =>
          _mainLabel.Bounds.Top == relativeLayout.Bounds.Top + 10 &&
          _mainLabel.Bounds.Left == relativeLayout.Bounds.Left + 10 &&
          _mainLabel.Bounds.Width == 150 &&
          _mainLabel.Bounds.Height == 40 &&

          _relativeLabel.Bounds.Top == _mainLabel.Bounds.Bottom + 10 &&
          _relativeLabel.Bounds.Left == _mainLabel.Bounds.Right + 10 &&
          _relativeLabel.Bounds.Width == _mainLabel.Bounds.Width &&
          _relativeLabel.Bounds.Height == _mainLabel.Bounds.Height &&

          _centerLabel.Bounds.GetCenterX() == _relativeLabel.Bounds.GetCenterX() &&
          _centerLabel.Bounds.Top == _relativeLabel.Bounds.Bottom + 10
          );

      Limitations


      ELXF makes the RelativeLayout more powerful, but it can't patch over all of the issues. Until Xamarin.Forms 3 comes out, the following are a few of the known issues:
      • If you update the text of a view with Right or Center constraints, the relative layout doesn’t know to redraw it. To force the redraw you have to call relativeLayout.ForceLayout() twice
      • You can’t currently constrain a Left edge to one view and a Right edge to another view the way you could with iOS Autolayout. The workaround is to set the width just like you would with a regular RelativeLayout
      • Unlike the iOS version of EasyLayout, be aware that ELXF has no less than or greater than constraints

      A Brief History

      Speaking of the iOS version of EasyLayout, I must give credit where it's due and provide some context. EasyLayout is a UI framework originally developed by Frank Krueger (@praeclarum) to simplify doing programmatic Autolayout in Xamarin.iOS. It does this by creating a simple DSL using the awesome Expression Trees feature of C#. EasyLayout for iOS is so powerful that I wouldn’t start a Xamarin.iOS project without it, and I honestly feel sorry for traditional iOS developers for not having anything like it. But it was only for Xamarin iOS.

      Then, earlier this year, my team decided to move away from AXML files on our Xamarin.Android project. They did this because on our large project AXML files take a very long time to generate and significantly slow development. I took the opportunity to port EasyLayout to Android in the form of EasyLayout.Droid. This turned out to be a fantastic solution for our team, and I now wouldn’t do a Xamarin Android project without EasyLayout.Droid.

      While ELXF is not yet as mature as its predecessors, I did at least have the opportunity to bring in lessons learned from two mature projects.

      Getting Started


      If you'd like to give it a spin you can install it via nuget into a project with:

      Install-Package EasyLayout.Forms

      The source code is all at GitHub and there are an extensive set of examples in the source code like here and here. And as mentioned there is a self documenting page. Also if you clone source there is a playground page where you can experiment.

      What's nice is that if you like it you can adopt ELXF on your existing projects on a page by page basis. In fact, you can even use it for just a single view in a single relative layout. There's no obligation to adopt it everywhere. Just don't be surprised if, like me, you grow to like it enough to want it everywhere.

      Summary


      If you end up using and liking EasyLayout.Forms please shoot me a note on twitter @lprichar, I'd love to hear from you.

      Your Code Sucks, Get Over It

      $
      0
      0


      Horrifying. That about describes my first art class. As a computer science major with virtually no art experience I was surrounded by students who had devoted nearly every waking moment to drawing, painting, sculpting, and bending metal into non-functional shapes.

      The second class was the worst. Our assignment was to create something in Photoshop and print it out with virtually no instruction. Easy enough I chuckled to myself.

      It was 1996, and the school computers had two browsers: Netscape Navigator 1.1, and Mosaic. There was no Wi-Fi, and the dorm rooms had no Internet hook up. Photoshop created files so big you needed Zip, or hot-off-the-press Jaz drives (remember those?) to store your massive 10 to 20-megabyte files! I smugly felt I had a huge leg up in owning my own computer, knowing how to use it, and having "hacked" the dorm phone system to get Internet in my room so I could more easily do research.

      Upon entering class, the professor immediately instructed us to place our art at the front of the room.

      Oh crap, I thought. Everyone's pieces were beautiful. They'd had no difficulty using a computer. They hadn't needed the Internet to figure out how to use non-dot matrix printers.

      With heart in my mouth and head hung low I reluctantly placed by far the worst piece of crap the department had ever seen or will ever see, up for all to critique.

      The class lightly critiqued the first several pieces. Minor adjustments, mostly.

      When it was my turn there was an awkward silence. After an eternity, the professor let them off the hook by drawing attention to a 2cm square part of my piece as potentially interesting. He suggested I try again this time with a massive zoom. A polite way of saying: "you completely failed, try again".

      Reckless Persistence


      Despite the humiliation, for some reason I persisted. The group persisted too. Persisted in humiliating me again, and again, and again with constant criticism, three times a week for a semester.

      Think your code reviews are bad? This was awful to a whole new level.

      Except, at some point this thing happened. It became a little less awful every time. Toward the end I finally came to the realization: I am not my art. The class isn't criticizing me. Each comment of "it fails to engage the viewer's attention because it lacks [insert artsy term]" didn't require an emotional response.

      Essentially, they were saying: my art sucks, but that doesn't mean I do.

      This is described beautifully in this quote from Steven Pressfield in The War of Art, (a book I highly recommend):

      A professional schools herself to stand apart from her performance, even as she gives herself to it heart and soul. … The professional loves her work. She is invested in it wholeheartedly. But she does not forget that the work is not her.

      And, it was that realization that allowed me to grow exponentially as an artist. In fact, by the end I can confidently say I was not terrible. Here's one of my final pieces.


      Go ahead and critique it in the comments. I would genuinely welcome any feedback. Because, just like the blogs I produce, the CAD models I design, or the code I write, I'll be the first to admit there's lots of room for improvement.

      In fact, there're more than just room for improvement. I have proof that my code sucks. Every time I look at anything I wrote more than a few weeks ago I'm consistently embarrassed by it. Doesn't the same thing happen to you? Doesn't your code suck too?  Obtaining good, constructive, feedback just helps you discover sooner those ways in which your code can be improved.

      Overcoming Criticism Anxiety


      If criticism causes you anxiety, you're not alone. Whether the venue is code reviews, reddit comments, or performance reviews, anxiety is a normal reaction. Here's how Stephen Pressfield describes the problem:

      Evolution has programmed us to feel rejection in our guts. This is how the tribe enforced obedience by wielding the thread of expulsion. … Resistance knows this and uses it against us. It uses fear of rejection to paralyze us and prevent us, if not from doing our work, then from exposing it to public evaluation.

      If the thought of feedback makes you queasy, consider this idea I learned in the public speaking group Toastmasters: we all have a circle of comfort. We generally go out of our way to stick to the activities in that circle. But, the more time we spend on activities outside of the circle, the larger our circle grows.

      While that was originally intended to encourage gaining comfort with public speaking by performing more public speaking, it could as easily be applied to fear of criticism.

      If you have anxiety about feedback consider this: instead of avoiding the situation, next time try putting yourself out for feedback even more. Maybe decrease scope to limit exposure, but don't hold back. Try committing to writing a blog post once a month or once a week for a year. Apply for jobs with technical interviews.  Speak at user groups.

      The more feedback you receive, the thicker your skin will grow, the more detached from it you will become, the less defensive you'll be, the more of it you can incorporate, and the faster you can grow.

      I feel extremely fortunate to have taken that art class and for having chosen persistence over paralysis. It didn't just grow my art skills, it helped free me from anxiety about feedback in general. Because of that experience I honestly love receiving constructive feedback.

      And, if increasing feedback frequency doesn't work, just envision your future-self looking back at your code from a few weeks in the future. Imagine your future-self telling you in all sincerity: "Your code sucks". Now it's time to get over it, and figure out how to make it better today.

      Live Coding iOS and Android with Xamarin: Episodes 1 and 2

      $
      0
      0
      In case you've missed it I've started a new weekly show where I live code how to build a cross platform mobile app from scratch using Xamarin.  The show is call lprichar code hour and it's live cast to twitch every Tuesday at 9 PM EDT, UTC-4.  Recorded episodes are on my youtube channel where you can should subscribe to get notified of new episodes.  Here's a recap of the first two episodes:

      Episode 1


      The first episode I introduced myself and the show, explained what Xamarin is, and how to set up your development environment.  Then I build out a hello world app in Xamarin.Android and Xamarin.iOS.  I flushed out the UI for a calculator in the iOS app using auto-layout constraints.  I explained the pitfalls of using storyboards and showed the all-code alternative using EasyLayout.  Here's the 1st show:


      Episode 2


      In the second episode I built out a calculator UI in Xamarin.Android.  I explained axml files, LinearLayout's, device independent pixels (dp) vs scaleable pixels (sp), themes, styles, and appcompat.  I also explained some of the pitfalls of axml files in a cross platform architecture.


      What's Next


      In episode 3 I'll get into how to organize your code to share logic across platforms and how to unit test your logic.  In future episode I'll do page navigation, lists, memory management, and animations.

      Call To Action


      If this show sounds interesting, please subscribe to my channel on youtube or twitch.  I'd also greatly appreciate you sharing this with friends who might want to learn more about cross platform mobile.  Finally, please write me on twitter or in the comments to let me know how to make the show better or what topics you'd like to see for future episodes.

      Securing Communications via Certificate Pinning in UWP

      $
      0
      0

      If you've ever clicked the "Decrypt HTTPS Traffic" button in Fiddler you know how extremely easy it is to initiate a man-in-the-middle attack, and watch (and even modify) the encrypted traffic between an application and a server.  You can see passwords and app private information and all kinds of very interesting data that the app authors probably never intended to have viewed or modified.

      It's also easy to protect against against man-in-the-middle attacks, but few apps do.

      For instance, I own a Ring doorbell and have the Ring (UWP) app installed in Windows so I can (among other things) ensure when outgoing Siren of Shame packages are picked up by the post  Here's a recent HTTPS session between the app and the server:


      I wonder what would happen if I modified the value of "bypass_account_verification" to True upon requests to https://api.ring.com/clients_api/profile?  You can do that type of thing with little effort in the FiddlerScript section, which I show in a supplementary episode of Code Hour:


      If you're writing an app, your risk of man-in-the-middle attacks isn't limited to curious developers willing to install a Fiddler root certificate in order to hide all HTTPS snooping errors.  Consider this scary and articulate stack overflow answer:

      Anyone on the road between client and server can stage a man in the middle attack on https. If you think this is unlikely or rare, consider that there are commercial products that systematically decrypt, scan and re-encrypt all ssl traffic across an internet gateway. They work by sending the client an ssl cert created on-the-fly with the details copied from the "real" ssl cert, but signed with a different certificate chain. If this chain terminates with any of the browser's trusted CA's, this MITM will be invisible to the user.

      The under-utilized solution for app developers is: certificate pinning.

      UWP Pinning?  No Soup For You


      Certificate pinning, or public key pinning, is the process of limiting the servers that your application is willing to communicate with, primarily for the purpose of eliminating man in the middle attacks.

      If the Ring app above had implemented certificate pinning, then they would have received errors on all HTTPS requests that Fiddler had intercepted and re-signed in transit.  My personal banking app in Windows does this and on startup gives the error "We're sorry, we're unable to complete your request.  Please try again" if it detects that the signing certificate isn't from whom it should be (even if it is fully trusted).

      Implementing certificate pinning is usually pretty easy in .Net.  Typically it involves the ServerCertificateVerificationCallback method on the ServicePointManager.  It then looks something like this:

      publicstaticasyncvoid Main(string[] args)
      {
          // Set callback (deleagte)
          ServicePointManager.ServerCertificateValidationCallback = PinPublicKey;

          WebRequest request = WebRequest.Create("https://...");
          WebResponse response = await request.GetResponseAsync();
          // ...
      }

      privatestaticbool PinPublicKey(object sender, X509Certificate certificate, X509Chain chain, SslPolicyErrors sslPolicyErrors)
      {
          if (certificate == null || chain == null)
              returnfalse;

          if (sslPolicyErrors != SslPolicyErrors.None)
              returnfalse;

          // Verify against known public key within the certificate
          String pk = certificate.GetPublicKeyString();
          return pk.Equals(PUB_KEY);

      }

      That works for all requests in the AppDomain (which, incidentally, is bad for library providers, but convenient for regular app developers).  You could also do it on a request by request basis by setting the ServerCertificateCustomValidationCallback method of the HttpClientHandler for an HttpClient (see example below).

      Either way, notice the GetPublicKeyString() method.  That's a super-useful method that'll extract out the public key so you can compare it with a known value.  As OWASP describes in the Pinning Cheat Sheet, this is safer than pinning the entire certificate because it avoids problems if the server rotates it's certificates.

      That works beautifully in Xamarin and .Net Core.  Unfortunately, there's no ServicePointManager in Universal Windows Platform (UWP) apps.  Also, as you'll see we won't be given an X509Certificate object so getting the public key is harder.  There's also virtually zero documentation on the topic and so the following section represents a fair amount of time I spent fiddling around.

      UWP Certificate Pinning Solved (Kinda)


      As described by this Windows Apps Team blog there are two HttpClients in UWP:

      Two of the most used and recommended APIs for implementing the HTTP client role in a managed UWP app are System.Net.Http.HttpClient and Windows.Web.Http.HttpClient. These APIs should be preferred over older, discouraged APIs such as WebClient and HttpWebRequest (although a small subset of HttpWebRequest is available in UWP for backward compatibility).

      If you're tempted to use System.Net.Http.HttpClient because it's cross platform or because you want to use the ServerCertificateCustomValidationCallback method I mentioned earlier, then you're in for a unpleasant surprise when you attempt to write the following code:

      HttpMessageHandler handler = new HttpClientHandler
      {
          ServerCertificateCustomValidationCallback = OnCertificateValidate
      };

      var httpClient = new System.Net.Http.HttpClient(handler);

      UWP will give you this response:

      System.PlatformNotSupportedException: The value 'System.Func`5[System.Net.Http.HttpRequestMessage,System.Security.Cryptography.X509Certificates.X509Certificate2,System.Security.Cryptography.X509Certificates.X509Chain,System.Net.Security.SslPolicyErrors,System.Boolean]' is not supported for property 'ServerCertificateCustomValidationCallback'.

      Even using Paul Betts' awesome ModernHttpClient doesn't get around the problem. The only solution I've found is to use the Windows.Web.Http.HttpClient and the ServerCustomValidationRequested event like this:

      using (var filter = new HttpBaseProtocolFilter())
      {
          // todo: probably remove this in production, avoids overly aggressive cache
          filter.CacheControl.ReadBehavior = HttpCacheReadBehavior.NoCache;
          filter.ServerCustomValidationRequested += FilterOnServerCustomValidationRequested;
          var httpClient = new Windows.Web.Http.HttpClient(filter);
          var result = await httpClient.GetStringAsync(new Uri(url));
          // always unsubscribe to be safe
          filter.ServerCustomValidationRequested -= FilterOnServerCustomValidationRequested;

      Notice the CacheControl method.  I thought I was going mad for a while when requests stopped showing up in Fiddler.  Turns out Windows.Web.Http.HttpClient's cache is so aggressive that unlike System.Net.Http.HttpClient, it won't make subsequent requests to a url it's seen before, it'll just return the previous result.

      The last piece of the puzzle is the FilterOnServerCustomValidationRequested method and how to extract a public key from a certificate without the benefit of of an X509Certificate:

      privatevoid FilterOnServerCustomValidationRequested(
          HttpBaseProtocolFilter sender, 
          HttpServerCustomValidationRequestedEventArgs args
          ) {

          if (!IsCertificateValid(
              args.RequestMessage, 
              args.ServerCertificate, 
              args.ServerCertificateErrors))
          {
              args.Reject();
          }
      }

      privatebool IsCertificateValid(
          Windows.Web.Http.HttpRequestMessage httpRequestMessage, 
          Certificate cert, 
          IReadOnlyList sslPolicyErrors)
      {
          // disallow self-signed certificates or certificates with errors
          if (sslPolicyErrors.Count > 0)
          {
              returnfalse;
          }

          // by default reject any requests that don't use ssl or match up to our known base url
          if (!RequestRequiresCheck(httpRequestMessage.RequestUri)) returnfalse;

          var certificateSubject = cert?.Subject;
          bool subjectMatches = certificateSubject == CertificateCommonName;

          var certificatePublicKeyString = GetPublicKey(cert);
          bool publicKeyMatches = certificatePublicKeyString == CertificatePublicKey;

          return subjectMatches && publicKeyMatches;
      }

      privatestaticstring GetPublicKey(Certificate cert)
      {
          var certArray = cert?.GetCertificateBlob().ToArray();
          var x509Certificate2 = new X509Certificate2(certArray);
          var certificatePublicKey = x509Certificate2.GetPublicKey();
          var certificatePublicKeyString = Convert.ToBase64String(certificatePublicKey);
          return certificatePublicKeyString;
      }

      privatebool RequestRequiresCheck(Uri uri)
      {
          return uri.IsAbsoluteUri &&
              uri.AbsoluteUri.StartsWith("https://", StringComparison.CurrentCultureIgnoreCase) &&
              uri.AbsoluteUri.StartsWith(HttpsBaseUrl, StringComparison.CurrentCultureIgnoreCase
              );

      }

      There may be a less expensive version of the GetPublicKey() method that involves indexing into the type array, but the above seems pretty clean to me.  The only possible issue is you might need to reference the System.Security.Cryptography.X509Certificates nuget package from Microsoft depending on your UWP version.

      You can see my final version in the Maintenance project of the Siren of Shame UWP app I'm building, along with a possible drop-in CertificatePinningHttpClientFactory.

      Summary


      Hopefully this clarifies what certificate pinning is, why you'd want it, and how to implement it.  If you found it useful or have any questions please share in the comments or hit me up on twitter.
      Viewing all 75 articles
      Browse latest View live