Quantcast
Channel: Lee's Blog

3 Ways To Refactor EF Linq Queries w/o Killing Perf

$
0
0
Extracting a method from an Entity Framework LINQ query can quietly kill performance.  Here are three easy solutions including: Expressions, Extension Methods, and LinqKit.

Embed from Getty Images

Enumeration<Problem>

Last week I was shocked to discover that refactoring Entity Framework LINQ queries for readability or reusability by extracting a method can quietly swap a query out of SQL and into in-memory processing and kill performance. 

Here's a simplified version of my problem.

privateasync Task<List<User>> GetUsersMatching(IMainFilterDto filter, string prefix)
{
   var usersQuery = Users.Where(u =>
      (filter.StartDate == null || u.CreationTime > filter.StartDate) &&
      (filter.EndDate == null || u.CreationTime <= filter.EndDate) &&
      u.Name.StartsWith(prefix));
   return await usersQuery.ToListAsync();
}


I had a site-wide filtering object supplied by the front-end, but then I needed to do something else specific to the task at hand like the .StartsWith().

Then elsewhere I needed something very similar:

privateasync Task<List<User>> GetUsersWithoutRoles(IMainFilterDto filter)
{
       var usersQuery = Users.Include(i => i.Roles).Where(u =>
              (filter.StartDate == null || u.CreationTime > filter.StartDate) &&
              (filter.EndDate == null || u.CreationTime <= filter.EndDate) &&
              !u.Roles.Any()
              );

       return usersQuery.ToList();
}

Uch.  The common code between the two isn't DRY and feels awful.  If I ever needed to change it, perhaps by replacing > with >= I'd have to track down all the places with that code.  I was tempted to extract it like this:

privatebool ApplyMainFilter(IMainFilterDto filter, User u)
{
       return (filter.StartDate == null || u.CreationTime > filter.StartDate) &&
              (filter.EndDate == null || u.CreationTime <= filter.EndDate);
}

And use it like this:

private async Task<List<User>> GetUsersWithoutRoles(IMainFilterDto filter)
{
    var usersQuery = Users.Where(u =>
        ApplyMainFilter(filter, u) &&
        u.Name.StartsWith(prefix));

That certainly reads better.  And when I tested it, it returns the exact same results.  Sadly, when I ran it through LINQPad the original query (where filter has a non-null start date but null end date) turns from this:

SELECT [stuff]
FROM
[Users]AS[u]
WHERE ([u].[CreationTime]>@__filter_StartDate_0) AND (([u].[Name]LIKE@__prefix_1+ N'%'AND (LEFT([u].[Name], LEN(@__prefix_1)) =@__prefix_1)) OR (@__prefix_1= N''))

into:

SELECT [stuff]
FROM
 [Users] AS [u]WHERE ([u].[Name]LIKE@__prefix_1+ N'%'AND (LEFT([u].[Name], LEN(@__prefix_1)) =@__prefix_1)) OR (@__prefix_1= N'')

It dropped out all the code in ApplyMainFilter()!  That may not look terrible in this simple example, but imagine more complex scenarios.  It could result in a lot more records returning from the database.  It could create a network bottleneck or put excess strain on the middleware. 

Worst of all it could prevent the database from doing what it does best: use indexes to optimize query execution.  This could mean bypassing existing indexes, preventing query optimization with future indexes, or reducing the effectiveness of performance recommendations in e.g. the Azure SQL database by hiding the problem from the database entirely.

Incidentally, if you'd prefer to see a video of the problem and solutions, check out Episode 22 of Code Hour:


return solution[0]

The solution turned out to be fairly easy once I identified the problem.  Understanding how Entity Framework works internally helped.  It's all about expression trees, which I've written about before (ok, I wrote that 11 years ago, but the fundamentals it describes are still solid).

Anticipating all the possible ways someone might pass arbitrary C# language into a where clause and turning it all into SQL is a hard problem.  I needed to give Entity Framework a hand.  One way to do that is to return a fully parseable expression tree like Expression<Func<User, bool>> rather than just a bool or a Func<User, bool>.  It looked like this:

private Expression<Func<User, bool>> GetMainFilterQuery(IMainFilterDto filter)
{
    return u => (filter.StartDate == null || u.CreationTime > filter.StartDate) &&
        (filter.EndDate == null || u.CreationTime <= filter.EndDate);

}

Executed like this:

privateasync Task<List<User>> GetUsersMatching(IMainFilterDto filter, string prefix)
{
       var usersQuery = Users
              .Where(GetMainFilterQuery(filter))

              .Where(u => u.Name.StartsWith(prefix));

Isn't that an aesthetically pleasing solution?  It's reusable, reads well, and converts to SQL.

But Wait, There's More

But, if you're up for reading further I thought I'd present one more more interesting option.  If you're into flow style API's then an extension method approach may be perfect:

publicstaticclass QueryUtils
{
    publicstatic IQueryable AppendMainFilterQuery(
        this IQueryable existingQuery, IMainFilterDto filter)
    {
        return existingQuery.Where(u => (
            filter.StartDate == null ||  u.CreationTime > filter.StartDate) &&
            (filter.EndDate == null || u.CreationTime <= filter.EndDate));
    }
}

Which is a little harder to read, but allows this:

privateasync Task<List<User>> GetUsersMatching(IMainFilterDto filter, string prefix)
{
    var usersQuery = Users
        .Where(u => u.Name.StartsWith(prefix))
        .AppendMainFilterQuery(filter);

That reads nicely, is reusable, and like the 1st solution keeps the SQL exactly how it was initially.

OR LinqKit?

I ran all this by a smart co-worker who recommended I check out LinqKit in case I ever needed to do anything more complicated.  Among other things LinqKit allows you to build up expressions across multiple methods.  For instance if I needed an OR clause instead of an AND clause it might look like this:

private ExpressionStarter<User> GetMainFilterPredicate(IMainFilterDto filter)
{
    var predicate = PredicateBuilder.New<User>().Start(u =>
        (filter.StartDate == null || u.CreationTime > filter.StartDate) &&
        (filter.EndDate == null || u.CreationTime <= filter.EndDate));
    return predicate;
}

private Task> GetUsersMatching(IMainFilterDto filter, string prefix)
{
    var predicate = GetMainFilterPredicate(filter);
    predicate = predicate.Or(u => u.Name.StartsWith(prefix));
    return Users.Where(predicate).ToListAsync();
}

Pretty nifty.

Summary

I like the 1st approach if I don't need anything more complex, but regardless, identifying how not to refactor LINQ queries is the important part.  If you have any other creative solutions please share in the comments or hit me up on twitter.

Stored Procedures in ASP.Net Boilerplate

$
0
0
Using stored procedures in ASP.Net Boilerplate is a little trickier than you might imagine.  There's the problem of getting them into the database with EF Code-First migrations.  Then there's the issue of how to call them through the repository pattern while keeping things unit testable.

And did you know there are three different way to call stored procedures?  Which you use depends on on whether they return an existing entity, return nothing, or return something else entirely.  That last option is the trickiest.

Fortunately I just released Episode 23 of Code Hour, that lays it all out:


All the code is available in this tidy little sproc pull request.

See also: the official ASP.Net boilerplate documentation on stored procedures.

Multi-Tenancy is Hard: ASP.Net Boilerplate Makes it Easy

$
0
0
If you're liable to start a new web project that even might need multi-tenancy, you should probably use ASP.Net Boilerplate (ABP). As I've blogged about previously, ABP will save weeks of dev time on new websites, even without multi-tenancy. However, as soon as you bring on a second customer, I'd estimate you'll eliminate over a month of development time (extrapolating from my 2 ABP project data points, solid math).


But what even is multi-tenancy? What are typical solutions? And how does ABP save so much dev time? Fortunately, I just released a new episode of Code Hour to answer these questions:


If you don't have 35 minutes to invest right now (less at chipmunk speed, even less if you stop after ~6 minutes when I switch to live coding) then let me tl;dr (tl;dw? 😜):

Multi tenancy is a software architecture in which a single application is shared between multiple customers. Each customer only sees their own data and is completely unaware that there are other customers.

There are several ways to approach the problem, as described in ABP's Multi-Tenancy Documentation.

1. Multiple Deployment - Multiple Database


This is the less work up-front approach. There's no need for a framework, you just deploy your app multiple times, once per tenant. This offers the best performance (because tenants can be scaled independently) and best data isolation (e.g. database backups will never contain other customers data).

In exchange it requires the highest maintenance cost and most challenging deployments. The maintenance challenge is you'll need to pay for an app and database for each customer, and if you're passing those costs on, it could be detrimental to smaller customers. The deployment risk is you'll have to be extremely structured in deployments of app and database script to all environments and carefully consolidate error logs.

But there are three other common solutions, and in these scenarios ABP brings huge benefits to the table:

2. Single Deployment - Single Database


This is my favorite approach because it's simplest and least expensive to maintain. In this solution each database table contains a foreign key to a tenants table. All database queries must filter to retrieve items for the current user's tenant and insert records with the current users tenant. When doing it by hand it would be a pain to apply these filters to every single query. Enter ABP.

By inheriting from the IMustHaveTenant interface, ABP give all entities a foreign key to a Tenants table. Then, silently in the background, ABP figures out the tenant of the currently logged in user and for all queries only returns the records from that tenant. If a user creates an entity with IMustHaveTenant, then ABP additionally automatically sets the correct foreign key. No code is required and all database queries pick up this filter (just like the soft delete I described in Be a Hero On Day 1).

The downside to this approach is that one tenant with a lot of data could affect the performance of other tenants, and some users might worry about security since all data lives in the same database. So there's another approach ABP provides:

3. Single Deployment - Multiple Database


When a user from the host (host = a singleton tenant that can create other tenants) creates a tenant, they can specify a connection string specific to that tenant. ABP even offers a cool solution to data migrations that I explain in the video (at ~12:55). But the end result is much better data isolation, great performance, but still a potentially high price tag since you could be paying for one database per customer.


4. Single Deployment - Hybrid Databases


ABP offers the best of the last two solutions by allowing some tenants to live in shared database instances and others to live in their own databases. This offers data isolation and performance to tenants that need it (or will pay for it), and value for tenants that don't (or won't).

What's awesome about ABP is that it works identically from a code perspective for all of the above multi-tenancy approaches. The only difference is whether a tenant's connection string property is provided or not. The filtering, permissions, and migrations are otherwise all identical.

Summary


If you've interested in more details (such as how to disable tenant filtering) please check out the video (and like and subscribe and all that). Also, hit me up on twitter or in the comments if you have any questions, comments, or threats.

Conquer ASP.Net Boilerplate Query Performance in LINQPad, (Announcing LINQPad.ABP)

$
0
0
Ever made it to production only to realize your code fails miserably at scale?  When performance problems rear their gnarly head and there name is EntityFramework, there is but one blade to slice that gordeon knot: LINQPad.  
However, if you're using the ASP.Net Boilerplate (ABP) framework, the situation is a tad more dire. That's because ABP uses a repository pattern, which, it turns out, is less than compatible with LINQPad's DataContext centric approach.
In this post I'll describe two ways to use LINQPad with ABP apps to solve performance problems:
1. Rewrite repository pattern based queries to run in LINQPad with a data context.  This works well for small problems.
2. Enable LINQPad to call directly into your code, support authentication, multi-tenancy, and the unit of work and repository patterns with the help of a NuGet packge I just released called LINQPad.ABP. This helps immensely for more complex performance problems.

Repository Pattern 101


The Repository and Unit of Work patterns used in ASP.Net Boilerplate apps are a wonderful abstraction for simplifying unit testing, enabling annotation based transactions, and handling database connection management.  As described in this article from the Microsoft MVC docs:
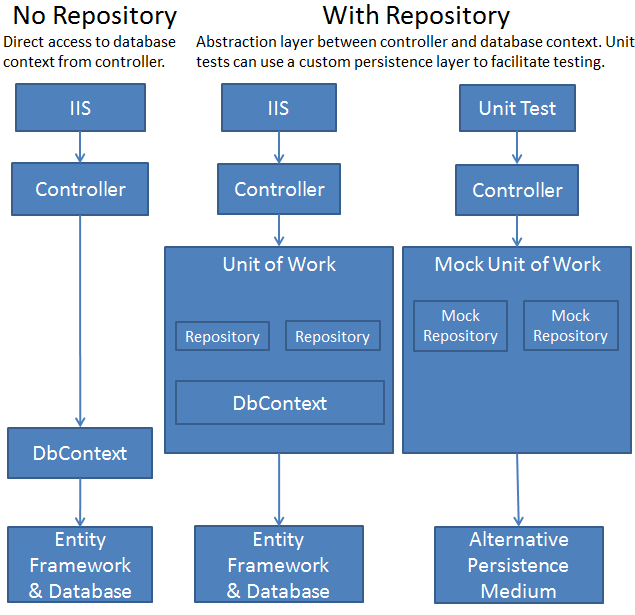
The repository and unit of work patterns are intended to create an abstraction layer between the data access layer and the business logic layer of an application. Implementing these patterns can help insulate your application from changes in the data store and can facilitate automated unit testing or test-driven development (TDD)
That document gives a nice diagram to show the difference between an architecture with and without a repository pattern:


However, these abstractions present a problem for LINQPad.  When using LINQPad to diagnose performance problems it would often be super convenient to call directly into your app's code to see the queries translated into SQL and executed.  However, even if LINQPad understood dependency injection, it would have no idea how to populate a
 IRepository, what to do with a [UnitOfWork(TransactionScopeOption.RequiresNew)] attribute, or what value to return for IAbpSession.UserId or IAbpSession.TenantId.  Fortunately, I just released a NuGet Package to make that easy. 
But first, the simplest way to solve the problem for single queries is just to rewrite the query without a repository pattern and paste it into LINQPad.

Undoing Repository Pattern


This is where this blog post gets into the weeds.  If you'd rather watch me perform the following steps please check out my latest episode of Code Hour:


Otherwise, here it is in written form:
Step one is to enable ABP'S data context to support a constructor that takes a connection string.  If you add the following code to your DataContext:
#if DEBUG
        privatestring _connectionString;

        ///
        /// For LINQPad
        ///

        publicMyProjDbContext(string connectionString)
            : base(new DbContextOptions())
        {
            _connectionString = connectionString;
        }

        protectedoverridevoid OnConfiguring(DbContextOptionsBuilder optionsBuilder)
        {
            if (_connectionString == null)
            {
                base.OnConfiguring(optionsBuilder); // Normal operation
                return;
            }

            // We have a connection string
            var dbContextOptionsBuilder = new DbContextOptionsBuilder();
            optionsBuilder.UseSqlServer(_connectionString);
            base.OnConfiguring(dbContextOptionsBuilder);
        }

#endif

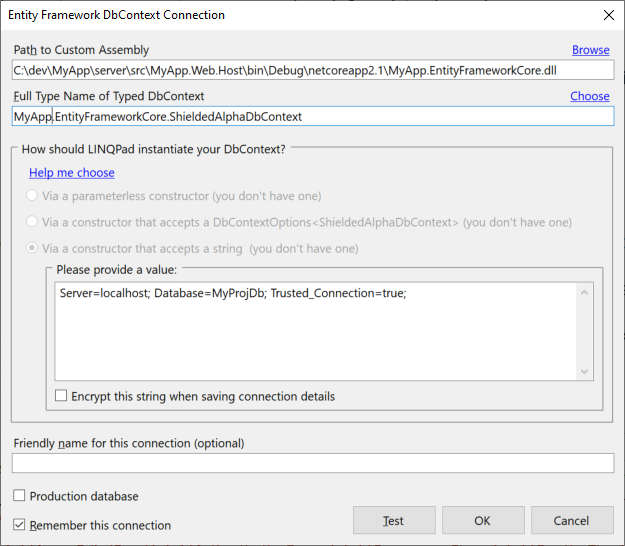
Then in LINQPad you can
  1. Add a connection
  2. "Use a typed data context from your own assembly"
  3. Select a Path to Custom Assembly like "MyProjSolution\server\src\MyProj.Web.Host\bin\Debug\netcoreapp2.1\MyProj.EntityFrameworkCore.dll"
  4. Enter a Full Type Name of Typed DbContext like "MyProj.EntityFrameworkCore.MyAppDbContext"
  5. LINQPad should instantiate your DbContext via a constructor that accepts a string, then provide your connection string


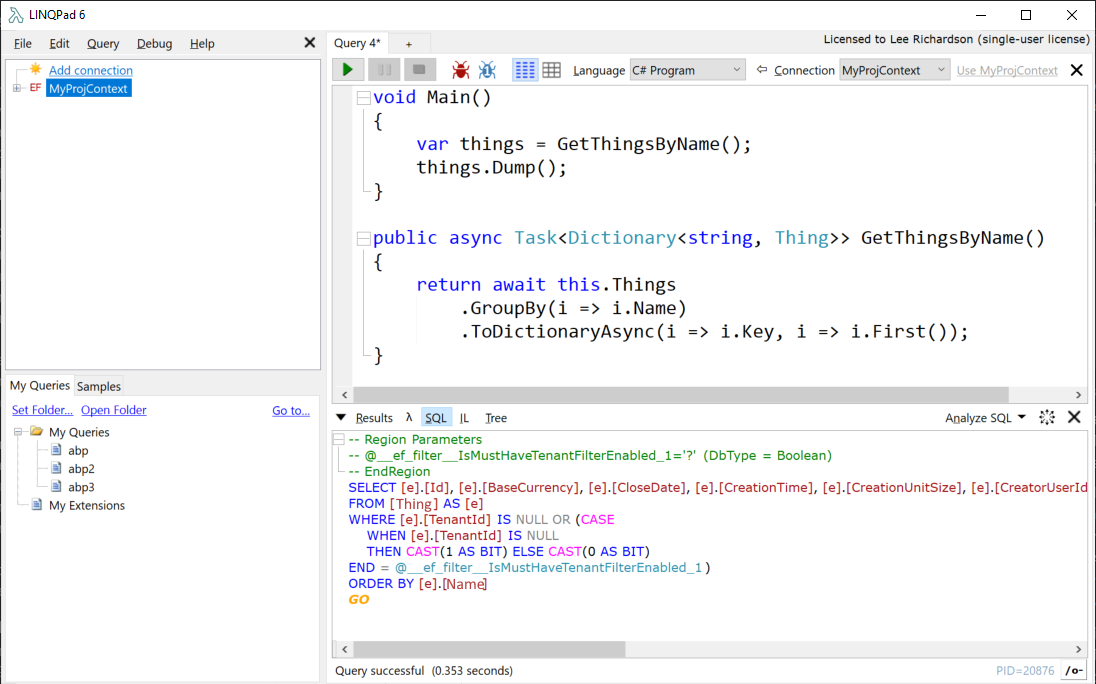
Now, when you start a new query you can write:
var thing = this.Things.Where(t => t.Id == 1);
thing.Dump();

And if you run it you'll see the resulting SQL statement.
Not bad.  If you paste in any real code you'll need to add using statements and replace _thingRepository.GetAll() with this.Things and you'll be translating LINQ to SQL in no time.


Pretty cool.  It certainly works for simple queries.
However, in my experience performance problems rarely crop up in the easy parts of the system.  Performance problems always seem to happen in places where multiple classes interact because there was simply too much logic for the author to have stuffed it all into one class and have been able to sleep at night.

Enter: LINQPad.ABP


To enable LINQPad to call directly into ABP code you'll need to set up dependency injection, define a module that's starts up your core module, specify a current user and tenant to impersonate, and somehow override the default unit of work to use LINQPad's context rather than ABP's.  That's a lot of work.
Fortunately, I just published LINQPad.ABP, an Open Source NuGet Package that does all this for you.  To enable it:
  1. In LINQPad add a reference to "LINQPad.ABP"
  2. Add a custom Module that's dependent on your project's specific EF Module
  3. Create and Cache a LINQPad ABP Context
  4. Start a UnitOfWork and specify the user and tenant you want to impersonate
The code will look like this:
// you may need to depend on additional modules here eg MyProjApplicationModule
[DependsOn(typeof(MyProjEntityFrameworkModule))]
// this is a lightweight custom module just for LINQPad
publicclassLinqPadModule : LinqPadModuleBase
{
    publicLinqPadModule(MyProjEntityFrameworkModule abpProjectNameEntityFrameworkModule)
    {
        // tell your project's EF module to refrain from seeding the DB
        abpProjectNameEntityFrameworkModule.SkipDbSeed = true;
    }

    publicoverridevoid InitializeServices(ServiceCollection services)
    {
        // add any custom dependency injection registrations here
        IdentityRegistrar.Register(services);
    }
}

async Task Main()
{
    // LINQPad.ABP caches (expensive) module creation in LINQPad's cache
    var abpCtx = Util.Cache(LinqPadAbp.InitModule(), "LinqPadAbp");

    // specify the tenant or user you want to impersonate here
    using (var uowManager = abpCtx.StartUow(this, tenantId: 5, userId: 8))
    {
        // retrieve what you need with IocManager in LINQPad.ABP's context
        var thingService = abpCtx.IocManager.Resolve();
        var entity = await thingService.GetEntityByIdAsync(1045);
        entity.Dump();
    }
}

That may look like a lot of code, but truest me, it's way simpler than it would otherwise be.  And now you can call into your code and watch every single query and how it gets translated to SQL.  

Summary


I hope this helps you track down a hard bug faster.  If maybe then please subscribe, like, comment, and/or let me know on twitter.

Strongly Typed, Dependency Managed Azure in C#: Introducing Cake.AzureCLI

$
0
0
The story, nay legend, of providing strongly typed, cross platform, dependency managed access to all 2,935 Azure CLI commands in C#.


You can now have strongly typed, cross platform, dependency managed access to all 2,935 Azure CLI commands in C#, with full intellisense including examples. That's because I just published a Cake plugin for AzureCLI called Cake.AzureCli.


This blog post is a little about what it is and how to use it, but it's more about how I built it. That's because I had a blast solving this problem and my solution might even entertain you: parsing thousands of help files through the CLI, storing results in 16 meg intermediate JSON files, and code generating 276K lines of code with T4 templates.


In the process I apparently also broke Cake's static site generator.


Oops.

But first, I suppose the most relevant information is the what and the how.

Have & Eat Your Cake.AzureCLI


This plugin runs in Cake. If you aren't familiar with cake, please check out Code Hour Episode 16, Intro to Cake, where I go over what it is and why you should care.


If you don't have a spare hour right now: it's a dependency management system (like make, ant, maven, or rake) except in C#. It also has a huge plugin ecosystem, one that's now "slightly" larger with access to all of Azure CLI.

Right, you didn't watch the video, and you're still skeptical, right? You're wondering what was wrong with the official azure-sdk nuget plugins. The answer is: they aren't Cake enabled and so they don't support dependency management. If that statement isn't meaningful to you, please, watch just the "Scripts" section of my talk starting at 9:08.

Now that you're 100% convinced let's dig in. Using Cake.AzureCLI is as simple as adding a preprocessor directive to pull it from NuGet:
#addin "nuget:?package=Cake.AzureCli&version=1.2.0"
And then accessing commands like Az().. So a simple program to log in and list all your resource groups might look like this:

var target = Argument("target""Default"); var username = Argument<string>("username"null); var password = Argument<string>("password"null); Task("Login")    .Does(() => {    // 'az login' is accessed via Az().Login()    Az().Login(new AzLoginSettings {       Username = username,       // all commands can be customized if necessary with a ProcessArgumentBuilder       Arguments = new ProcessArgumentBuilder()          // anything appended with .AppendSecret() will be rendered as [REDACTED]           //    if cake is run with `-verbosity=diagnostic`          .Append("--password").AppendSecret(password)    }); }); Task("ListResourceGroups")    .IsDependentOn("Login"// yayy dependency management!    .Does(() => {    // listing names of all resource groups    Information("Resource Groups:");    // all results are strongly typed as dynamic if results are json    dynamic allResourceGroups = Az().Group.List(new AzGroupListSettings());    foreach (var resourceGroup in allResourceGroups) {       Information(resourceGroup.name);    } }); RunTarget(target);
And that should hopefully provide enough background to go create sql instances, scale up or down kubernetes clusters, and provision VM's with dependency management, from the comfort of a language you know and love.

The Making Of


"But Lee, I'm dying to know, how did you build this work of art?"
Oh, I'm so very glad you asked. Writing something this large by hand was obviously not going to work. Plus it needs to be easy to update when Azure team releases new versions. Code generation it was. And I always wanted to learn T4 templates.

I first came up with a data structure, always a solid place to start. I wanted something that would support Azure CLI, but that could also be used to generically represent any CLI tool, because ideally this solution could work for other CLI programs as well. I came up with this:


A Program contains a single root Group (az). Groups can contain other Groups recursively (e.g. az contains az aks which contains az aks nodepool). Groups can contain Commands (e.g. az aks contains az aks create). And for documentation Commands can have Examples and Arguments.

It's basically a tree, with Commands as leafs, and so will work nicely in json. But how to populate it?

Fill er up

"Well, that's not how I would have done it"

said a skeptical co-worker when I told him I was executing thousands of az [thing] --help commands and parsing the results. See, AzureCLI was written in Python and is open source, so theoretically I could have downloaded their source and generated what I needed from there in Python.

But I really wanted a more generic approach that I or someone else could apply to any CLI program. So I parsed each "xyz --help" into an intermediary object: a Page. That's basically just a collection of headers, name-value pairs, and paragraphs. Then I converted pages to groups or commands and recursed to produce a 350,385 line, 15 megabyte behemoth.


Incidentally a fun side-effect of this approach is you can see all the changes across Azure CLI version changes e.g. this commit shows changes from 2.0.77 to 2.1.0 (although GitHub doesn't like showing diffs across 16 Meg files in the browser for some reason, can't imagine why).

T4 Templates


I'd never used T4 templates. Turns out they're super awesome. Well, super powerful, and pretty awesome anyway. They are a little annoying when every time you hit save or tab off a .tt file it takes 13 seconds to generate your 178 thousand lines of code -- even on an 8 core i9 with 64 gigs of ram and an SSD. Oh, and then at that scale Visual Studio seems to crash periodically, although I'm sure Resharper doesn't help.

But whatever, they work. And this part is cool: If you set hostspecific=true, then you can access this.Host to get the current directory, read a json file, then deserializing it to model objects that live in a .Core project that you can reference inside of the tt file yet not reference inside of your main project (Cake.AzureCli). If you're interested check out Az.tt.

What to generate was interesting too. The easy part is exposing a method to cake. You just write an extension method like this:

public static class AzAliases {     [CakeMethodAlias]     public static AzCliGroup Az(this ICakeContext context)     {         return new AzCliGroup(context);     } }
And Cake is good to go. But what about generating 2,935 extension methods? Turns out, not such a great idea. The intellisense engine in Visual Studio code is powered by OmniSharp. As awesome as OmniSharp is, it just isn't quite powerful enough to generate intellisense quickly or accurately with that architecture. However, if you group commands into "namespaces" like Az().Aks.Create() instead of AzAksCreate(), then you get nice intellisense at every level:


Conclusion


While this project may not solve world hunger just yet, I do hope it'll make someone's life a little easier. More importantly, I hope this technique will entertain or better yet inspire someone (you) to create something cool. If it does, please let me know about it in the comments or on twitter.

ABP CRUD Cheat Sheet: The Distilled, Essential Steps to Add an Entity in ASP.Net Boilerplate with Angular

$
0
0

While the process of making Create, Read, Update, and Delete (CRUD) pages in ASP.Net Boilerplate is well documented on their website, and while I did a detailed walk through in my video E19: Be a Hero on Day 1 with ASP.Net Boilerplate (particularly the demo starting at 40:59), I feel the community could use a high level, quick, reference guide for starting the CRUD process from scratch with a new entity: an ABP CRUD Cheat Sheet.


Here are 15 steps broken down by server-side and client-side.  They may seem complicated compared to adding an entity to a SharePoint or Power Apps app, but remember the end product is infinitely customizable, and when something goes wrong you can almost always code your way out of it.

To use this reference I imagine you'd want to skim over it like a checklist each time you add a new entity to ensure you didn't forget anything.  That's what I plan to do, anyway.  I expect it will save me time and effort and reduce the unnecessary rework that comes with missing a step.  Hopefully it will for you too.

Quick note: For readability when you see "Product" substitute your entity name.  When you see "Category" substitute a foreign table.  When you see "LeesStore", substitute your project name.  These were the entities I used in the video, and on my ABP Demo Site, and I feel they read better than [EntitySingular] or [EntityPlural].

A. Server-Side

A1. Add Entity

LeesStore.Core/Products/Product.cs

public class Product : Entity<int> { ...}

  • : IFullAudited if you want a history of who created, deleted, and last edited and when
  • : ISoftDelete if you're not doing auditing and want soft-deletes
  • : ICreationAudited or : IModificationAudited if you're not doing full audit and want just last modified or creation info
  • : IMustHaveTenant if you're doing multi-tenancy
  • [ForeignKey(nameof(Category))]public int CategoryId { get; set; } in addition to public Category Category { get; set; } if you want the ID of a foreign key
  • [Required] to strings and foreign entities as needed
  • [MaxLength(255)] to strings as needed

A2. Add to DbContext

LeesStoreDbContext.cs

public DbSet<Product> Products { get; set; }

  • Migrations will show up empty if you forget to do this

A3. Add Migration

Add-Migration "Add-Products"

  • Run from Package Manager Console window.  Don't forget to set the Default project to [MyProject].EntityFrameworkCore or else you'll get:

    "No DbContext was found in assembly 'LeesStore.Web.Host'. Ensure that you're using the correct assembly and that the type is neither abstract nor generic."
Set Default Project in Package Manager Console
  • Alternately: dotnet ef migrations add Add-Products from the LeesStore.EntityFrameworkCore directory

A4. Update Database

Either:

  • Update-Database in Package Manager Console with Default project set per above; OR
  • dotnet ef database update from the command line; OR
  • Run the Migrator project, which is required if you are using one of the multi-database multi-tenant solutions (see Multi-Tenancy is Hard: ASP.Net Boilerplate Makes it Easy)  

A5. Add a DTO

LeesStore.Application/Products/Dto/ProductDto.cs

[AutoMapFrom(typeof(Product))][AutoMapTo(typeof(Product))]publicclassProductDto:EntityDto<int>{}
  • Copy over only fields that need to be updated to prevent overposting attacks
  • AutoMapFrom and AutoMap to if it's a simple mapping.  For more complex mappings instead add an auto-mapper profile:
publicclassProductProfile:Profile{publicProductProfile(){CreateMap<Product,ProductDto>().ForMember(x => x.LastModifiedByUsername, opt => opt.MapFrom(i => i.CreatorUser.UserName));}}
  • [MaxLength(255)][Required] , and other data annotations for server-side validation
  • : IValidatableObject for custom validation

A6. Register a Permission

LeesStoreAuthorizationProvider.cs

context.CreatePermission(PermissionNames.Pages_Products, L("Products"), multiTenancySides: MultiTenancySides.Host);

  • multiTenancySides is optional but you should treat it as required because the default value is both Host AND Tenant, which is probably wrong.
  • Add your entity to LeesStore.xml or else localization will look bad in the UI

<text name="Projects" value="Projects" />

A7. Add an AppService

LeesStore.Application/Products/ProductsAppService.cs

[AbpAuthorize(PermissionNames.Pages_Products)]publicclassProductsAppService:AsyncCrudAppService<
    Product, ProductDto,int, PagedAndSortedResultRequestDto, ProductDto
>
  • Either [AbpAuthorize(SomePermission)] or [AbpAuthorize] else it won't require authorization (it will be open to the Internet)
  • The final generic property should be a CreateEntityDto if creating has different bits
  • Override CreateFilteredQuery if you need to .Include foreign entities e.g.
protectedoverride IQueryable<Product>CreateFilteredQuery(PagedAndSortedResultRequestDto input){returnbase.CreateFilteredQuery(input).Include(i => i.CreatorUser);}

A8. Run App, See Swagger Update, Rejoice

  • Ctrl+F5 (run without debugging starts your app fast)
Swagger UI

Client-Side

B1. Update nSwag

  • PC: \angular\nswag\refresh.bat
  • Mac: npx nswag run /runtime:NetCore31

B2. Register Service Proxy

src/shared/service-proxies/service-proxy.module.ts

ApiServiceProxies.ProductsServiceProxy,

B3. Update Left-Hand Nav

src\app\layout\sidebar-nav.component.ts

new MenuItem(this.l('Products'), 'Pages.Products', 'local_grocery_store', '/app/products’),

B4. Duplicate Tenant Folder and Find/Replace "Tenant" with "[Entity]" and "tenant" with "[entity]"

  • Within every file name; and
  • Inside of each file including .ts files and .html files

B5. Update Route

src\app\app-routing.module.ts

{
  path:'products',
  component: ProductsComponent,
  data:{ permission:'Pages.Products'},
  canActivate:[AppRouteGuard]},

B6. Register new components in app.module.ts

src\app\app.module.ts

  • Add all three components to declarations:
  • Add both modal dialogs to entryComponents:

B7. Fix Fields, Tidy Up UI, Rejoice

Fix columns in the table of the main component and columns in the create and edit components.  Fix linting errors, and anything that doesn't run.  

Relax.  Smile.  You did it.  Well done! 😁

Completed UI for a new product

Conclusion

If you found this useful please tweet at @lprichar, or add a comment and let me know.  If you found a bug, please add a comment.  If you'd rather see this as a github page, please tell me, I'm game.  Otherwise: I hope this helps, and happy coding!

Mastering External Web API's in ASP.Net Core and ABP with Swagger, ApiExplorer, and NSwag

$
0
0
Embed from Getty Images


Recently a customer asked me to build out a small end user facing web API in addition to the existing one used by my SPA (Angular) app.  A few weeks later someone asked me how to do this on my YouTube channel.

Excellent video!!! I have the same project and I am trying to add a second webapi to be used in a couple of pages, but I don't know where to start. Any example? Thanks

This seemed like a great opportunity to blog about my experience and share the knowledge of my approach and solution with a wider audience.  I also recorded this as an episode of Code Hour if you're more of a visual learner.


My current application is built on ASP.Net Boilerplate with the Angular template.  While that isn't strictly important to this story, what is, is that it's an ASP.Net Core app with where Swashbuckle (a tool to "Generate beautiful API documentation") generates a Swagger document.

I initially considered adding an additional micro service to the Kubernetes cluster that my site is deployed in.  The problem was that the new API was small, and the amount of work involved in setting up security, DI, logging, app settings, configuration, docker, and Kubernetes port routing seemed excessive.

I wanted a lighter weight alternative that extended my existing security model and kept my existing configuration.  Something like this:


More Cowbell Swagger

Adding a second swagger file to my existing web app was relatively easy.  Controlling what was in it, less so.

To add that second swagger file I just had to call .SwaggerDoc a second time in services.AddSwaggerGen in Startup.cs

services.AddSwaggerGen(options =>{// add two swagger files, one for the web app and one for clients
    options.SwaggerDoc("v1",newOpenApiInfo(){ 
        Title ="LeesStore API", 
        Version ="v1"});
    options.SwaggerDoc("client-v1",newOpenApiInfo{ 
        Title ="LeesStore Client API", 
        Version ="client-v1"});

Technically this is saying that I have two versions of the same API, rather than two separate API's, but the effect is the same.  The 1st swagger file is exposed at http://localhost/swagger/v1/swagger.json, and the second one is exposed at http://localhost/swagger/client-v1/swagger.json.

That's a start.  If you love the Swagger UI that Swashbuckle provides as much as I do, you'll agree it's worth trying to add both swagger files to it.  That turned out to be easy with a second call to .SwaggerEndpoint in the UseSwaggerUI call in Startup.cs:

app.UseSwaggerUI(options =>{var baseUrl = _appConfiguration["App:ServerRootAddress"].EnsureEndsWith('/');
    options.SwaggerEndpoint(
        $"{baseUrl}swagger/v1/swagger.json","LeesStore API V1");
    options.SwaggerEndpoint(
        $"{baseUrl}swagger/client-v1/swagger.json","LeesStore Client API V1");

Now I could choose between the two swagger files in the "Select a definition" dropdown in the top right:

That's pretty nice, right?

Except: both pages look identical.  That's because all methods are currently included in both definitions.

Exploring the ApiExplorer

To solve that, I needed to dig a little into how Swashbuckle works.  It turns out that internally it uses ApiExplorer, an API metadata layer that ships with ASP.Net Core.  And in particular, it uses the ApiDescription.GroupName property to determine which methods to put in which files.  If the property is null or it's equal to the document name (e.g. "client-v1"), then Swashbuckle includes it.  And, it's null by default, which is why both Swagger files are identical.

There are two ways to set GroupName.  I could have set it by setting the ApiExplorerSettings attribute on every single method of my controllers, but that would have been tedious and hard to maintain.  Instead, I chose the magical route.


That involves registering an action convention and assigning actions to documents based on namespaces, like this:

publicclassSwaggerFileMapperConvention:IControllerModelConvention{publicvoidApply(ControllerModel controller){var controllerNamespace = controller?.ControllerType?.Namespace;if(controllerNamespace ==null)return;var namespaceElements = controllerNamespace.Split('.');var nextToLastNamespace = namespaceElements.ElementAtOrDefault(namespaceElements.Length -2)?.ToLowerInvariant();var isInClientNamespace = nextToLastNamespace =="client";
        controller.ApiExplorer.GroupName = isInClientNamespace ?"client-v1":"v1";}}

If you run that you'll see that everything is still duplicated.  That's because of this sneaky line in Startup.cs

services.AddSwaggerGen(options =>{
    options.DocInclusionPredicate((docName, description)=>true);

The DocInclusionPredicate wins when there's a conflict.  If we take that out then, well, Radiohead says it best:

Consuming the Swagger

In case you've somehow missed it, I'm a big fan of Cake.  It's a dependency management tool (like Make, Rake, Maven, Grunt, or Gulp) that allows writing scripts in C#.  It contains a plugin for NSwag, which is one of several tools for auto-generating proxies from swagger files.  I thus generated a proxy like this:

#addin nuget:?package=Cake.CodeGen.NSwag&version=1.2.0&loaddependencies=trueTask("CreateProxy").Description("Uses nswag to re-generate a c# proxy to the client api.").Does(()=>{var filePath =DownloadFile("http://localhost:21021/swagger/client-v1/swagger.json");Information("client swagger file downloaded to: "+ filePath);var proxyClass ="ClientApiProxy";var proxyNamespace ="LeesStore.Cmd.ClientProxy";var destinationFile =File("./aspnet-core/src/LeesStore.Cmd/ClientProxy/ClientApiProxy.cs");var settings =newCSharpClientGeneratorSettings{
       ClassName = proxyClass,
       CSharpGeneratorSettings ={
          Namespace = proxyNamespace
       }};

    NSwag.FromJsonSpecification(filePath).GenerateCSharpClient(destinationFile, settings);});

Ran it with build.ps1 -target CreateProxy or build.sh -target CreateProxy on Mac/linux, and out popped a strongly typed ClientApiProxy class that I could consume in a console like this:

usingvar httpClient =newHttpClient();var clientApiProxy =newClientApiProxy("http://localhost:21021/", httpClient);var product =await clientApiProxy.ProductAsync(productId);
Console.WriteLine($"Your product is: '{product.Name}'");

🎉? ... Not So Fast

Happy ending, everyone wins right?  Not quite.  If you're running in ASP.Net Boilerplate that always returns Your product is "".  Why?  The quiet failure was tricky to track down.  Watching site traffic in Fiddler I saw this:

{"result":{"name":"The Product","quantity":0,"id":2},"targetUrl":null,"success":true,"error":null,"unAuthorizedRequest":false,"__abp":true}

That seems reasonable at first glance.  However, that won't deserialize into a ProductDto because the ProductDto in the JSON is inside a "result" object. The wrapping feature is how (among other things) ABP returns UserFriendlyException messages to the user in nice modal dialogs.

The above screenshot came from JSON like this:

{"result":null,"targetUrl":null,"success":false,"error":{"code":0,"message":"Dude, an exception just occurred, maybe you should check on that","details":null,"validationErrors":null},"unAuthorizedRequest":false,"__abp":true}

The solution turned out to be pretty easy.  Putting a DontWrapResult attribute onto the controller:

[DontWrapResult(WrapOnError =false, WrapOnSuccess =false, LogError =true)]publicclassProductController:LeesStoreControllerBase

Resulted in nice clean JSON

{"name":"The Product","quantity":0,"id":2}

And the console app writing Your product is "The Product".

Fantastic.

Final Tips and Tricks

One last thing.  That method name "ProductAsync" seems a bit unfortunate.  Where did it even come from?

Turns out when I wrote this:

[HttpGet("api/client/v1/product/{id}")]publicasync Task<ProductDto>GetProduct(int id)

The ApiExplorer only exposed the endpoint, not the method name.  Thus Swashbuckle didn't include an operationId in the Swagger file and NSwag was forced to use elements in the endpoint to come up with a name.  

The fix is to specify the name so Swashbuckle can generate an operationId.  That's easy with the Name property in the HttpGet or HttpPost attribute.  And thanks to nameof in C# 6 we can keep it strongly typed.

[HttpGet("api/client/v1/product/{id}", Name = nameof(GetProduct))]
public async Task<ProductDto> GetProduct(int id)

And that generates the await clientApiProxy.GetProductAsync(productId); I would expect.

Conclusion

This post is the story of how to generate an unauthenticated client.  Check back soon for a follow-up on how to generate API Keys to perform authentication and authorization on an external Web API.

In the meantime all the code is runnable in the multiple-api's branch or perusable in the Multiple API's Pull Request of the LeesStore demo site.  I hope this is helpful.  If so let me know on twitter @lprichar or in the comments.

Secure External APIs with API Keys - and Keep the Villains at Bay

$
0
0


Suppose you've written a web app and exposed an external REST API based on Swagger and Swashbuckle in an ASP.Net Core site.  Perhaps you blindly followed some rando's recent blog post about it, published it to production, and your customers are super happy except: Horrors, you've just realized you forgot to secure it and now it's open to all the villains of the Internet!  Worse, your customers don't want to use their existing credentials, they want something called API Keys.  

Good news: you've just stumbled on said rando's follow-up blog post about how to secure those external web API's, and even better it's got diagrams, detailed videos, and a whole working Pull Request in a sample GitHub repo.  

One caveat: this post is fairly specific to the security model in the ASP.Net Boilerplate framework, but even if you're not using that framework, this technique should be generally applicable.

What Are API Keys?

The idea of API Keys is fairly standard with systems that offer an external API.  They offer customers a way to connect to an API with credentials that are separate from their own.  More importantly API Keys offer limited access, a critical element of a good security model.  API Keys can't, for instance, log in to the site and create new API Keys, or manage users.  They can only perform the limited actions that the external Web API grants.  If the credentials become compromised, users can reject or delete them without affecting their own credentials.


Data Structure

The first step in implementing API Keys is to design the data structure and build out the CRUD for the UI.  Well, the CRD, anyway, updating API Keys doesn't make much sense.

Conveniently enough ASP.Net Boilerplate already provides a Users entity that ostensibly offers a superset of everything required.  ASP.Net Boilerplate Users can have multiple Roles and each of those Roles can have multiple Permissions.  


Developers can then restrict access to methods and classes via the AbpAuthorize("SomePermission") attribute, which takes a Permission as a parameter.  When an end user makes a request to an endpoint ABP determines the user from a bearer token in the request header, figures out their roles, and figures out which permissions belong to those roles.  If one of those permissions matches the requirement in the AbpAuthorize() attribute, the call is allowed through.

API Keys should be similar.  As far as fields they'll have an "API Key" instead of "Username", and a "Secret" instead of a "Password".  Unlike users they'll likely only need one permission for decorating the external API instead of many.  Thus, they'll have just a single Role to help link the single permission to the API Keys.

Therefore, implementing this should be as simple as having ApiKey inherit from User and pretend that Username is ApiKey and Password is Secret.


Crudy Keys

Last month this rando also published an ABP CRUD Cheat Sheet to help build out CRUD for new entities in ASP.Net Boilerplate apps.  Following that guide for creating API Keys would be a great place to start.  I'll include the original step and any customizations below.  Also, if you want to follow along visually this dude also posted a video of the process including explaining topics like Table-Per-Hierarchy inheritance and published it as an episode to something called Code Hour (to which you should totally subscribe):


A1. Add Entity

The ApiKey contains zero additional columns:

publicclassApiKey:User{}

A2. Add to DB Context

A3. Add Migration

The addition of inheritance to the User entity means Entity Framework will add a discriminator column because Entity Framework Core prefers the  Table per Hierarchy inheritance strategy. It will take care of setting that discriminator column for all future data, but it won't for older data.  To address that add either a second migration or add this to the first migration:

migrationBuilder.Sql("UPDATE AbpUsers SET Discriminator = 'User'");

A4. Update Database

A5. Add DTO

The only field we want to expose when viewing API Keys is the key (username).  We want a custom mapping from Username to ApiKey when AutoMapper converts it.  Therefore we want a DTO like this:

publicclassApiKeyDto:EntityDto<long>{[Required][StringLength(AbpUserBase.MaxUserNameLength)]publicstring ApiKey {get;set;}}

And a mapping profile like this:

publicclassApiKeyDtoProfile:Profile{publicApiKeyDtoProfile(){CreateMap<ApiKey,ApiKeyDto>().ForMember(i => i.ApiKey, opt => opt.MapFrom(i => i.UserName));}}

A6. Register a Permission

context.CreatePermission(PermissionNames.Pages_ApiKeys, L("ApiKeys"), multiTenancySides: MultiTenancySides.Host);

A7. AppService

The AppService has three things of note.  

First, the Create DTO is different from the View DTO, because users send in a Secret but never get one back.  We can solve that by making a CreateApiKeyDto that inherits from the view DTO and customizes the final generic parameter

[AutoMapFrom(typeof(ApiKey))]publicclassCreateApiKeyDto:ApiKeyDto{[Required][StringLength(AbpUserBase.MaxPlainPasswordLength)]publicstring Secret {get;set;}}[AbpAuthorize(PermissionNames.Pages_ApiKeys)]publicclassApiKeysAppService:AsyncCrudAppService<ApiKey, ApiKeyDto,long, PagedAndSortedResultRequestDto, CreateApiKeyDto>{...

Second, we need a custom method to retrieve unique API Keys and Secrets.  A quick naive version would look like this:

publicCreateApiKeyDtoMakeApiKey(){returnnewCreateApiKeyDto{
        ApiKey = User.CreateRandomPassword(),
        Secret = User.CreateRandomPassword()};}

Finally, when we create ApiKeys we need to put in some fake value in the various required user fields, but most importantly we need to hash the secret with an IPasswordHasher<User>.

publicoverrideasync Task<ApiKeyDto>CreateAsync(CreateApiKeyDto input){var fakeUniqueEmail = input.ApiKey +"@noreply.com";var apiKey =newApiKey{
        UserName = input.ApiKey,
        EmailAddress = fakeUniqueEmail,
        Name ="API Key",
        Surname ="API Key",
        IsEmailConfirmed =true,
        NormalizedEmailAddress = fakeUniqueEmail
    };

    apiKey.Password = _passwordHasher.HashPassword(apiKey, input.Secret);await _userManager.CreateAsync(apiKey);var apiRole =await _roleService.EnsureApiRole();await _userManager.SetRolesAsync(apiKey,new[]{ apiRole.Name });await CurrentUnitOfWork.SaveChangesAsync();returnnewApiKeyDto{
        Id = apiKey.Id,
        ApiKey = apiKey.UserName
    };}

That call to _roleService.EnsureApiRole() basically just creates a Role and a Permission that we can decorate our external API calls with.

/// <summary>/// ApiKeys should have the API permission.  Users/ApiKeys must get permissions by association with a Role./// This code finds and returns a role called API or if it doesn't exist it creates and returns a role/// called API that has the API permission.  This code is called when an API Role is created.  Thus, the API/// role is created the 1st time a user creates an API Key for a tenant./// </summary>publicasync Task<Role>EnsureApiRole(){var apiRole =await _roleRepository.GetAll().FirstOrDefaultAsync(i => i.Name == RoleNames.Api);if(apiRole !=null)return apiRole;var permissions = _permissionManager.GetAllPermissions().Where(i => i.Name == PermissionNames.Api);
    apiRole =newRole{
        TenantId = CurrentUnitOfWork.GetTenantId(),
        Name = RoleNames.Api,
        DisplayName ="API"};await _roleManager.CreateAsync(apiRole);await _roleManager.SetGrantedPermissionsAsync(apiRole, permissions);return apiRole;}

A8. Run App, See Swagger Update, Rejoice

Great, the API is finished:


B1. Update nSwag

B2. Register Service Proxy

B3. Update Left-Hand Nav

B4. Duplicate Tenant Folder and Find/Replace "Tenant" with "[Entity]" and "tenant" with "[entity]"

B5. Update Route

B6. Register New Components in app.module.ts

B7. Fix Fields, Customize ... Rejoice?

With the back-end work finished, the front-end is fairly straightforward.  Just delete the edit dialog and in the create dialog to set the DTO on init and pick up the random passwords:

publicngOnInit(){this.apiKey =newCreateApiKeyDto();this.apiKeyServiceProxy
        .generateApiKey().first().subscribe(apiKey =>(this.apiKey = apiKey));}

And add a "Copy To Clipboard" button:

<mat-form-fieldclass="col-sm-12"><inputmatInputtype="text"name="Key"[(ngModel)]="apiKey.apiKey"requiredplaceholder="Key"readonly#keyInput/><buttonmat-icon-buttonmatSuffixtype="button"(click)="copyInputToClipboard(keyInput)"><mat-iconmatTooltip="Copy to clipboard">content_copy</mat-icon></button></mat-form-field>
publiccopyInputToClipboard(inputElement: HTMLInputElement){
    inputElement.select();
    document.execCommand('copy');
    inputElement.setSelectionRange(0,0);}

And now users can add API Keys:


But API users still aren't authenticating with those API Keys.

ClientTokenAuthController

The existing SPA site authenticates a username, password and tenant by calling into the TokenAuthController class.  If the credentials check out that class returns an access token that the client appends to subsequent requests.

The Web API should do the same thing.  Mostly just copy and paste the existing TokenAuthController class into a ClientTokenAuthController and put it in the external API folder (\Client\V1 from my previous blog post).  The main customization is that the ClientTokenAuthController should take an ApiKey and Secret, and it should not take a tenant (if multi-tenancy is enabled) because the ApiKey is unique across tenants.

The full code for the ClientTokenAuthController is in this commit, but the relevant part looks like this:

/// <summary>/// Authenticates an API Key and Secret.  If successful AuthenticateResultModel will contain a token that/// should be passed to subsequent methods in the header as a Bearer Auth token./// </summary>/// <param name="model">Contains the API Key and Secret</param>/// <returns>The authentication results</returns>[HttpPost("api/client/v1/tokenauth", Name =nameof(Authenticate))][ProducesResponseType(typeof(AuthenticateResultModel),200)][DontWrapResult(WrapOnError =false, WrapOnSuccess =false, LogError =true)]publicasync Task<IActionResult>Authenticate([FromBody]ClientAuthenticateModel model){/*
     * This 1st Authenticate() looks only in ApiKeys, which are assumed to be unique across Tenants (unlike Users),
     * thus we can pull back a TenantId on success and set the session to use it
     */var apiKeyAuthenticationResult =await _apiKeyAuthenticationService.Authenticate(model.ApiKey, model.Secret);if(!apiKeyAuthenticationResult.Success){// this 401 is much cleaner than what the regular TokenAuthController returns.  It does a HttpFriendlyException which results in 500 :|returnnewUnauthorizedObjectResult(null);}using(_session.Use(apiKeyAuthenticationResult.TenantId,null)){/*
         * This 2nd Authenticate is almost entirely guaranteed to succeed except for a few edge cases like if the
         * tenant is inactive.  However, it's necessary in order to get a loginResult and create an access token.
         */
        AbpLoginResult<Tenant, User> loginResult =awaitGetLoginResultAsync(
            model.ApiKey,
            model.Secret,GetTenancyNameOrNull());returnnewOkObjectResult(CreateAccessToken(loginResult));}}

And after placing that class in the Client.V1 namespace, the SwaggerFileMapperConvention (from Mastering External API's) will expose it in Swagger


Authenticating The External API

Finally, the last step is to lock down the existing method and ensure (ala TDD) that client's can't get in.  If you're a visual learner this section along with details about password hashing and AutoMapper details is covered in Code Hour Episode 29:


With that shameful self-promotion out of the way, next register an API Permission.  Unlike the earlier permission this one is for accessing API endpoints, not managing API Keys:


context.CreatePermission(PermissionNames.Api, L("Api"), multiTenancySides: MultiTenancySides.Tenant);

Now restrict the external API's controller with that permission:

[AbpAuthorize(PermissionNames.Api)]publicclassProductController:LeesStoreControllerBase

Now if when clients hit the /api/client/v1/product endpoint, they get an HTTP 401.  Excellent!

To authenticate with an API Key and Password call into ClientTokenAuthController with an API Key and Secret and save the token onto the ClientApiController:

var authenticateModel =newClientAuthenticateModel{
    ApiKey = apiKey,
    Secret = secret
};var authenticateResultModel =await clientApiProxy.AuthenticateAsync(authenticateModel);

clientApiProxy.AccessToken = authenticateResultModel.AccessToken;var product =await clientApiProxy.GetProductAsync(productId);

What's that?  You're following along and it didn't compile?!  No AccessToken property on ClientApiProxy?!  Oh, that's easy!  Just use the fact that the NSwag generated proxy is partial and has a PrepareRequest partial method:

partialclassClientApiProxy{publicstring AccessToken {get;set;}partialvoidPrepareRequest(System.Net.Http.HttpClient client,System.Net.Http.HttpRequestMessage request,string url){if(AccessToken !=null){
            request.Headers.Authorization =newAuthenticationHeaderValue("Bearer", AccessToken);}}}

Huzzah!  Now check out that happy 200:


🎉 We Did It!!

If you made it to the end of this post I am deeply impressed.  I hope it was useful.  The code is at the Api Keys Pull Request in my ASP.Net Demo Site.  If you found this helpful or have a better approach please let me know @twitter or in the comments.  Happy coding!


800+ Subscribers: A Tale of Inspiration (via Hanselminutes) and Pivot (Eric Ries)

$
0
0


Three years ago last month Scott Hanselman recorded an episode of Hanselminutes he's undoubtedly already forgotten.  I haven't.

I wasn't looking for inspiration the day I stumbled on that episode, but 29 of my own episodes, 47,000 views, and 5,000 watch hours of Code Hour later, my YouTube channel is a testament to Scott Hanselman's ability to inspire others.

His interview with Daniel Shiffman in episode 584 made sharing knowledge in video form seem approachable, exciting, and rewarding.  I'd been blogging for over a decade as a way to learn development topics more deeply, and give back to the community.  Doing it visually seemed like a more efficient means to accomplish those goals.

Code Hour was born.  It sucked.

I started "Code Hour" with the idea I'd live code Xamarin development for an hour weekly on Twitch and YouTube streaming, no post editing, just like Daniel Shiffman, and see what stuck.

Nothing stuck.  It was, I can now admit, pretty terrible.

Don't believe me.  Here's proof:


Viewership: near zero, for a year and a half despite weekly episodes.  I learned a ton, but I certainly wasn't giving back to the community.

Giving up would have been reasonable, probably prudent.  But I'm a fan of patience and persistence, and if you've read Your Code Sucks, Get Over It, you'll know I believe in the power of separating ego from work product, and objectively looking for areas of improvement.  I requested feedback from a co-worker (thank you Josh Blanchard) and learned in short: too much noise, not enough signal.

According to Eric Ries in the Lean Startup (do read it if you haven't) a pivot "is a structured course correction designed to test a new fundamental hypothesis about the product, strategy, and engine of growth".  I had my new hypothesis: bad signal to noise ratio.  I pivoted.

What Even Is Code Hour?

If you asked me today what it is I'd say ... well, this 1 minute promo about covers it:


Basically I took my coworkers feedback to heart: episodes are now heavily post-edited live coding that "maximizes signal and minimizes noise".

In short: an hour of live coding in about 30 minutes.

The format is now a high level overview on development, typically .Net related topics, with post edited diagrams and visuals, then a dive into the implementation details.  It pulls the best elements of live coding like: 

  • Real world tricks and tips
  • Common pitfalls based on experience
  • The joy that only comes from solving hard, unexpected problems

Except without all the boring elements of live coding like compiling and excessive typing.

I've also moved away from Xamarin and toward ASP.Net Core and ASP.Net Boilerplate in particular, for which there seems to be a voracious appetite (big thanks to all the retweets and shares from the ABP.IO team and fans).  In fact my most popular episode is:


(I'll be releasing an updated version for ABP.IO shortly)

One downside: before the pivot I could knock out an episode in 60 minutes.  Now each episode is 8-16 hours per 30 minute show (thus > monthly rather than weekly episodes).  It's time well spent.

The pivot didn't yield immediate results, but I'm happy to say that as of this week I hit a goal I'd never have imagined two years ago: 800 subscribers.


Ultimately sharing knowledge in video form has turned out to be approachable, exciting, and rewarding just like Daniel Shiffman and Scott Hanselman promised.  It just required some patience, persistence, and finding the right audience.  I've certainly learned a ton and had fun.

What's the Point?

I guess what I'm saying is: subscribe if you haven't.  There's an upcoming episode on Blazor Web Assembly you'll love.  But more importantly thank you to everyone that's provided inspiration: Scott Hanselman, Daniel Shiffman, Eric Reis, Josh Blanchard, the folks at ABP.IO, and to everyone who's shared, liked, commented and subscribed.  You all rock!  Thank you!

But more importantly if you have an idea: be prepared to find inspiration in unexpected places, don't give up if your first version sucks, and be prepared to dispassionately analyze and improve.  The world needs your idea.  Now go do it!

Blazor WebAssembly vs Angular: Client Side Clash

$
0
0


Think quick: you're starting a new project, which single page application (SPA) technology should you use: That shiny Blazor WebAssembly you've heard so much about or something more mature like Angular, and why?

That's the primary question I set out to answer when I built typershark.io, a simple web based single or multi-player co-op game that I built to help encourage typing for my daughter and simultaneously to learn Blazor.


I'm certainly no Blazor expert at this point, but I've sunk about 40+ hours into building the game, and after working professionally in Angular 2+ apps for the last two years I feel comfortable comparing the technologies and sharing my feelings.  Also, as a consultant I've worked on 38 unique projects in the last two decades, and am no stranger to the considerations one faces when starting new projects, or the regrets one feels after making poor architectural decisions.

I'll compare them across ten categories where I feel their differences are interesting and might affect a project's technology choice:

  1. View Typing
  2. Component Level CSS
  3. Validation
  4. Tooling
  5. Maturity
  6. Language
  7. Debugging
  8. Testability
  9. Interop
  10. Code Sharing

First I'll give a quick overview of the Blazor WebAssembly technology, in case you've missed it.  I'll assume you have a minimal grasp of Angular.

Blazor WebAssembly, What Is It?

Announced in 2017, officially released just a couple months ago on May 19, 2020, Blazor WebAssembly is a technology that allows developers to write client-side code in C# and Razor (a pleasant hybrid of HTML and C#) and have it compile down to WebAssembly.  

WebAssembly is exciting because it's faster, more compact, and has more functionality than JavaScript.  If it sounds like I'm blowing smoke read this excellent Blazor article by Jeremy Likness, here's an excerpt:

As a byte code format, there is no need to parse script and pre-compile for optimization. The code can be directly translated to native instructions. Startup times to load and begin execution of the code are orders of magnitude faster compared to asm.js

On top of WebAssembly, Blazor adds data binding, components, JavaScript Interop, dependency injection, and the ability to run any .Net Standard code you can pull from NuGet – all natively in the browser.  If that sounds exiting, it is.  But is it ready for prod?

Server-Side or Client Side?

In this article I will not explore the more mature server-side execution model of Blazor.  In that mode Blazor does not compile C# to WebAssembly, instead it runs C# on the server-side and communicates HTML via SignalR, similar to AJAX UpdatePanels in WebForms (remember those?).  Server-side Blazor supports older browsers (IE 11+), but it has no offline support, and the server needs to maintain state for every single client, which limits scalability.

Incidentally, I wrote the 1st version of typershark.io in server-side Blazor and converted it.  While server-side and WebAssembly Razors look nearly identical, the architectures are fundamentally very different, and thus the conversion was not straightforward.  If you're starting a new project choose your execution model up front, don't plan on switching.

Components

Before I can get to the categories I'll introduce a little code to ground the conversation.  This code will take the form of a component.  Components, in both Angular and Blazor, accomplish information hiding which increases maintainability.

Here's the Blazor code for a GetPlayerName component that can accept a default player name (perhaps pulled from local storage), prompt the user for the name, and upon submission will return the name the player provided:

<EditForm Model="TempPlayer" OnValidSubmit="SetName"><DataAnnotationsValidator /><ValidationSummary />....<InputText type="text" @bind-Value="TempPlayer.Name"/>...</EditForm>

code {[Parameter]publicEventCallback OnSetName {get;set;}[Parameter]publicstring InitialName {get;set;}privateasyncTaskSetName(){await OnSetName.InvokeAsync(TempPlayer.Name);}}

That can then be used from a parent component like this:

<PlayerNameComponent InitialName="@MyInitialName" OnSetName="@OnSetName"/>

@code
{privatestringPlayerNamepublicvoidOnSetName(string playerName){// do something}}

1. View Typing: Blazor++

Check out the EditForm element on line 1 of the PlayerNameComponent, with its Model attribute.  That's a Blazor provided component that translates to a Form in HTML, but with the benefit of strongly typed errors in the view if there are type mismatches.  That makes refactoring safer and easier, and it provides great IntelliSense.  It's really nice!  

By comparison an Angular PlayerName component feels very similar:

@Component({
  template:`
  <form type="submit" (ngSubmit)="addPlayer()">
    <input type="text" name="PlayerName" [(ngModel)]="playerName">
    <button type="submit">Save Player</button>
  </form>
  `,
  styleUrls:['./add-player.component.scss'],})public playerName:string;

  @Input()public defaultPlayerName:string;

  @Output()public onAddPlayer: EventEmitter<string>=newEventEmitter<string>();publicaddPlayer(){this.onAddPlayer.emit(this.playerName);}publicngOnInit():void{this.playerName =this.defaultPlayerName;}}

And here's how to use the component in angular:

@Component({
  template: `
        <app-add-player defaultPlayerName="Sally" (onAddPlayer)="myOnAddPlayer($event)"></app-add-player>
        Your name is {{ playerName }}
    `,
})
export class HomeComponent extends AppComponentBase {
  public playerName = "initial value";

  public myOnAddPlayer(playerName: string) {
    this.playerName = playerName;
  }
}

The template code looks pleasant (it is, I actually really like Angular views and data binding syntax), but before runtime there's very little syntax validation, and certainly no type checking.  And IntelliSense is poor, even if the view is in a separate .html file (I combined views and components for all code samples here for readability).

You can catch some issues with an ng build --prod --aot at the Angular CLI (even more in Angular 9 with strict template checking), but full compilations can take minutes to run on larger applications, it's not a regular part of development, and it still misses the type checking.   That makes refactorings more dangerous, and IntelliSense virtually useless.  Blazor definitely wins this category.

2. Component Level CSS: Angular++

Where Blazor really falls over is hidden away on line 8 in the Angular AddPlayerComponent code sample above: styleUrls: ['./add-player.component.scss'],.  Angular's ability to bundle component-level CSS, LESS, or SCSS styling is essential in a SPA app of any size.  I simply could not return to a framework without it at this point.  Fortunately, it may be on the horizon: check out this Blazor issue on CSS isolation.  Once that's solved Blazor will have removed a huge negative for me.

3. Validation: Angular++


Take another look at Blazor's AddPlayerComponent from the perspective of validation.  I left in the DataAnnotationsValidator and ValidationSummary to show how extremely simple validation is in Blazor.  It just picks up and uses C# data annotations.  I love that.  Unfortunately it just doesn't feel as robust as Angular validation.

Angular can track dirty state, or invalid state on a per field basis and roll it up to the form or even sub-form levels (imagine you have a form with multiple sections).  The amount of flexibility offered in the reactive forms model (as opposed to the template driven forms approach I showed above) provides a huge advantage and I couldn't find anything comparable in Blazor (although as with everything Blazor I'm new at this, please write in the comments if I missed something).  So validation is a win for Angular, but in its simplicity, Blazor's got game.

4. Tooling: Angular++

You were expecting me to give Blazor the win because of strong typing and IntelliSense in forms?  Not so fast.  There are about three other failings that overshadow that win.

First, Adding a new component, directive, or pipe in Angular is easy with the Angular CLI.  Simply ng generate component MyNewComponent and you have a component class, view template, CSS/LESS/SCSS file and a test file, and Angular registers it for you.  Blazor, on the other hand, gives you none of that.  If you want separate view and component files you have to know to add a "code-behind" of the correct name and make it partial.  Boo.

Next, while IntelliSense worked great inside of forms, I found it frequently failed to find built-in components like the aforementioned ValidationSummary, which I had to know about and copy-paste in.  Also, frequently view errors failed to show up as compiler errors but only showed up in DevTools at runtime, or sometimes in some hidden generated file for the view that would randomly show up in the IDE.  Boo.

Finally, Angular's live-reload makes its dev innerloop faster.  The closest I could come with Blazor was hitting Control F5 (Run Without Debugging), and then I could make changes to .razor or .css files (just not code) and refresh, and I'd see non-C# changes quickly.

Overall tooling was a big win for Angular, but stay tuned, I bet Blazor will come out strong in the next version.

5. Maturity: Angular++

Maturity of a platform is important because running into edge cases or exploring a new scenario that lacks an answer on StackOverflow can add big delays to your project.  I only ran into a few such issues building TyperShark, and was actually impressed with the content already out there.  Blazor clearly has a passionate fan base.  Nonetheless, Angular wins this category.  If you're building a production app and have a tight deadline stick with the mature platform.

6. Language: Razor++

 Controversial opinion alert


According to StackOverflow's 2019 developer survey C# is the 10th most loved language while TypeScript is 3rd.  There's a simple explanation for this.  Those developers are all stupid, and I'll grant this category to Razor without further debate.

Ok, I lied, one more word on this.  Retrieving data from the back-end in Angular typically involves RxJS subscriptions.  I find RxJS to be overkill and obtuse in 99% of scenarios.  Consider this RxJS code:

this.userService
    .findAll()
    .finally(() => {
        finishedCallback();
    })
    .subscribe(
        (users: UserDtoPagedResultDto) => {
             this.users = users.items;
             this.showPaging(users);
         },
         err => console.log('HTTP Error', err),
     );

vs the alternative in Razor:

try {
    var users = await _userService.FindAll()
    _users = users.Items;
    ShowPaging(users);
} catch (Exception ex) {
    Logger.LogInformation("HTTP Error", err);
} finally {
    FinishedCallback?.Invoke();
}

If the first code snippet doesn't raise your blood pressure and the second one lower it, you may need to see a doctor.

7. Debugging: Angular++

For now Blazor WebAssembly can't break on unhandled exceptions or hit breakpoints during app startup.  This was a big frustration of mine.  It meant that for most errors I had to copy stack traces out of Chrome Dev Tools and paste them into Resharper's Browse Stack Trace tool (best hidden feature ever).  I know this will be fixed soon, but it is very frustrating now.  The good news is, once this is fixed I suspect I'll prefer the Visual Studio debugging experience.

8. Testability: Tie

Blazor is extremely testable.  Everything Blazor provides is an interface for mockability, and dependency injection is a first class citizen.  They clearly borrowed extensively from Angular's strengths.  If Microsoft's historical lack of respect for testability has scared you off before: reconsider, it's no longer an issue.

9. Interop: Angular++

Obviously JavaScript Interop, the most common scenario, isn't an issue in Angular, so Angular wins.  That said, calling into .Net Code from JavaScript (e.g. TyperShark's onkeypress event handler) or calling into JavaScript from .Net with IJSRuntime is extremely easy.  Furthermore, integrating with packages pulled down from npm is doable, although you might be doing it wrong if you need to.

Conversely, interop goes both ways.  If you have a NuGet library that doesn't exist in JavaScript that you need client-side, then Angular falls flat and Blazor triumphs!  That scenario seems far less likely given the massive JavaScript ecosystem, so I'll have to give the win to Angular.

10. Code Sharing: Blazor++

I saved the best for last.  typershark.io can run in single player mode or multi-player mode.  It has a core engine that produces sharks, tracks active sharks, figures out when sharks have timed out, and tracks which users (assuming multi-player mode) have typed which elements of the sharks.  It sends notifications out like: SharkAdded, GameOver, or GameChanged.  It's not super complicated, but it's not super simple.  What's beautiful about it: I was able to get it to run client-side for offline support in single player mode or entirely server-side with SignalR callback events when run in multi-player mode.  

Let me repeat that: the exact same C# code could run either in the browser or in the server based on a runtime condition.

This feature could be enormous, depending on what you're building, and the fact that I never once needed to think about where my code was running was amazing.  

Granted, you could probably get the same thing with node.js and Angular, but if you're using an ASP.Net Core stack and you also love C#, then this can be an absolutely awesome feature.

Conclusion

If the game sounds fun check it out at typershark.io (keep your expectations low).  If the code sounds interesting check it out on github (I accept pull requests).  If you're interested in more details about how I built it keep an eye on my blog and/or subscribe to Code Hour.

More importantly, should you start your next project with Blazor WebAssembly?  It depends.  If you have a tight deadline, need a lot of JavaScript interop, or need maturity and stability, then go Angular, Vue or React.  However, if you need to share C# code client-side and server-side, have a NuGet package that you want to interop with, or like me just really love C#, then pick Blazor.  Either way Blazor is bright and shiny and fun to work with today, and it has an even shinier future ahead.  I'll be keeping a sharp on it, if you've read this far you definitely should too.

Deploying ASP.Net Boilerplate Apps for Devs in a Hurry

$
0
0

I've deployed two apps based on ASP.Net Boilerplate (Angular + ASP.Net Core) through to production.  The second used Azure Kubernetes Services.  It's slick, sophisticated, self-healing, extremely scalable, uses infrastructure as code with a multi-stage Azure DevOps build pipeline, and it's micro-services are independently deploy-able.

That second site is awesome.  It's also complicated, took a lot of effort to build, and will take a lot of effort to maintain.  This is not its story.


This is the story of my first site, where I threw the SPA (Single Page Application) into ASP.Net Core's wwwroot directory, and slung it up to Azure App Services as a single site, and called it a day.  Kind of mostly.

Anyway, it didn't need micro-services, massive scalability, self-healing, and all that mumbo jumbo.  It just needed to be simple, quick to build, and easy to maintain.

If deploying a SPA in an ASP.Net Core site is in your future, you're in a hurry, and quick and easy sounds good: this article is for you.  I'll go over it in five steps:

  1. Create Database
  2. Deploy Database
  3. Create App Service
  4. Compile and Deploy Host
  5. Compile and Deploy Angular

If you're already familiar with deploying Azure Resources via the Azure CLI skip to step 5, else here's the how to create and deploy starting from zero, optimizing for simplicity:

1. Create Database

Obviously we need a database.  Using the Azure Portal is wonderful, but let's say we want repeatability.  Perhaps for other environments (e.g. test/prod), or for subsequent projects.  So let's use a script.

But how to avoid the problem of running it twice and creating duplicate resources?  Parameters, right?  And if statements to ensure the resource doesn't already exist.

But what if we want to make a resource change, e.g. to the database SKU, and deploy it through to multiple environments?  This is sounding complicated, and it's what products like Terraform are made for.  With Terraform we can describe the desired state using configuration as code and the tool looks at actual state and makes it happen, like magic.

Terraform sounds awesome (it is), but let's avoid 3rd party dependencies and not worry about idempotence at all for now.  I'm also sorely tempted to use Cake and the world famous (not really) Cake.Azure CLI Plugin, but we're in a hurry, let's avoid all nonessential 3rd party dependencies 😢.

# todo: Use Terraform# todo: Convert this all to Cake for dependency management$resourceGroupName = "LeesStoreQuickDeploy"$location = "eastus"# login to Azure interactively, fyi this won't work in scripts
az login

# create a resource group to hold everything
az group create -l $location-n $resourceGroupName# create a sql server$sqlUsername = "[username]"$sqlPassword = "[password]"$sqlName = "leesstorequickdeploy"
az sql server create -g $resourceGroupName-n $sqlName `
    -u $sqlUsername-p $sqlPassword-l $location# create a sql database$sqlDbName = "LeesStoreQuickDeploy"
az sql db create -g $resourceGroupName-s $sqlName-n $sqlDbName `
    --compute-model "Serverless"-e "GeneralPurpose"-f "Gen5" `
    -c 1 --max-size "1GB"


2. Deploy Database

Obviously we need to get the database tables created and insert some data.  That's exactly what the Entity Framework Migrations are for.  

It'd be tempting to update appsetting.json with the connection string info from step 1 and run dotnet ef database update or Update-Database just like we did locally.  However, that approach won't support the multi-tenancy multi-database scenarios granted by ASP.Net Boilerplate (see also Multi-Tenancy is Hard: ASP.Net Boilerplate Makes it Easy).  Furthermore, if we ever do a multi-stage Azure DevOps pipeline, we'd want to publish a single asset that we could download and run in each stage for each environment.

Fortunately, this is exactly why ASP.Net Boilerplate provides the "Migrator" command line application.  We just need to compile and run it.

# note: convert connection string to a parameter, or at the very least#     don't check it in to source control (the way I did ;) )$connectionString = "Server=leesstorequickdeploy.database.windows.net;Initial Catalog=LeesStoreQuickDeploy;UID=lee;Password=[pwd];"# cleanRemove-Item".\dist\Migrator\*.*"# publish migrator (single file so we can publish it as an asset)
dotnet publish -c Release -o ".\dist\Migrator" `
    -r "win-x64"/p:PublishSingleFile=true `
    .\aspnet-core\src\LeesStore.Migrator
Copy-Item".\aspnet-core\src\LeesStore.Migrator\log4net.config" `
".\dist\Migrator"# run migrator with customized connection stringPush-LocationSet-Location".\dist\Migrator"$env:ConnectionStrings__Default = $connectionString.\LeesStore.Migrator.exe -q
Pop-Location


3. Create App Service

✔ Databases & Migrations
❔ Webs of Azure

There are many options to deploy a website, even narrowing the universe to Azure.  They all have pro's and con's.  Virtual Machines (IaaS) are expensive and require maintenance.  Kubernetes is complicated.  Azure's Web App for Containers Instances is pretty awesome, and ASP.Net Boilerplate is already containerized.  But then we'd need to maintain the container image and it adds complexity.  

App Services are simple and fast, and good enough for most scenarios:

$appServicePlan = "LeesStoreServicePlan"$webAppName = "leesstore2"
az appservice plan create -n $appServicePlan-g $resourceGroupName--sku Free -l $location
az webapp create -n $webAppName-g $resourceGroupName-p $appServicePlan


4. Compile and Deploy Host

A website without code is like a taco without fillings: an abomination.


To fix it first we have to set the connection string.  The rest should be relatively easy, just dotnet publish, compress the results, and upload them with an az command:

# set connection string
az webapp config appsettings set-n $webappname-g $resourceGroupName--settings ConnectionStrings__Default=$connectionString# compile
dotnet publish -c Release -o ".\dist\Host".\aspnet-core\src\LeesStore.Web.Host

# zip
Compress-Archive -PassThru -Path ".\dist\Host\*"-DestinationPath ".\dist\Host.zip"# upload
az webapp deployment source config-zip -n $webappname-g $resourceGroupName--src ".\dist\Host.zip"

Maybe not so easy.  If we run that script the chances are good we'll get some error about an IP restriction:

SqlException: Cannot open server requested by login. Client with IP Address is now allowed to access the server. To enable access use the Windows Azure Management Portal or run sp_set_firewall_rule on the master database to create a firewall rule for this IP address or address range.

Either add the IP to the SQL Firewall, or allow all Azure resources to access it like:

# add firewall rule for access from Azure services
az sql server firewall-rule create -g $resourceGroupName-s $sqlName `
    -n Azure --start-ip-address 0.0.0.0 --end-ip-address 0.0.0.0

Problem solved.  Of course, behind every good error there's always another error:

Failed to fetch swagger.json. Possible mixed-content issue? The page was loaded over https:// but a http:// URL was specified. Check that you are not attempting to load mixed content.

This sneaky problem is most likely that ASP.Net Boilerplate depends on knowing the host URL, the Angular URL, and any other possible URL's for CORS.  Because we're going to publish Angular at the same URL we can set all three to the same URL, and per the error above they're currently set to http://localhost:[someport].  At some point we might add a custom URL and custom SSL cert, but for now we can just override them with the azurewebsites.net setting:

# set url's$url = "https://leesstore2.azurewebsites.net/"
az webapp config appsettings set-n $webappname-g $resourceGroupName `
    --settings `
    App__ServerRootAddress=$url `
    App__ClientRootAddress=$url `
    App__CorsOrigins=$url

And with any luck Swagger! 😁

Swagger UI

5. Compile and Deploy Angular

That's great.  But however much devs might like that UI, users won't exactly be blown away.  We need the Angular site.

Step one is to compile the SPA.  With Angular that's as easy as ng build --prod.  Throwing on an --aot, however, will catch more compiler errors, that's good.  Then let's send the resulting site to a temporary location and move it to the Hosts's /wwwroot folder.

# Compiler angularPush-LocationSet-Location".\angular"
ng build --prod --aot --output-path "../dist/ng"Pop-LocationMove-Item"dist/ng""aspnet-core/src/LeesStore.Web.Host/wwwroot"

If we run the Host site now, it'll continue to throw up the Swagger site.  That's because the call to app.UseStaticFiles() in Startup.cs excludes default files, like Angular's oh so important index.html.

We could either add app.UseDefaultFiles(new DefaultFilesOptions()); or replace the app.UseStaticFiles() call with app.UseFileServer() and now if we run it locally (remembering to update the App section of appsetting.json) then Angular works at our Host port of 21021!

LeesStore Login Page

Not bad, but there's still two problems.

Problem 1 - appconfig.json

If we rerun the deploy script now things fail on the server:

GetAll net::ERR_CONNECTION_REFUSED

See the issue?  The immediate error and the underlying problem are both in the screenshot.

The immediate error (in the Console) is that the site made a request to http://localhost:21021/.../GetAll.  The underlying problem (in the Network tab's Response window) is that when it made a call to appconfig.production.json, both the remoteServiceBaseUrl and the appBaseUrl were wrong.  

We could fix those problems in a variety of ways, but I especially like adding ASP.Net Core middleware to catch that request and dynamically generate the values based on what's in the appconfig.json (or in environment variables).  Check this out:

publicclassStartup{...publicvoidConfigure(...){...
        app.UseCors(_defaultCorsPolicyName);
        
        app.UseDynamicAppConfig(_appConfiguration);//app.UseSpa();
        
        app.UseFileServer();...}}

Ha, a setup, didn't see that coming did you?  We just used an undefined UseDynamicAppConfig() extension method in Startup.cs/Configure().  Again, this time for real:

publicstaticclassDynamicAppConfigMiddlewareBuilder{publicstaticIApplicationBuilderUseDynamicAppConfig(thisIApplicationBuilder builder,IConfigurationRoot appConfiguration){var serverRootAddress = appConfiguration["App:ServerRootAddress"];var clientRootAddress = appConfiguration["App:ClientRootAddress"];return builder.UseMiddleware<DynamicAppConfigMiddleware>(serverRootAddress, clientRootAddress);}}publicclassDynamicAppConfigMiddleware{privatereadonlyRequestDelegate _next;privatereadonlystring _serverRootAddress;privatereadonlystring _clientRootAddress;publicDynamicAppConfigMiddleware(RequestDelegate next,string serverRootAddress,string clientRootAddress){
        _next = next;
        _serverRootAddress = serverRootAddress;
        _clientRootAddress = clientRootAddress;}publicasyncTaskInvoke(HttpContext context){conststring appConfigPath ="/assets/appconfig.production.json";var isRequestingAppConfig = appConfigPath.Equals(context.Request.Path.Value, StringComparison.CurrentCultureIgnoreCase);if(isRequestingAppConfig){string response =GenerateResponse();await context.Response.WriteAsync(response);}else{await _next.Invoke(context);}}privatestringGenerateResponse(){var cleanServerRootAddress = _serverRootAddress.TrimEnd('/');var cleanClientRootAddress = _clientRootAddress.TrimEnd('/');return $@"{{
""remoteServiceBaseUrl"": ""{cleanServerRootAddress}"",
""appBaseUrl"": ""{cleanClientRootAddress}""
}}";}}

That looks complicated, but it just intercepts any requests to /assets/appconfig.production.json and writes out a string json in GenerateResponse() that includes values from the appConfiguration.

I love the idea of dynamically generating that config file rather than duplicating values, it feels very clean.  And it even works!

Rerun the deploy script, and holy cow!

Home page for uncustomized ASP.Net Boilerplate Site

We can log in and access the database!

And you know that's exciting because I just ended three paragraphs with exclamation points! (four?  ugh, stupid off by one errors)

Problem 2: Angular Server-Side Routing

But behind any apparent success there is at least ... one minor problem.  In this case if we refresh the page on any URL other than the root we get a 404.  This is a server-side routing problem.  We need any requests to /app/[anything] to get rerouted to /index.html.  Fortunately that's easy to fix with a little more middleware magic.  Check out the app.UseSpa(); call on line 11 of Startup.cs above.  If we uncomment that and add the following middleware:

publicstaticclassSpaMiddlewareBuilder{publicstaticvoidUseSpa(thisIApplicationBuilder app){
        app.Use(async(context, next)=>{awaitnext();if(context.Response.StatusCode ==404&&
                context.Request.Path.StartsWithSegments("/app")&&!Path.HasExtension(context.Request.Path.Value)){
                context.Request.Path ="/index.html";awaitnext();}});}}

Now we can refresh on any page in Angular and it all just works.

🎉 Done!

We're done!!  This warrants even more exclamation points!!!

SPA's add deployment complexity, but that deployment was pretty quick and easy.  If you're interested in the source code check out Pull Request 22 on LeesStore on GitHub.  Now we just need to rewrite it all in Cake, use Terraform, and automate those scripts to run on the server.  Tomorrow perhaps.

Was this interesting?  I'd be happy to dig into more complex ABP deployment scenarios, just let me know in the comments or on twitter.

Six Lessons Learned and a New Tool Published After Organizing My 1st Virtual CodeCamp

$
0
0

6 lessons learned while moving the NoVA Code Camp online, and announcing Sessionized, a new open source app for Code Camp organizers

2020 hasn't generally been an awesome experience, fortunately organizing NoVA CodeCamp in a post-COVID world was.  I met wonderful people, gained an appreciation for all conference organizers, and felt like I helped the developer community grow.  

In this post I'll share what I learned organizing an event for my first time ever, introduce an open source tool I just published for other organizers, and hopefully provide information to help decrease stress for others figuring out how to move forward in a post-COVID world.

1. Expect More Response in Call for Speakers

NoVA Code Camp has used Sessionize for a long time.  It's a great tool for capturing and evaluating presentations.  It costs nothing for free conferences like ours, is great for communicating with speakers, and as I'll explain shortly: has an awesome API.

During call for speakers we received 75 fantastic submissions from a variety of locations and time zones (not just Northern Virginia).  75 was about 50% more than usual thanks to being online.  However, reading through 75 presentations turned out to be a lot of work and I wish I'd started earlier and known to put extra time into the schedule for evaluation.


2. Plan Shorter Sessions

Historically our sessions have been 75 minutes each, which equates to 5 sessions in a track.  With 37 speakers we would have need over 7 tracks!  We only had 4 volunteers, so that simply wasn't going to work.

At the same time, I was interviewing several experienced online organizers to get tips and tricks (thank you Alex SlotteJim Novak, and of course Ed Snider the main organizer for NoVA Code Camp in years past).  One individual suggested that online audiences had a shorter attention span and that sessions should be shorter.

Voila, with a little culling (not easy!), and a reduction to 60 minutes (45 for presentations + 10 minutes for Q&A + 5 for a coffee break) we made it all fit.  I have no data to prove the shorter attention span theory, but the conference timing seemed to work out nicely.


3. Create Speaker Cards

Marketing an online event is substantially different from marketing an in-person one.  Once call for speakers closed we did the normal things: e-mailing previous attendees, notifying leaders of nearby meetups, and creating a registration page on Eventbrite (which also has no cost for free conferences).  That achieved a moderate response.

Then one of our speakers, Gant Laborde, who speaks regularly, made the suggestion of "speaker cards" to help the speakers to promote the event like he'd seen at a react conference.


Sounded great, but the thought of making 27 images in Paint.Net was cringy (as my daughter would say), and so (of course) I wrote an app instead.  It pulled Sessionize data from their API, provided text for the 27 tweets with speaker twitter handles, and linked to a "speaker page".  


The speaker page it linked to provided a picture, presentation description, speaker bio, and a link to our Eventbrite registration page.  Then I just took screenshots of each speaker page, copied the tweets, and pasted them all into Buffer for posting slowly over many days.

It worked beautifully.  The speakers loved it, it helped them promote, and we ended up with nearly 200 registered attendees by the day of.  Incidentally, that 200 translated to 70 at peak, which is a good showing historically:


4. Allow Audience Interaction

Audience interaction is a critical element of a Code Camp, and conferences generally.  But how to reproduce that in-person feel while preventing unsavory individuals from doing inappropriate things?

We chose Discord to solve that problem.  It allowed attendees to interact with each other and the speakers and the organizers.  And it has automated tools for spotting inappropriate content.  We additionally posted a code of conduct and had one of our organizers (Stan Reiser) who was an expert with Discord set up permissions and train everyone on how to mute and boot.

5. Perform 1-1 AV Checks For Everyone

Personalized one-on-one AV checks for each speaker probably saved the conference.

We'd settled on Microsoft Teams for the main event after much research and deliberation because it was inexpensive and their "Live Events" feature looked awesome for attendees.

Live Events allowed attendees to easily join without authenticating, provided Tivo-like features of pause and rewind, was mobile friendly, recorded presentations for later viewing or posting to YouTube (see also our new NoVA Code Camp YouTube Channel), and provided a moderated Q&A.  


Sounded great, but not everyone loved Teams.  While the experience was excellent for attendees, getting speakers logged in as guests accounts in our single-user Office 365 account was finnicky.  The good news for subsequent organizers: we talked with a Microsoft employee who said these were known issues and will be resolved in the next update.

Regardless, the number one piece of advice I can offer other organizers: leave a couple weeks in the schedule to do AV checks for every single speaker.  27 AV checks would be too much for any one person to do while staying employed.  Fortunately, we assigned one moderator as MC for each channel so no one person had to do more than 7 AV checks.

In the check we ensured everyone could get in (the hard part), their audio sounded crisp and clean, the moderator pronounced their name correctly, they understood the 10 second delay, and understood how to work the moderated Q&A.

6. Sell Your Speakers During the Event (Announcing, Sessionized!)

Everything seemed to be in order for the big day, but one last concern: Having attendees navigate through 27 presentations to pick which ones to attend could be intimidating.  And how to keep people engaged after a talk ended?

The default grid that Sessionize provides (pictured earlier in green) was ok, but it isn't especially pretty or usable.  It also doesn't provide links to "watch now".  It wasn't going to cut it for an online conference.

Fortunately implementing per-track and per-time slot views with links to speaker details pages with the app I'd already started only took a couple more evenings:


Oh, and the moderators also asked for slides to show when out to lunch or if there were technical difficulties.


But fortunately we never had to show that last screen.  The CodeCamp went off without a hitch.  Thanks to a great team (Scott LockLaBrina Loving, and Stan Reiser) and a lot of hard work up-front, all of the speakers got in, none of the Internet's unsavory characters did, and a good time was had by all😁.

And since it wasn't much extra effort to genericise and open source the tool, why not?  Thus I just published sessionized.  I hope it helps another CodeCamp organizer somewhere.  You can view NoVA Code Camp's implementation here.

Summary

2020 has brought many changes, most of them not so great.  However, for Code Camp I think our changes were mostly positive.  Of course I missed the in-person interaction (and the cronuts), but moving online brought us our first international speaker (thank you Emanuil), the coffee was better (no offense Stan), we had a long time volunteer turned first time speaker (Go Vijay!), a new volunteer (yayy LaBrina!), and many excellent first-time and returning speakers to NoVA Code Camp (thank you all!).

Overall we had an excellent Saturday of fun, learning, and networking all while staying safe.  There was much rejoicing.  And if you're an organizer I hope this post will help you find your way to much rejoicing at your next event.

Add Superpowers to Your Next ASP.NET Project with the ABP Framework

$
0
0

Two years ago I discovered ASP.Net Boilerplate and on two subsequent projects realized enormous time savings and quality improvements thanks to it.  The ABP Framework (aka ABP.IOis the next version of ASP.Net Boilerplate, and it promises the same benefits, but on a cleaner, more modern stack.

I've held off writing about the ABP Framework because when 1.0 was released, in 2019 with .NET Core 3, I felt it wasn't sufficiently mature to start a new project on ... yet.  But with the launch of ABP Framework version 4.0 last week, which supports .NET Core 5, it's time to re-evaluate.

In this post I'll review what it is, and go over the benefits and features with an eye toward what's changed since ASP.Net Boilerplate.

What is the ABP Framework?

In case you're new to it I describe both it and it's predecessor as follows:

It is:

  1. A one-time code generator for new ASP.Net Core projects, and
  2. A framework,

that provides an end-to-end working site on day 1, along with foundational features and best practices.

I like this definition because I think it's critical to understand both the code generation and framework aspects.  Code generation grants the flexibility to easily customize the generated site to fit your needs.  The framework allows the ABP.IO team to easily ship updates, enhancements and bug fixes through NuGet or NPM updates.

Previously, ASP.Net Boilerplate put the emphasis on the code-generator side. The ABP Framework instead weighs more toward the framework side, with the benefit that they can help keep your bits fresh.


ABP.IO is composed of two elements:

  1. The ABP Framework, the free and open source foundation
  2. ABP Commercial, the optional add-on component that provides additional features and grants support and helps keeps Volosoft in business

Benefits

ABP.IO provides the same benefits as ASP.Net Boilerplate: it gets you up to speed extremely fast with a well thought out domain driven architecture, a ton of pre-implemented best practices, a ton of foundational features, and excellent documentation.  Basically it allows you to kick butt on day 1, and well into the future.


Front End Features

Front-End Choices


With ABP.IO you can choose from among three front-ends.  Sadly it loses the Vue and React options from ASP.Net Boilerplate, but it still has an MVC and Angular front end, and the best news is it giveth where it taketh away with: Blazor!  I generated a quick Blazor app and gave it a quick once-over and so far it looks great, just like the Angular one (see also Blazor vs Angular).

Themes

One thing that's entirely new with the front-end is themes:


Themes are nice if you're on ABP Commercial, because the "Lepton" themes are attractive and you have several to choose from.  If you're on the free ABP Framework there's a base one for all front-ends or several community developed ones to choose from (currently only for MVC and Razor front-ends).

If you need to heavily customize the look and feel of your site you will likely find themes are more work than with ASP.Net Boilerplate, especially in Angular.  But, themes do allow the framework to send down bug fixes and enhancements, so this is a trade off.

UI Helpers

UI helpers are a new super helpful front-end feature.  They offer reusable components that are far less code duplication than the previous version.


The table helpers in particular (for Angular) make building data tables with pagination, sorting, and filtering super easy.


Auto-Generated Service Proxies

Just like in ASP.Net Boilerplate ABP.IO gives you Swagger files out of the box with Swashbuckle.  However, in the Angular world ABP.IO drops NSwag in favor of a custom Typescript proxy generation with it's own CLI.  One benefit is many smaller files rather than one gigantic proxy file.


Back-End Features

If you've ever started a new project you know there's a lot of things to set up, and a lot of ways to do it wrong.  This is where ABP.IO shines.  It takes care of everything, and correctly too.


There's simply too many back-end features to cover.  But here's an attempted quick overview anyway:

  • Dependency Injection - ABP.IO removed Castle Windsor, and replaced it with Microsoft's dependency injection extension library implemented via Autofac, huge win! 🎉
  • Logging - ABP sets up ASP.NET Core's logging system for you, and now it additionally logs all EF SQL queries for easier performance debugging 😎
  • Localization - Awesome feature front-to-back, but now in json and with Microsoft.Extensions.Localization instead of xml
  • Authorization - Declarative based authorization with permissions has always been a super power of ASP.Net Boilerplate, and it's just as awesome in V2, but now it has better support for oAuth 2 and Identity Server
  • Multi Tenancy - If you need this feature you need to use ABP.IO, it will save weeks of dev effort (see also Multi-Tenancy is Hard: ASP.Net Boilerplate Makes it Easy).
  • DDD Based App Services - The DDD approach helps organize project code and keep it maintainable while framework implemented CRUD base classes help you avoid a ton of boilerplate
  • Repository Pattern - Great for modularity and simplified unit testing
  • Validation - Server-based validation is simple and DRY, just as awesome as it had been
  • Auditing - I have always loved this feature.  By simply implementing an interface (IFullAuditedAggregateRoot) you get modified date, modified by, created date, and created by: no extra coding
  • Soft delete - Just implement an interface and delete operations fill in an IsDeleted column, and data retrievals ignore records where it's true.  Fantastic.
  • Exception Management - This is hard to do right, but ABP.IO kills it.  Unexpected exceptions product detailed logs and a pleasant generic message to the end user.
  • And more - ABP.IO brings forward a ton of awesome features like SignalR setup, background jobs, an event bus, and modules adds a ton of new features like C# based data-seeding and the Virtual File System

Summary

That's a quick overview of ABP.IO.  Having dug into the details, I would choose it for my next project.  I recommend it.

If you're interested in a deep dive on the details including two technical demo's please check out my hour long Code Hour episode on ABP.IO.


If, after watching that you don't choose ABP.IO for your next project, I'll be surprised.  After all, why wouldn't you want to be a superhero on your next project?

The One Thing I Wish I'd Known Before Using Cake

$
0
0

Set yourself up for success on your next DevOps project by avoiding this gnarly Cake mistake


 Let's cut to the chase: A little known Werner Heisenberg axiom discovered during his 1927 quantum physics research states:

An equal number of calories spent on Ben and Jerry's Americone Dream Ice Cream is unequivocally more satisfying than those spent on any slice of cake, ever.

Wow!  If only I'd known earlier.  That guy was frickin brilliant!


While that anecdote is 100% true, this post is less about the cake certainty principal, as no one calls it, and more about the dependency management tool Cake, as in C# Make.  I've blogged about it manymany, times.  It's the C# equivalent to Grunt, Gulp, Maven, Rake, PSake, and replaces that nasty pile of PowerShell / bash scripts you keep in abject shame hidden away inside a folder /BoringImagesNothingToSeeHere.

Now any kind of software that tracks tasks and their dependencies rather than mindlessly running procedural code is typically offered by a tool that rhymes with make and is wonderful (yea you heard me right "psake", Japanese rice wine need not apply).  Dependency management tools decrease complexity and organize DevOps spaghetti.  But Cake has an unfortunate problem that's only apparent after several years of it building it up.

Are you ready for this?  Sure?


Holy jebus, what is that?!

That, my friends, is a single 2,000+ line build.cake file amassed after two years of active development split into 10 columns in VS code, zoomed out to max, as viewed on a 4K monitor.

It's also what space aliens use to terrorize computer science abductees into catatonia.  It's use is now expressly forbidden under the Geneva Convention.  

Sadly, I am it's author.  

Wait, don't judge.  I mean, it's gotten better.  I swear: it's now all puppies and kittens dancing in synchrony on rainbows.  It's been nominated for a Nobel peace prize.

Happy ending, but you might not be so lucky.  If you are considering adopting Cake, and you absolutely should, here's the one bit of advise I wish I'd known:

Don't use a build.cake file.

Whoa, heresy.  Build.cake is the default file Cake uses when you initiate it with build.sh or build.ps1.  It's the file generated when you run the command "Install to workspace" in VSCode (from the Cake plugin).  Using anything else is inconvenient, poorly documented, and just weird.  If you hid that idea in a box even Erwin Schrödinger would agree it was dead.

Yet if you follow the easy path and put all your tasks in there by default like I did, you will end up with the afore mentioned large file problem, which becomes a maintenance nightmare but furthermore lacks encapsulation, a core tenant of good design.  In other words every task can access every other task, method or property even if it's completely unrelated.  And if one task needs a plugin, all the tasks get that plugin.

Maybe there's a middle path.  Let's explore our options.

The best tool available to solve Cake's weak sauce encapsulation story is the load directive:

#load OtherFile.cake

Once you start thinking about the large file and encapsulation problems and the only real tool you have to fix it, without giving up on build.cake you'll likely come up with this solution:


Have one file per "public" Task, and make build.cake reference each of those.  This was the intrim step I took to solve my large file problem.  I thus had all the e.g. deployment tasks in one file and all the environment creation in another, and a nearly empty build.cake.

This solution is good and relatively tidy, files sizes are smaller, but plugin usage is still not isolated.  And it's still so tempting to slip something quick into build.cake if you (or the other dev's you're hoping to empower by writing DevOps in a language the whole team can understand) are in a hurry.

If I were starting Cake DevOps scripts on a new project I'd remove build.cake entirely:


Temptation removed.  Plugin usage is isolated.  And it's now clearer that any new "public" tasks like a new "Run UI Automation Tests" should be placed in a new dedicated file along with all dependencies.  It's also easier to refactor as things grow more complicated:


And before you accusing me of offering high level advice without any specifics, here's how to specify a custom cake file on a PC:

.\build.ps1 -Script deploy.cake -target=deploy

And here's how it looks on Linux/Mac:

./build.sh --script 'deploy.cake' -target=deploy

Subtle differences, case matters.

Conclusion

Rocket Science?  Not so much.  Is this insight on the level of Heisenberg's Americone Dream Axium.  Sadly, no.  But perhaps avoiding the use of deploy.cake will prevent your imminent trial at The Hague.  Just maybe.

Cake Frosting: More Maintainable C# DevOps

$
0
0


This week Cake V1.0 was released and with it: an upgrade to Frosting, a more robust technique for writing DevOps in a language the whole team can understand.  The timing is fantastic, because last week I just posted The One Thing I Wish I'd Known Before Using Cake, in which I warned of uncontrolled growth of the more traditional build.cake file.  The solution I offered there still stands, however Cake Frosting offers an even better solution for modularity, encapsulation and maintainability.  And the tooling is better too, if you're ready to accept some tradeoffs.

What Is Frosting?

Cake Frosting is one of four Cake "Runners", which are ways of running Cake and gaining access to it's vast plugin ecosystem and it's "Dependency Management" pattern whereby you define tasks and their dependencies rather than running C# code linearly.  The four options are:

  • .NET Tool
  • .NET Framework
  • .NET Core, and
  • Frosting

The first three runners require building in a DSL, a domain specific language, created by the Cake team to remove unnecessary C# chrome and make your C# DevOps code concise and pretty.

That last runner allows you to abandon the traditional Cake DSL and instead write DevOps inside a .NET Console App with the addition of a Cake context and some custom attributes.  

Essentially, instead of writing a DSL like this:

projDir =Directory("./src");Task("Build").IsDependentOn("Clean").Does(()=>{DotNetCoreBuild(projDir)});

With Frosting you write it like this:

// Cake DSL aliases like DotNetCoreBuild are extension methods off ICakeContextusing Cake.Common.Tools.DotNetCore;[TaskName("Build")][IsDependentOn(typeof(CleanTask))]publicsealedclassBuildTask:AsyncFrostingTask<BuildContext>{publicoverrideTaskRunAsync(BuildContext context){var projDir = context.Directory("./src");
        context.DotNetCoreBuild(projDir);return Task.FromResult(true);}}

Granted I threw in some unnecessary asynchronicity to show it's support, but that still looks far more verbose by comparison.  That's the big downside.

However, in exchange for that verbosity you get C# classes with all of the modularity, encapsulation, and maintainability that infers.  Furthermore, it's strongly typed, so unlike with the DSL if you mistype a variable, method, or alias, the tooling reliably tells you before you compile, let alone before you run.  And Intellisense works reliably.  Even better, you get refactorings and static analysis and maybe ReSharper if you're into that kind of thing.

Lastly: check out line 5 where it's got strongly typed dependency management.  So not only will the Cake runner ensure when you run BuildTask, that CleanTask and any of it's dependencies are run (and only run once), but it will give a compiler error if CleanTask is renamed.

Getting Started

The Frosting setup documentation is fairly straight forward, but here's a quick recap:

Prerequisites:

  • .Net Core 3.1.301 or newer
  • Mac, Windows, or Linux
  1. Install Cake.Frosting.Template, which is a .NET Tool template pack that allows you to quickly create new Frosting projects.  This is global, you only need to do it once.

dotnet new --install Cake.Frosting.Template

2. Go to an empty folder and create a project based on the Frosting template from above

dotnet new cakefrosting

3. Run it with either the PowerShell or Bash bootstrapper

.\build.ps1 --target=Default

./build.sh --target=Default

That's it, Cake just executed a "Default" task, it's dependent "World" task and it's dependent "Hello" task.


If you investigate the generated files you'll see the two bootstrappers, and a /build folder with a .csproj and a Program.cs file.  


The Program.cs is the equivalent of Cake's traditional build.cake file, except with extra code for setting up a BuildContext object.


Adjusting To Frosting

If you're coming from the Cake DSL world then you'll need to be prepared to make some adjustments in how you code.

Aliases

All aliases in the DSL world are actually extension methods off of the context object.  Thus in Frosting you'll need to know the namespace and have access to a context object.

For instance, if you're trying to access the CleanDirectories command like CleanDirectories("./**/bin") to remove everything in all bin directories recursively, then you'll instead need to:

  1. Import the Cake.Common.IO namespace, as found on the documentation page
  2. Invoke the command off of the ICakeContext object (e.g. context.CleanDirectories("./**/bin");)

Directories / Files

If you're used to the convenience of Cake's ConvertableDirectories and ConvertableFiles where you can just concatenate Files and Directories together like:

var projectDir =Directory("./project/");var subProjectDir = projectDir +Directory("subproject");var subProjectCsProj = subProjectDir +File("subproj.csproj")

Then sadly you'll finding Frosting much more verbose.  It requires saving those objects in the constructor of the Context object.

publicclassBuildContext:FrostingContext{publicConvertableDirectoryPath ProjDir {get;set;}publicConvertableDirectoryPath SubProjDir {get;set;}publicConvertableFilePath SubProjCsProj {get;set;}publicBuildContext(ICakeContext context):base(context){
        ProjDir = context.Directory("./project");
        SubProjDir = ProjDir + context.Directory("subproj");
        SubProjCsProj = SubProjDir + context.File("subproject.csproj");}}

The convenience may or may not be worth the inconvenience.

Plugins and Tools

Fortunately some things are nearly as simple.  With the DSL accessing plugins was a directive at the top of the file:

#addin "nuget:?package=Cake.AzureCli&version=1.2.0"

(shh, that's my open source AzureCli Cake plugin I'm quietly plugging)

The Frosting alternative is to just reference the project via NuGet.

<ProjectSdk="Microsoft.NET.Sdk"><PropertyGroup><OutputType>Exe</OutputType><TargetFramework>netcoreapp3.1</TargetFramework><RunWorkingDirectory>$(MSBuildProjectDirectory)</RunWorkingDirectory></PropertyGroup><ItemGroup><PackageReferenceInclude="Cake.AzureCli"Version="1.2.0"/><PackageReferenceInclude="Cake.Frosting"Version="1.0.0"/></ItemGroup></Project>

And tools are only slightly more complicated, requiring a call to InstallTool in Main():

publicstaticclassProgram{publicstaticintMain(string[] args){returnnewCakeHost().UseContext<BuildContext>().InstallTool(newUri("nuget:?package=ReportGenerator&version=4.8.1")).Run(args);}}

Summary

I'm a big fan of Frosting, however the tradeoff should be clear by now.  Code is more verbose and many conveniences like aliases and directories are less convenient.  But the strongly typed, maintainable code you'll get back is probably worth it, especially on larger projects.  And more importantly two years into your project you definitely won't accidentally end up with a 2000 line build.cake file.  And that, my friends, is golden.


2 Ways to Log the Current User in ASP.Net Core

$
0
0

How to automatically add current user info to logs in ASP.Net Core. First shown in ASP.Net Boilerplate with log4net. Next shown in ABP Framework with the Microsoft Logging Framework and Serilog.


If you've ever had to debug a problem with a production system you know that good logs are absolutely essential.  However, knowing what information might be useful, and how much is too much is almost an artform.

I had the opportunity to develop that artform recently when I published an ASP.Net Boilerplate based system into production.  Overall the deployment went well, but I realized that I'd failed to include the currently logged in user or tenant in logs.  That made debugging issues harder.

Therefore, this is the story of how to how to add information about the currently logged in user, potentially including the tenant in a multi-tenant solution, in ASP.Net Core.  First I'll show it in ASP.Net Boilerplate with log4net.  Next I'll show how with ABP Framework and the Microsoft Logging Framework via Serilog.  Hopefully, you can find something here to adapt for your tech stack, and help you develop your inner log artistry.

ASP.Net Boilerplate + log4net

For log4net, the first trick is adding custom fields.  That happens in the log4net.config configuration file.  It turns out to be somewhat unintuitive via log4net's property{name} syntax:

<appendername="RollingFileAppender"type="log4net.Appender.RollingFileAppender">
    ...
    <layouttype="log4net.Layout.PatternLayout"><conversionPatternvalue="%-5level %date [%-5.5property{userid}] [%-5.5property{tenantid}] [%-5.5thread] %-40.40logger - %message%newline"/></layout></appender>

I surrounded the userid and tenantid fields with brackets and used the fixed-width pattern layout -5.5 to pad integer values less than 5 characters to 5 characters.

To populate those fields in log4net you need set the property on a context, which makes it available for all logs.  There are four contexts to choose from, but the one that makes the most sense here is the logical thread context, since that is the level at which requests are processed and it can persist across await points even if a different thread is used to resume the request.  The code then looks like LogicalThreadContext.Properties["userid"] = ??.  But where to set it.

The most appropriate place is in a middleware component during the request pipeline, right after authentication so that the current user is available.  In other words:

publicvoidConfigure(IApplicationBuilder app,ILoggerFactory loggerFactory){...
    app.UseAuthentication();
    
    app.UseSessionLogging();...}

UseSessionLogging is an extension method that looks like this:

publicstaticclassSessionLoggingMiddlewareUtil{publicstaticvoidUseSessionLogging(thisIApplicationBuilder app){
        app.UseMiddleware<SessionLoggingMiddleware>();}}

I chose Factory-based middleware activation in ASP.NET Core so that I could get dependency injection in order to get access to to an IAbpSession, upon which I could get the current user and tenant.  So the last piece of the puzzle is then:

publicclassSessionLoggingMiddleware:IMiddleware, ITransientDependency
{privatereadonlyIAbpSession _session;publicSessionLoggingMiddleware(IAbpSession session){
        _session = session;}publicasyncTaskInvokeAsync(HttpContext context,RequestDelegate next){
        LogicalThreadContext.Properties["userid"]= _session.UserId;
        LogicalThreadContext.Properties["tenantid"]= _session.TenantId;awaitnext(context);}}

The full code is available in LeesStore PR #30.  

Note that using other appenders like an ApplicationInsightsAppender are similar with some minor variation.  

<appendername="AiAppender"type="Microsoft.ApplicationInsights.Log4NetAppender.ApplicationInsightsAppender, Microsoft.ApplicationInsights.Log4NetAppender"><thresholdvalue="Info"/><layouttype="log4net.Layout.PatternLayout"><conversionPatternvalue="%-5level %property{userid} %property{tenantid} %message%newline"/></layout></appender>

The AdoNetAppender is slightly trickier:

<appendername="AdoNetAppender"type="MicroKnights.Logging.AdoNetAppender, MicroKnights.Log4NetAdoNetAppender">
  ..
  <commandTextvalue="INSERT INTO LogEntries ([Date],[Level],[Logger],[Message],[Exception],[UserId],[TenantId]) VALUES (@log_date, @log_level, @logger, @message, @exception, @userid, @tenantid)"/>
    ...
    <parameter><parameterNamevalue="@userid"/><dbTypevalue="Int32"/><layouttype="log4net.Layout.RawPropertyLayout"><keyvalue="auserid"/></layout></parameter></appender>

ABP Framework + Serilog

I love log4net.  I've been using it forever.  But serilog is more modern and feels more elegant.  Using it's equivalent of custom fields for a "console appender" is as simple as placing them in curley brackets in an output template set up in Program.cs:

Log.Logger =newLoggerConfiguration().Enrich.FromLogContext().WriteTo.Async(c => c.File("Logs/logs.txt", outputTemplate:"{Level:u4} [{UserId}] [{TenantId}] [{Timestamp:HH:mm:ss}] {Message:lj}{NewLine}{Exception}")).WriteTo.Async(c => c.Console()).CreateLogger();

Setting those custom fields is done with LogContext.PushProperty().  Where to place that code is a bit trickier.  I'm still a fan of a custom middleware component, but plugging in a middleware component in ABP Framework doesn't happen in Startup.cs.  That's because ABP Framework decentralizes that logic, allowing each dependent Module the ability to register custom middleware.

However, there's no need for a custom module.  Just add the middleware component like before but in the OnApplicationInitialization() method of the [MyProject]ApiHostModule.

public override void OnApplicationInitialization(ApplicationInitializationContext context)
{
    ...
    app.UseAuthentication();
    app.UseSessionLogging();
}

Then the middleware component itself is extremely similar to the last one:

publicclassSessionLoggingMiddleware:IMiddleware, ITransientDependency
{privatereadonlyICurrentUser _currentUser;privatereadonlyICurrentTenant _currentTenant;publicSessionLoggingMiddleware(ICurrentUser currentUser,ICurrentTenant currentTenant){
        _currentUser = currentUser;
        _currentTenant = currentTenant;}publicasyncTaskInvokeAsync(HttpContext context,RequestDelegate next){using(Serilog.Context.LogContext.PushProperty("UserId", _currentUser.Id))using(Serilog.Context.LogContext.PushProperty("TenantId", _currentTenant.Id)){awaitnext(context);}}}

And now the console logs contain the user and tenant.


Or perhaps you're sending them to Application Insights.  Or if you're logging them to the database you can expose them on an internal page:

The full changes are in LeesStore PR 31

Conclusion

This concludes two fairly different approaches to logging.  Hopefully you can adapt something you learned here to avoid some production pain, or just to develope your artistic sensibilities.


Stop Saving to Disk with C# Asynchronous Streams

$
0
0

My journey to solve a hard performance problem with a newish language feature: asynchronous streams. Explains what asynchrnous streams are, and shows a real world problem they can solve.


Recently I faced a fun performance challenge and ended up reducing a 3 hour job to 1.5 hours, thanks to an awesome recent C# language enhancement: Asynchronous Streams.  Whoa, so 2019 I hear you say.  I'm sure you've read some headlines and skimmed some blog posts, but have you really grokked this technology and what it means?  I hadn't.  In this post I'll quickly explain what asynchronous streams are, describe what real world problem they helped me solve, and show some common pitfalls just in case you're in a similar situation.

What Are They?

In short asynchronous streams are a language feature introduced in C# 8 that allow you to process a stream of data ... asynchronously.  Right, obviously.  An example will help.

IAsyncEnumerable<int> numbers = Producer.GetNumbersAsync();awaitforeach(var number in numbers){if(number >10)break;}

Above we're retrieving a set of numbers of type IAsyncEnumerable (an interface introduced in C# 8) and iterating over the first 10 of them with await foreach (a new language feature also introduced in C# 8).  

What's fancy here is that each iteration of the loop has a hidden await that creates a continuation and returns control to the caller, until such a time as the data provider has a new number to provide.  That returning of control to the caller is generally what await, introduced in C# 5 does.  It frees the host up to refresh the UI of mobile apps or perhaps respond to HTTP requests.  What's new with IAsyncEnumerable is that await is now a first class citizen now when it comes to enumerables.

You can see how it works if you open up the code from the prior example in ILSpy.  If you decompile and view it as a release prior to C# 8 (ILSpy is awesome that way).  


Then you end up with this:

IAsyncEnumerable<int> numbers = Producer.GetNumbersAsync();
IAsyncEnumerator<int> asyncEnumerator = numbers.GetAsyncEnumerator();try{while(await asyncEnumerator.MoveNextAsync()){int number = asyncEnumerator.Current;if(number >10){break;}}}finally{if(asyncEnumerator !=null){await asyncEnumerator.DisposeAsync();}}

Now you can clearly see that IAsyncEnumerable works almost exactly like IEnumerable did with it's .MoveNext and .Current methods.  Except three things:  

1. The method names are suffixed with the word Async

2. Everything is task based

3. There's some extra cleanup going on

Interesting, but how useful remains to be seen.

Obscure Language Feature: Meet Real World

On my project we need to download and process large files daily.  Think 60 Gig CSV files.  Technically they're 60 Gig BSON files.  If they were CSV they'd be even larger.  Whatever, the point is that we need to read and process a lot of data, and it's slow.  It takes hours.  And that's a problem because the data needs to be ready by a certain time of day and if something goes wrong we have to start over.  So we only get a couple shots, and worse: the data is going to get even bigger in the future for this customer.  We needed to find performance optimizations.

Now historically we'd treated this process in several steps like:

  1. Download file
  2. Read and process file (using DataFlow from the Task Parallel Library, which if you aren't familiar you should go drop everything and learn about)
  3. Insert results (only about 90 megs) into database

That's simplified but overall those three steps took over 2 hours.  Downloading: ~40 minutes.  Reading and processing: ~1.5 hours. Inserting: ~10 minutes.

The team spent a lot of time brainstorming solutions to performance.  But there was one thing that was bugging me about that process.  Maybe reread the the bullet points and see if anything stands up.  

Answer: Why were we saving to disk and reading from disk at all?!  Theoretically this is why streams exist.  We should be able to download the data and process it down into 90 megs and never hit the disk at all.  Right?!  

Also, that IO sounds slow, but that's a different story.

Capture Content As Stream?

But I didn't know if asynchronous streams could be applied to downloading large files over HTTP.  First of all, the team had been downloading zip files in BSON.  I needed the data to be consumable as a stream, so zipping was right out.  Consuming BSON as a stream eventually turned out to be doable, but that came later and is beyond the scope of this post.  Thus unzipped CSV for the first pass.

Fortunately, there was a way to specify in the data provider's API that we wanted unzipped CSV content.  That was going to increase the download time, but I was betting we'd make it up during processing, since the disk appeared to be such a bottleneck.

Next I was curious if the TCP packets started immediately upon request and broke at newline boundaries.  Important?  Not sure, although it does make a good picture for a blog post.


Wireshark packets looked like this:


In other words this was a packet:

`U0(ñòßGAäwÆMP'Û10d
2021-06-26T23:24:45,10.79
2021-06-26T23:24:53,97.83
2021-06-26T23:25:01,86.53
2021-06-26T23:25:09,3.83
2021-06-26T23:25:17,39.38
2021-06-26T23:25:25,37.94
2021-06-26T23:25:33,31.59
2021-06-26T23:25:41,12.55
2021-06-26T23:25:49,74.67
2021-06-26T23:25:57,95.25

Some random meta-data at top, but it ends with a newline.  Great.

Incidentally, that's actually the result of an app I built to simulate our actual data provider for the purposes of this blog post.  It's called DisklessAsynchronousStreams (maybe don't try to say that 10 times fast).  It's open source if you feel like exploring the code of this post in more detail.

Asynchronous Consumption

p.s. That's a fantastic subheading, and will absolutely be the next big diet fad, just wait and see.

Getting back to the point, I soon learned the important magic for asynchronously pulling data without writing to disk is the setting the HttpCompletionOption.ResponseHeadersRead flag when calling GetAsync() or SendAsync() on the HttpClient.  That tells the compiler to block only until the headers are received, then continue execution.  Then calls to ReadLineAsync() may proceed while data is still downloading.  More specifically:

usingvar response =await httpClient.GetAsync(
                uri, HttpCompletionOption.ResponseHeadersRead);
response.EnsureSuccessStatusCode();awaitusingvar stream =await response.Content.ReadAsStreamAsync();usingvar streamReader =newStreamReader(stream, Encoding.UTF8);while(!streamReader.EndOfStream){var line =await streamReader.ReadLineAsync();var trade =GetTradeFromLine(rowNum, line);yieldreturn trade;}


The above code works, but only because of C# 8.  Prior to C# 8 the return type would need to be async Task<IEnumerable<Trade>> .  Seems reasonable.  Except, the compiler then gives you:

The return type of an async method must be void, Task, Task<T>, a task-like type, IAsyncEnumerable<T>, or IAsyncEnumerator<T>

The easy solution with C# 8 and IAsyncEnumerable though is to return IAsyncEnumerable that can then subsequently be consumed with async foreach.

private async IAsyncEnumerable<Trade> StreamReadLines() 
{
    ...
}

p.s. if you're shaky on how yield works check out How System.Linq.Where() Really Works

Asynchronous Limitations

Here's an interesting error, guess what it means:

Message: Unable to read data from the transport connection: An existing connection was forcibly closed by the remote host.
Inner exception:
    SocketErrorCode: ConnectionReset
    Message: An existing connection was forcibly closed by the remote host.
    StackTrace:
    ...
        at System.IO.StreamReader.d__67.MoveNext()
        System.IO.StreamReader.d__59.MoveNext

If you said the remote host closed the connection on us, congratulations you can read, but sadly that is not at all what happened.  The actual problem is the consumer exceeded a buffer (it happens to the best of us) and then .NET lied to us and that made us sad.

The problem occurs when the consumer is too slow in reading the data from the producer.  Basically if data is coming in faster than we're processing it then someone needs to hold that data in a certain sized slot of memory, and eventually data will exceed the size of the slot.


Interestingly you can make it happen faster by setting a smaller value of MaxResponseContentBufferSize on HttpClient.  Unfortunately you cannot set MaxResponseContentBufferSize beyond it's default size of 2 Gigs.  Therefore make sure you don't do anything slow inside your main message processing loop.

One More Gotcha

Don't expect consumers to successfully stream read data asynchronously with Fiddler open.  Fiddler is awesome for watching regular HTTP traffic, but it batches entire requests up before forwarding them, and next thing you know you've wasted 30 minutes trying to figure out why you can't reproduce your production environment on a duplicate project while writing up a blog post.  Heed my warning: don't be that person.

Conclusion

Great, so I stopped saving data to disk but increased my download size substantially.  But was it worth it?  Fortunately I was very happy to discover a 50% reduction in batch processing time.  Also it consumed less memory and CPU and electricity and cooling costs, and then the planet sent me a personal thank you note that I've got up on my fridge.  Your results may vary.  Speaking of: this code is harder to maintain, so use it sparingly.  But diskless asynchronous streams is an great technique to know about if you find the right problem.  With any luck you too start a new diet fad or be personally appreciated by a celestial body.

6 Ways I'm Improving Mental Health in 2022

$
0
0

I sincerely hope you'll find some inspiration here.  I'm temporarily veering away from my traditional topics of .NET, OSS, and Maker content.  I share a personal story related to mental health.  I want to thank Jeremy Sinclair for breaking the ice on this topic for me.


I'm ready for a better 2022.

It wouldn't take much.  2021 pretty much sucked, right?  Even for introverts like me who were gifted the best excuse ever to just stay home and code.

I mean, it's possible 2021 rocked for one or two people (per billion).  Like remember that time your tech startup went public, you effectively won the lottery, and you bought a Maserati?  You then quit your job only to find that true happiness was inside you all along and so you went back to work part time for the pure pleasure of it?  Doesn't ring a bell?  Oh yea, that was actually my roommate from college I recently met up with.  I appreciate and am genuinely happy for him, but I suspect even he's had a tough year.

The point is 2022 is ripe for improvement.  And tops on my areas for improvement: health.  Here are some areas in which I hope to improve.

1. Be More Compassionate

When Jeremy Sinclair spent a sizable segment of his Keynote at NoVA Code Camp last year on mental health, I was amazed at his bravery.  I've been struggling with why that is.  I suppose as an industry, and maybe as a culture generally, we tuck this topic away and don't discuss it because it's hard and it's personal.  But when we remain silent, we lose the opportunity to learn from each other.

Following Jeremy's lead, I'm going to try to be brave too.  Hopefully you can find something useful here.  Please stop skimming and either compassionately read or skip this paragraph.  You see this has been the hardest year I've had in a long time.  My younger brother died this year.  Please know that I share this out of love for his memory and my sincere hope that my honesty will help others.  Sharing will at least help me.  See, my brother struggled with Schizophrenia.  He was the kindest, sweetest, quirkiest, most honest, trusting, most genuine, most loving person.  But he struggled with these inner demons that no one should ever have to face.  Once he discovered the right medication, and the right professional help, and after a lot of hard work, he was virtually indistinguishable from any other quirky person you've ever known.  With the help of family and friends he lifted himself out of a mental health facility.  By 2021 he had accomplished his three main life goals: he had a driver's license and a car, a condo where he lived on his own, and a job delivering food.  I was so proud of him.  Long story short COVID disrupted the medication he needed, and things went south.

My brother's situation may seem foreign, but I bet you know folks that are a little different like he was.  There were many people that picked on or took advantage of my brother, especially in the work world because he didn't fit the mold.  That sucks.  I can't change others but going into 2022 I'm going to try harder to be compassionate to those around me.

Schizophrenia is one thing, but mental health challenges come in all shapes and sizes, and many aren't so visible.  Jeremy described his challenges with ADHD.  I know several folks that struggle with depression, some with addiction, and others that struggle with Asperger's.

Personally, I struggle with anxiety.  I've had two anxiety attacks in my life.  I'm also currently struggling with mourning.  I haven't blogged or done a video in 6 months.  I'll get back to blogging regularly when I'm ready.  But I'm striving to be more compassionate to myself too in the coming year.

2. Improve Physical Health

I firmly believe that there is a strong correlation between physical and mental health.  For me there is anyway.

For instance, today crowds don't bother me at all, but when I was younger, I couldn't stand them.  Large groups of people caused such anxiety that I routinely had to literally run away.  When someone asked recently, I estimated it improved about 10 years ago.

I don't believe it's a coincidence that almost exactly 10 years ago in August of 2012 I got a Garmin Watch, and it changed my life.  I started running daily in order to get 10,000 steps.  My physical health improved, and my mental health along with it.  My doctor confirmed that running helps with anxiety and indeed my overall anxiety decreased.  I feel that this one daily habit has additionally improved my mental acuity, reduced stress, improved my sleep, and allowed me to manage my mental health challenges without medication.

So, in 2022 I will continue to prioritize physical health because it improves my mental health.  If that sounds good to you, I highly recommend a step counter.  I particularly love my Apple Watch because it tracks calories not steps, and thus accounts for swimming and biking activities, and the achievements make it fun.

3. Track Mental Health

Ask any software developer and the first step of improving performance is collecting data.  There are many folks I work with and respect that might collect mental health data with pen and paper.  However, for the last month I've been using the daylio app.  It's produced a number of personalized insights for both preventative and reactive triggers for anxiety and mental wellbeing generally.  For instance, I've started my day with meditation (with the Insight Timer app) for the last two weeks and I've discovered it improves my mood and reduces anxiety.  Also music, comedy, hobbies, me time, cleaning (seriously), and getting to sleep early seem to make a big difference.  I will continue tracking my moods in 2022 to gain additional insights to improve my mental health.

4. Manage Psychic Weight

I receive an enormous amount of anxiety from unfinished, and especially unenumerated tasks.  I believe Scott Hanselman refers to this as psychic weight.

I was really stressed out ten years ago. I felt that familiar pressure between my eyes and felt like all the things that remained undone were pressing on me. I called it "psychic weight." I have since then collected my Productivity Tips and written extensively on the topic of productivity and getting things done. I'm going to continue to remind YOU that Self-Care Matters in between my technical and coding topics.

I'll never be as productive as Scott, but I recently discovered Microsoft ToDo.  I feel like I've tried just about all the other task management systems but solving daily task enumeration has helped me reduce stress immensely.  The one feature I love most about it is the "My Day" list.  This feature is a list that clears out every single day to help force you to reconstruct what's important to you on any given day.  It forces good daily habits and doesn't hit you over the head with uncompleted tasks.  Using this software I start each day with a fresh perspective and less psychic weight.  I will keep this up daily in 2022, and that will make it a much better year for me.

5. Consume Carefully

Thanks to daylio I've discovered that the content I consume affects my mental health: comedy makes me happier, music inspires me, news results in fear and sadness, and politics make me angry.  I don't want to be angry.  So for 2022 I've removed political podcasts from my feed and reduced news consumption.

I'm also trying to alternate reading inspiring non-fiction books that can improve my mental health with pleasurable fiction just for fun.  If this sounds like something that might appeal to you, I would like to suggest some of the following books in which I have found inspiration:
  • Speaker for the Dead (Orsen Scott Card)
  • So You Want to Talk About Race (Ijeoma Oluo)
  • Celestine Prophecy (James Redfield)
  • How to Win Friends and Influence People (Dale Carnegie)
  • 7 Habits of Highly Effective People (Sean Covey)
  • 10% Happier (Dan Harris)
  • Altered Traits Science Reveals How Meditation Changes Your Mind, Brain and Body (Daniel Goleman, Richard Davidson)
  • The Power of Positive Thinking (Dr. Norman Vincent Peale)
  • How to Fail at Almost Everything and Still Win Big (Scott Adams)
  • The Road Less Traveled (M. Scott Peck M.D.)
  • Quiet: The Power of Introverts in a World That Can't Stop Talking (Susan Cain)
  • Zen and the Art of Motorcycle Maintenance (Robert M Pirsig)
  • The Paradox of Choice (Barry Schwartz)
  • The 4 Hour Workweek (Timothy Ferriss)

Please post additional inspirational reading suggestions for me and readers in the comments or message me on Twitter with them and I'll RT.

6. Value Creativity

Consuming (e.g. books, video games, podcasts, movies) can be helpful or a nice distraction, but for me they rarely bring joy the way creating does.  I find my life is happier when I spend time creating things or solving problems.  For me that includes coding, natural language writing (e.g. this post), woodworking, 3D Printing, electronics, cooking, playing guitar, and smoking meats.  I don't know if it's technically creativity but also on that list is spending time in nature and quality time with family and close friends.  These are the types of creative, non-consumption activities that produce joy for me that I will do more of in the coming year.

Summary


2021 was hard, but 2022 will be better.  What activities will you do more of to improve mental health?  Is compassion a part of your New Year's resolutions?  What will you do more of in 2022 to reduce stress and feel more balanced?  Please share.

If this post was helpful in any way, please say so on Twitter or in the comments.  I've branched out by doing a personal, non-tech post and would be happy to do more if it struck a chord.


5 Ways to Supercharge Your Productivity with GitHub Copilot

$
0
0

The new AI coding assistant from GitHub can help increase your speed, quality, and efficiency. Here's 5 tips to get you started.


Copilot recently saved my bacon. I had a tight three-week deadline and a lot of code to write. Copilot, the new AI coding assistant from GitHub, allowed me to meet my deadline with enhanced quality and at a rate substantially faster than I normally travel. It felt like being pulled along a moving walkway at an airport.

But while I highly recommend Copilot, it's still just a tool, and one that works better in some situations than others. Below is what I learned about it on my recent project organized as five tips to help you learn Copilot fast and increase your speed, quality, and efficiency.

Let's get right to where Copilot it fails before covering where it shines.

🐛 Write More Bugs, Faster


I imagine everyone knows copy-paste bugs. Someone writes a section of code, later someone copies and pastes that section wholesale into another part of the application. However, some part of that section required a modification for the new context, or maybe the original had a bug in it that was just duplicated. The result is at least one subtle bug that looks reasonable at first glance.

Copilot elevates copy-paste bugs to a whole new level. Consider this:

I wrote this shortly after starting with Copilot. I was so impressed that after I converted just one hex string to binary in comments Copilot figured out what I was doing for the second and subsequent lines and auto suggested the binary conversions.


The 2nd and 3rd lines were correct, and the 4th looked right, and all too quickly I developed a false sense of security. I stopped double checking.

BIG MISTAKE. New AI Enhanced Bug (nearly) introduced.

ProTip #1 - Double Check All Output


Copilot is not infallible, and everything it proposes must be double-checked. Like fertilizer on a garden, it can supercharge weeds as well as vegetables and flowers. So be careful, and never trust what it auto-suggests.

🪤 The Distraction Trap


I find there are different phases of the software development process that require different mindsets. For instance, both testing and self-reviewing PR's requires a dispassionate, critical mindset. Working new problems requires creativity. And following existing patterns to build out CRUD functionality allows you turn up the jams, turn down the creativity, and give your frontal cortex a break. Copilot works amazingly in that latter modality.

But I've identified two other development modes where Copilot is extremely unhelpful. The first is when you're establishing a new pattern in your code, such as introducing dependency injection when you didn't start with it from day one. The second is when you need to solve a hard problem specific to your domain for which there are necessarily no existing patterns to follow.

In both of these cases Copilot will attempt to throw code up at you as you type. It's so very tempting to want to look at that code and see if just maybe Copilot has some magic that can short circuit you having to think.

IT'S A TRAP! That flash of code leads to distraction and losing the thread of thought right when you need thought continuity the most.

ProTip #2 - Turn it Off


When you know you're doing something unique, turn off Copilot or just hit the escape key as fast as you can to force yourself to do the hard thinking that only an actively engaged, fully focused human mind can ever accomplish.

🤘 Rocking Boilerplate


In my experience software development requires quite a bit of boilerplate coding. Copilot rocks boilerplate coding. When you're just repeating a pattern, Copilot will accelerate you up to dizzying speeds. Just remember that speed doesn't always happen on day one. It takes a few days until Copilot learns your codebase and coding style.

Once you're up to speed though take the extra time it gives you back to fit in some refactoring time to implement the Boy Scout rule and continuously leave the codebase cleaner than you found it.

ProTip #3 - Give It Time

Give Copilot a few days to warm up. Then enjoy superspeed, but use some of the time saved to improve, not just expand, your codebase.

🏆 Get Specific Solutions, Fast

At some point in this three week sprint I spent hours trying to convert a UTC date into the local time zone in Python. Exasperated and getting nowhere fast, I eventually recalled that Copilot would read the name of a method and auto-suggest an implementation. Maybe it could kind of search though all of GitHub for me and find what I needed? I wrote this:
defconvert_utc_to_local(utc_dt: datetime) -> datetime:

And as if by magic Copilot instantly found the alternate universe in which there existed an answer:

It worked beautifully and might have saved me hours if I'd only thought to do that up front.

ProTip #4 - Write Small Well Named Functions


If you have a very specific problem to solve that has undoubtedly been solved before, write up a small well named function (which hopefully you're doing already anyway) and delegate that job to Copilot, and save yourself hours of frustration.

➿ Improve Consistency


Occasionally I discovered that Copilot would provide a suggestion that didn't match what I was expecting. It was tempting to accept that answer if it's good enough, but I also found it's extremely helpful to ask why.

Asking why Copilot suggests code different than expected often produces the answer that you aren't consistently following a pattern in your codebase. That's because Copilot looks at both what you just typed and also at all of the code written thus far in the solution, and if your new code deviates from the prior pattern the autosuggestion will also deviate.

Sometimes that's ok but being alert to it can actually help you improve consistency within your codebase.

ProTip #5 - Use Copilot as a Heuristic

If Copilot suggests something you don't expect, use that as a heuristic to improve consistency.

Conclusion


In my mind Copilot is worth every penny. It allows developers to write faster boilerplate, find solutions to specific problems faster, and be more consistent. It comes with drawbacks too, but if you know the drawbacks and prepare for them, then overall it will boost your productivity to new heights. I would be shocked if AI assisted coding isn't the expected mode of working within the next few years.

So what do you think of AI enhanced coding? Please share in the comments your thoughts along with any tips and tricks you've discovered.


MAUI Sounds Amazing. Is It?

$
0
0

You're ready for .NET MAUI, but is it ready for you? In this post I share my real-world experience of Microsoft's latest write-once deploy-anywhere solution.


Technology vendors have promised write-once, deploy-everywhere solutions to developers since time immemorial.  

It seems to be an especially hard problem for user interfaces, particularly when accounting for both mobile and desktop platforms.

For instance, remember JavaFx?  It was a Java-based solution that was supposed to deploy to Windows, Mac, Linux, Symbian, and Windows Mobile.  I recall seeing that technology fail on virtually every platform in a live demo at a keynote at the JavaOne conference in 2009.  Ouch.

Is MAUI any different?

For one thing the MAUI demos consistently look strong and the "File->New" experience works well.  But I've long since learned to never trust even the best demo or File->New experiences.

Fortunately, over the last few weeks I've had the pleasure of working professionally on a .NET MAUI project and I think I've seen enough to help answer the question of whether .NET MAUI is ready for your next project.

What is MAUI?

First of all, in case you aren't familiar, the .NET Multi-platform App UI (MAUI) is the successor to Xamarin that allows writing one UI that can deploy to Mac, Windows, Android, and IOS.  There's no real Linux support yet (unless you count Tizen), but with Microsoft and Canonical being BFFs I bet it won't be long.

If MAUI sounds a bit like Electron so far: it isn't.  Electron embeds a web browser in your app and provides an identical HTML based UI for desktop clients and a TypeScript or JavaScript back end.

MAUI is much more.  First of all, it natively deploys to both desktop and mobile.  Even better, MAUI renders as native controls on each platform.  That means your app looks and behaves like a native Mac app on Mac (via AppCatalyst), a native Android app on Android, a native Windows app on Windows, etc.


But that's not all.  While the native experience is the default option, MAUI also offers a Blazor control whereby you can embed some or all of your app in a web browser.  Using that option you'd get an identical experience across iOS, Mac, PC, Android and could even deploy the same app to the web too!  

Even cooler you can mix and match native controls with the Blazor control for hybrid UI solutions.  A single UI and back-end codebase in C#, the best language ever: it sounds too good to be true.  

What follows are three takeaways from the real world for how it actually stands up.

Takeaway #1: It Actually Works!

Before I go any further, let me just say MAUI largely works as promised.  Our project had a custom UI deploying to Mac and Windows.  We had a dev team with a mix of Windows and Mac developers.  Each app looked and felt pretty native with the exact same UI codebase.

Unfortunately, this app didn't need to target Android, iOS, or Web platforms, so I can't confidently comment on how well MAUI works on mobile just yet.  But Xamarin has worked fine on mobile in the past, and the File->New experience works well, so I'm confident mobile works just as well as desktop.

The fact that it works on both PC and Mac though is awesome enough that any subsequent griping feels like bikeshedding by comparison.  That said I'm going to share some of my initial frustrations anyway, to hopefully help others avoid some of my pain.

Takeaway #2: Desktop UI Not Fully Baked

It's not just how a button looks that makes a native app native: it's also the little things like keyboard shortcuts, animations, and design paradigms.  For instance, a material design UI with a big floating plus button just doesn't look right on iOS.  MAUI solves some of these problems, but it also misses the mark some, particularly on its newer platforms: Windows and Mac.

For one thing, I discovered it was nearly impossible to get the cursor to change to a hand on mouseover of selectable elements.  Giving users a hint about interactive elements is important, but it didn't work on Mac or PC.  That's probably because MAUI has its roots in mobile.

Another issue is I found it extremely challenging to fire off an animation when users click a button but before they navigate, particularly when using MVVM architecture (more on that later).  These features would be easy or free in a native app (e.g., Win UI), but the desktop platforms just felt less fully baked in the current version (MAUI 7).

The solutions undoubtedly involve a custom renderer or handler, but the problems weren't quite big enough to warrant that investment just yet.  After all, a subsequent version of MAUI will probably fix these issues.  But attempting to solve it did give me the opportunity to fiddle with platform specific code, which is a great strength.

If you aren't familiar the location of the platform specific elements in MAUI is awesome and a huge improvement over Xamarin.


This folder-based approach to platform specific code is particularly awesome, because Xamarin used to require a separate project for each platform.

While that approach is helpful, it wasn't enough to solve my problems easily.  So, keep in mind if you're looking for a pixel perfect truly native app, it may be a large time investment, and you might even be better off writing your app from scratch for each platform.  If you're ok with a good enough UI: MAUI (version 7) is for you.

Takeaway #3: Quirky

In my experience Xamarin was pretty quirky.  MAUI is kinda green, so I expected it to be no less so.  I wasn't disappointed.  Here's a list of 3 quirks to be aware of if you're starting a new project.

Dependency Injection Helps, and Hurts

I love how dependency injection is a first-class citizen in MAUI.  Unfortunately, if there are any problems with DI, MAUI falls over on startup without any warning of what went wrong.  

On Mac it just fails.  It looks like this in Visual Studio on Windows:


Along with This program has exited with code 3221226107 (0xc000027b).

These can usually be quickly solved with something like:

// don't forget to register both the page _and_ the ViewModel
builder.Services.AddTransient<MainPage>();
builder.Services.AddTransient<IMainPageViewModel,MainPageViewModel>();

In MauiProgram.cs.  That first line is a mild gotcha.  It's because MAUI requires registering pages to get DI working, even though they worked fine prior to using DI.  Unhelpful errors, but recognizable once you get used to them.

More Unhelpful Error Messages

Continuing the trend of unhelpful error messages there's a checkbox on MAUI's file->new project dialog that if you click it will ruin your day.  That button accidentally got clicked at some point and it started our project with the solution and the project in the same directory.


Placing the solution and the project in the same directory worked out fine at first, but when we later went to add a library, we temporarily put that library in a child directory until the team got to a good stopping point for the big move refactor of the UI project.  

Except it failed.  We got tons of unhelpful errors like this:


IDE1100 Error reading content of source file 'C:\dev\Lprichar.MyMauiApp\Lprichar.MyClassLibrary\obj\Debug\net7.0\Lprichar.MyClassLibrary.AssemblyInfo.cs' -- 'Could not find file 'C:\dev\Lprichar.MyMauiApp\Lprichar.MyClassLibrary\obj\Debug\net7.0\Lprichar.MyClassLibrary.AssemblyInfo.cs'.'.

Eventually, we figured out the problem and sucked it up and immediately moved the MAUI and class library projects into sibling folders.

You probably won't run into this exact problem but just remember MAUI is a new platform with some sharp and painful edge cases, so reserve plenty of time to solve inexplicable and unhelpfully worded errors.

CommunityToolkit.Mvvm + Testing

If your project will have any complexity, I strongly recommend the MVVM (Model View ViewModel) pattern and the MVVM Community Toolkit (big thank you to Steve Maier for introducing the Community Toolkit to our project and putting up with my initial grumbling about it 🙃).  

Without getting into too much detail, MVVM will allow a cleaner architecture and a better separation of responsibilities, and the MVVM Community Toolkit will significantly simplify the work required to accomplish that cleaner architecture.

However, if you have a both a Maui App and a Library project, and you want to test elements from both in a unit test project then you're liable to end up with a ton of warnings like this:


Warning CS0436 The type 'ColorAnimationExtensions_Button' in 'CommunityToolkit.Maui.SourceGenerators\CommunityToolkit.Maui.SourceGenerators.Generators.TextColorToGenerator\ButtonTextColorTo.g.shared.cs' conflicts with the imported type 'ColorAnimationExtensions_Button' in 'Lee.MyMauiApp, Version=1.0.0.0, Culture=neutral, PublicKeyToken=null'. Using the type defined in 'CommunityToolkit.Maui.SourceGenerators\CommunityToolkit.Maui.SourceGenerators.Generators.TextColorToGenerator\ButtonTextColorTo.g.shared.cs'.

If that happens, I'd recommend taking the approach recommended by Ed Snider in his book Mastering Xamarin.Forms, and move the ViewModels into the library.  Any UI or platform specific code can be implemented in the UI project and dependency injected by interface into the library.  Then you can remove the reference to the UI project entirely from the test project.  That removes warnings, simplifies the architecture, and keeps business logic separate from user interface code.

Summary

So, is .NET MAUI ready for the real world on your next project?  If you need a cross-platform UI solution that can run on any or all of Android, iOS, Mac, Windows, and potentially the Web, and you're prepared for a bit of a bumpy ride then I would say absolutely yes.

I'd keep a sharp eye on the next release, but I can confidently say that the fundamentals of MAUI are strong, and it actually solves an extremely hard problem.  Once you get used to the quirks, you'll appreciate that it does what it promises.  Ultimately, it's ready for you, if you're ready for it.

Master ChatGPT Today or Risk Obsolescence Tomorrow

$
0
0

As a dev I tried ChatGPT for a week instead of search engines, official docs, and Stack Overflow. Here's what I learned.


Since ChatGPT is all the rage I thought I'd try it for couple weeks instead of my existing dev workflow of search engines, Stack Overflow, and reading docs.


Even as it exists today, in beta, it has substantially increased my productivity, and I guarantee it will for you.

In this article I'll break down six areas where ChatGPT can help increase your productivity as a developer. Of course, no tool is perfect and so I'll also list six areas where it fails, so you can avoid those pitfalls.

However, there's something I can't easily convey here: its potential. While this article can help you understand some use cases, until you try it, it'll be hard to appreciate what it might be like in a year, two, or five. Large Language Models (LLM's) like ChatGPT will be the de facto way of working very soon, and once you try it, you'll realize that if you aren't on board, you're going to be left behind.

And with that bold prediction out of the way I'll get started:

#1 Pro: Find Information, Fast

ChatGPT is amazing at searching through all of humanity's knowledge to find an answer to very specific tech questions in a human readable way. For instance:

  • In bicep if I specify a system assigned identity, how can I get back the app id of that identity?
  • How do I set the AccessToken in order to connect to an Azure SQL Database using a service principal?
  • In Azure pipelines, what hosted options are there when setting the vmImage setting for a pool?
  • How do you convert an object to json using System.Text.Json?
  • In Bicep what are the pro's and con's of using an import statement vs using a module?

ChatGPT answered all of the questions above perfectly. For instance:


It was able to surface the information I needed faster than I possibly could have with my existing workflow, and it always provided helpful code samples.

#2 Con: Over-Confidence

Do you have a friend or family member who answers questions with such conviction and precision that you can't help but believe them? Except that you've eventually learned that they're mostly full of crap? That's ChatGPT (today). It will dazzle you at the precision of the answers and the way it provides code samples that look runnable. Except they aren't. For instance:

  • In a windows azure app service when you set the WEBSITE_LOAD_CERTIFICATES app setting, in what folder does the app service store certificates?

ChatGPT provided a specific folder that looked like exactly what I was looking for. Except it was a complete lie.

The same as with my CoPilot suggestions: don't make the mistake of trusting AI results at all. In many cases ChatGPT provides obsolete information, or provides answers that look perfect, except they just aren't valid.

#3 Pro: Conversational Follow-Ups


When ChatGPT gives you a crappy answer or code that doesn't run, you can tell it that it was wrong, and why, and it can follow-up for a better answer. For instance:

  • There is no `group` parameter on the command `az role assignment create` did you maybe mean `--assignee`?
  • After executing that I got role "Directory Readers" doesn't exist. Why might that be?
  • Your example didn't work, I got "Missing expression after unary operator '--'.". In your multi-line example do there need to be quotes around each argument?

Each time ChatGPT corrected itself and helped get to a correct answer. For instance, to that last point ChatGPT responded:

  • I apologize for the confusion caused. You are correct that the arguments field in the PowerShell@2 task should be a single string, and the arguments field should not span multiple lines…

It then provided a valid example that was helpful. ChatGPT can even follow up with abstract concepts like theoretical reasoning about variable naming!

Incredible!

#4 Con: Stale, Unprioritized Sources


As the saying goes: bad data in bad data out. In this respect ChatGPT has some serious information shortcomings:

  • It fails to take authoritative sources into account (e.g. learn.microsoft.com will contain correct information about Azure content vs random discussion groups)
  • It also fails to take age of information into account (newer should be better)
  • Its model is over a year old, which is like 10 in dev years, so its information is often stale

While it tends to be correct more often than not, it's information on how to do Open ID Connect authentication for example was repeatedly and frustratingly out of date and I wasted a ton of time trying to get information out of ChatGPT that it just couldn't provide.

#5 Pro: Help Debugging


Chat GPT can help you troubleshoot issues too. For instance:

  • The command `.\build.ps1 --target=PublishDevopsArtifacts` appears to be freezing in DevOps. It produces the output "xyz", any idea why?

ChatGPT provided three possible reasons and then presented six extremely helpful debugging techniques such as logging to a file and increasing the verbosity level.

#6 Con: ML That Doesn't Learn


Sadly, when you point out areas where ChatGPT fails, it doesn't learn from its mistakes in subsequent sessions. Like an amnesiac, it forgets every single session. For someone who likes to give back to the community such as adding answers or clarifications to old questions in Stack Overflow this is a big disappointment.

#7 Pro: Writes Code


In many cases ChatGPT can write small functions to allow you to work at a higher level of abstraction. For instance:
  • Using Azure CLI can you please show me how to 1. create an Active Directory group called "DirectoryReadersGroup"; 2. assign the "Directory Readers" role to the group; then 3. Add a SQL Managed identity called "MyProj-dev-sql" to the group.

Or even more complicated tasks like:

  • Please provide me a DevOps multi-stage build pipeline. It should run on `windows-latest`. It should trigger on merge to the `main` branch. The first stage should run the command `.\build.ps1 --target=PublishDevopsArtifacts`. The second stage should download build artifacts to a downloads directory, and then it should run the command `.\build.ps1 --target=RunDbMigratorDevOpsArtifact --environment=$environmentName --migratorZip='$(Pipeline.Workspace)/download/Migrator/Migrator.zip'`

The results are sometimes immediately usable such as in the first case, or in other cases a guideline that you can follow as you hand write something more complicated, such as in the second case.

#8 Con: Writes Bad Code


ChatGPT can't run or compile code at the moment, so it can't verify that any code it provides to you is correct. If a future version had a dev environment it would be substantially more helpful.

However, like giving a toddler car keys, perhaps giving AI access to a development environment is a terrible idea. So, I guess just get used to bad AI code for the foreseeable future.

#9 Pro: Translate Paradigms and Languages


Sometimes the docs you're reading provide a sample in a different language or paradigm. ChatGPT to the rescue:

  • What is the equivalent of "Get-AzureADServicePrincipal -SearchString "Microsoft Graph";" in Azure CLI?

Very helpful.

#10 Pro: Simplify laborious tasks


Dev work has plenty of tasks that require a lot of typing. For instance:

  • Can you please create the C# records (or classes) that will allow me to deserialize the following json: `{ "student": [ { "id":"01", "name": "Tom", "lastname": "Price" }, { "id":"02", "name": "Nick", "lastname": "Thameson" } ] }`

Pretty nice. Unfortunately, ChatGPT produced non-idiomatic lowercase C# and records whose properties weren't in the constructor. Nonetheless I was impressed and appreciate the potential.

#11 Con: Doesn't list Sources


As a dev I find it frustrating that ChatGPT answers so confidently but doesn't give any indication how it knows what it knows. The good news is you can kinda get sources if you ask. For instance:

  • Please provide the NuGet link to the Azure Active Directory Authentication Library (ADAL) you just mentioned
  • Can you please provide a link to the official docs for the Azure SQL database resource in your example?
  • Can you please point me to the documentation for that `PowerShell@2` command?

With that type of query, you can quickly jump to the most up to date data about what you're attempting to accomplish.

Summary


After a week of using ChatGPT as my primary source of information, I have learned that it is sometimes, but not always the best first place to go. It is a powerful tool, but it doesn't entirely replace search engines or Stack Overflow just yet.


So, will AI eliminate the role of developers? Of course not. Until it can translate what users mean rather than what they say, navigate contradictory requirements, or grasp the bigger picture of a project, then it won't eliminate the role of software developers. Also, LLM's still need to solve some big problems like stale information, identification of authoritative sources, inability to validate code, and honestly just lack of ability to improve.

However, as in any industry with big change comes both opportunity and risk. Those individuals that fail to adapt may well get left behind. However, ChatGPT is also a fantastic opportunity to get ahead of the curve, and prudent developers will start mastering this new tool ASAP.

Full disclosure: While ChatGPT didn't write this post, I did use it to help flesh out some of the ideas. Also, the header image was created by DALL-E.

How To Deploy EF Database Migrations

$
0
0

How to deploy Entity Framework Database Migrations across multiple environments, revert migrations, and support complex migrations, all while avoiding security flags.


Managing stateful data is typically one of the tricker parts of a DevOps strategy. The migrations feature of Entity Framework can help immensely with its small, independently executable, PR friendly delta's. Theoretically it can even grant the ability to revert migrations if a deployment goes poorly. If used correctly the technology can be a huge help.

However, in practice, there are a lot of different ways to automate the execution of those deltas. Each approach has pros and cons, and what may work for one project may not for another.

In this post I'll show six ways to run EF Database Migrations, explain in which circumstances each would be most helpful, and then show how to set up Active Directory (AD) Authentication and set your connection string correctly when running migrations from a build server.

1. Migrating via App


The question of when to run migrations is ... interesting.  The thing is, it's so easy to run the migrations when an app starts for the first time with the  DbContext.Database.MigrateAsync()  command.


Running migrations on startup is convenient and a time saver because it piggybacks off of an existing database connection and firewall rule.  But it offers some downsides:
  1. Slows app startup
  2. Hard to revert
  3. Timeout problems for long-running migrations
  4. Violates the principal of least privilege
The last point bears explanation.  It references the following security best practice:

The principal of least privilege
In order to minimize the damage caused by security incidents, a system should be granted the minimum level of access required.  

In other words, don't grant a system any permissions it doesn't need.

For instance, as part of their day-to-day operations apps don't generally need to delete database tables, therefore they should not be granted that permission.  However, that's exactly the type of permission an app needs if it is going to run database migrations.  Thus, by having an app run database migrations we inadvertently grant attackers an ability to cause more mayhem than is necessary should they gain access to the database through an app.

To put it more concretely: if an app is connecting to a SQL Server, then it's ok to grant the account the app is running under db_datareader and db_datawriter, but not db_ddladmin, and definitely not db_owner.  Doing so will generate a flag in a security center audit.


Migrating via Build Server

Migrating via app may be good enough if you you're still in dev, intentionally deferring security risks, or are just generally comfortable with the risk.  However, the alternative, when you're ready for it, is to have your build server run EF migrations.  There are several ways to approach it, each with pros and cons.


2. Command Line Tools


As a developer you're probably already familiar with the dotnet ef database update command. This option is inconvenient in a DevOps world because it requires source code. Source code is a pain a variety of reasons, not the least of which is you'd need to get the exact version of code for the deployment you're trying to run. The other approaches below are usually preferable.

3. SQL Scripts


If you have your build server run the command dotnet ef migrations script [oldmigration] [newmigration], it'll produce a single file that you can save as an artifact in a build pipeline and then execute for each environment.  Unlike some other options, this approach produces an asset that can be reviewed by a DBA.  However, figuring out which values to use for oldmigration and newmigration would be tricky.  Worse, if each environment is at a different version, as often happens when not every PR is deployed through to production, then it could be impossible to produce a single artifact that would work for all environments because those values would be different for every environment.  Therefore, I wouldn't generally recommend this approach.

4. Idempotent SQL Scripts


Fortunately, if you pass the --idempotent parameter to the dotnet ef migrations script, then it will generate a script that will only run those migrations that need to run.  The resulting file looks like a bunch of if statements like this:
IFNOTEXISTS(SELECT*FROM[__EFMigrationsHistory]WHERE[MigrationId]= N'20230110143448_Initial')BEGINCREATEINDEX[IX_AbpAuditLogActions_AuditLogId]ON[AbpAuditLogActions]([AuditLogId]);END;
GO

While this option doesn't grant the option to revert a bad deployment, it works great as a published build artifact, can be reviewed by a DBA, and works when each environment is at a different version.  However, this approach isn't transactional, and so a failed migration could leave your database in an inconsistent state.

5. Bundles


Bundles are great.  They solve the problem of applying transactions to your migrations.  Simply have your build server run dotnet ef migrations bundle --self-contained -r [linux-x64|win-x64] and you'll have a single file binary (called efbundle.exe by default) that you can publish as an artifact, that runs migrations within a transaction, and that will run only the migrations that need to be applied.  You can even specify a specific migration, which allows you to revert migrations.  The resulting file looks like this:
.\efbundle.exe --help
Entity Framework Core Migrations Bundle 7.0.1

Usage: efbundle [arguments] [options] [[--] <arg>...]]

Arguments:
  <MIGRATION>  The target migration. If '0', all migrations will be reverted. Defaults to the last migration.

Options:
  --connection <CONNECTION>  The connection string to the database. Defaults to the one specified in AddDbContext or OnConfiguring.
  --version                  Show version information
  -h|--help                  Show help information
  -v|--verbose               Show verbose output.
  --no-color                 Don't colorize output.
  --prefix-output            Prefix output with level.
This option is almost my favorite.  The only thing it lacks is the ability to run custom code outside of a migration.

6. Command Line App

Once upon a time a project of mine was storing encrypted data in a field in a database.  After we were in production (of course) we realized that the encryption algorithm was too strong and was causing performance problems.  We needed to decrease the strength of the encryption, but that meant we needed to perform a complex data migration involving a method written in C#.  

We would have to run a query to read every row, decrypted it with the old algorithm in C#, re-encrypted it with the new algorithm in C#, and update it back into the database.  Should be easy enough for EF Migrations right?

Surprisingly, it turned out that EF migrations can't do that type of work.  They're designed to run insert or update SQL statements or create or drop DDL statements, but not retrieve data.  Check it out for yourself: see if you can find a single method to retrieve data on MigrationBuilder.  

So, since the algorithm was located in a C# method and since EF Migrations can't access it, we had to run code outside of EF Migrations.

Fortunately, because we were using ASP.Net Boilerplate (the predecessor to the ABP Framework), it contained a command line app that was running our migrations.  That provided the flexibility to run code before or after the migration and thus solve our problem.

Command line apps (or main apps with a command line option) that run  DbContext.Database.MigrateAsync() from the build server can run in transactions, and when compiled with  --self-contained -r [linux-x64|win-x64] are nearly single files (you do have to include Microsoft.Data.SqlClient.SNI.dll).  The downside is they don't allow reverting migrations.  However, they're my personal favorite because they offer the most flexibility when faced with tough migrations.  Also, they work particularly well in database-per-tenant multi-tenant scenarios.

If the details of this approach interest you, check out a DbMigrator sample project I created that compiles and publishes a command line app in one stage of a multi-stage build pipeline, then executes it in another.

Authentication


It's time to acknowledge the elephant in the room.  If you don't run migrations on app startup, how do you obtain a connection to your database from your build server?  Also, assuming you're using SQL Server on Azure and following best practices of only using AD authentication, how do you authenticate in a headless environment with an Active Directory account?  

Generally speaking, there are four steps.  First, create an App Registration.  Second, add the App Registration to your database with CREATE USER [{userName}] FROM EXTERNAL PROVIDER; and grant it permissions to run DDL with EXEC sp_addrolemember 'ddl_admin', '{userName}'.  Third, create a secret for the app registration:


Finally, add a firewall rule to allow access to your database from your custom build agent, or if you're using a Hosted Agent, then "Allow Azure services and resources to access this server", which in Bicep looks like this:

resource firewallRule_AzureIps 'Microsoft.Sql/servers/firewallRules@2021-11-01' = {
  name: 'AllowAzureIps'
  parent: sql
  properties: {
    startIpAddress: '0.0.0.0'
    endIpAddress: '0.0.0.0'
  }
}

Finally, you should be able to use a connection string like this: "Server=tcp:{sqlServerName}.database.windows.net,1433; "Database={dbName}; Encrypt=True; User Id={servicePrincipalAppId}; Password={servicePrinicpalSecret}; Authentication='Active Directory Service Principal';"

And that's all there is.  Plunk in your app registration app id and the secret you generated, and you're off to the races.


Summary

In this article I've discussed six ways to run migrations and followed it up with how to accomplish authentication.  The following chart will help summarize the pros and cons:


As I mentioned my personal favorite is the last, the command line app, because even though it doesn't support an automated revert, it'll run in transactions and it has the flexibility to perform complex migrations outside of EF.

What approaches have you tried?  Did I miss anything?  Feel free to chime in in the comments or hit me up on twitter or mastodon.


MS Build 2023: Must-See Sessions

$
0
0


I've been to every single Microsoft Build conference one save since it started in 2011.  It's one of my favorite conferences, and I'm so excited that it will be in-person again this year after a two year break.  

And now that they published the session catalog I have even more reason to be excited.  I had a blast browsing through the sessions.  There are so many that look amazing.  In case you don't have time to browse the full catalog here are the sessions I'm most looking forward to, roughly grouped:

.NET

Cloud

These are the sessions I'm most excited about, which talks did I miss?  Please share in the comments on social media.

How To Decrease ABP's Azure Costs by An Order of Magnitude

$
0
0

The Azure SQL Serverless SKU can save you a lot of money, but only if you know how to take advantage of it. This post will show you how to minimize costs, particularly if you use the ABP Framework. 


As I may have mentioned once or twiceABP Framework is an excellent way to jump start ASP.NET web projects.  It can propel you to production faster in the short term while improving maintainability and scalability and setting you up for success in the long term.

However, if you're deploying to Azure, you may discover that the out of the box settings are optimized more for convenience, security, and an on-premise deployment – they are definitely not optimized to reduce Azure spend.

In this post I'll share a couple minor tweaks you can implement to reduce your ABP Azure Costs by an order of magnitude.  Even if you don't use ABP, this article will help you understand how to minimize spend generally with the Azure SQL Serverless SKU.

Settings.BurnMoney = true

If you deploy ABP Framework as an App Service and an Azure SQL serverless database you're liable to see this after a few weeks:


In just 16 days, this deployment racked up $151 dollars of cost with 88% of that cost from the database alone.  That's $9.41 per day, $8.37 of which is for the database!  That's extremely high for a dev environment that contains virtually no data and was barely touched.

That wasn't for especially expensive Azure resources either.  For instance, I picked the lowest cost database SKU I could find: a General Purpose Serverless database with every setting cranked to the lowest cost position.


That looked promising when I set it up, especially that $4.78 / month estimate on the right.

MISLEADING AZURE UI ALERT: The estimate cost box when selecting a SKU is unhelpful at best.  To begin with my actual storage costs were closer to $32 per month not $4.78.  Worse, it mentions but doesn't include an estimate of compute costs.  As it turns out, my storage costs were virtually insignificant compared to my actual ~$259 / month of compute costs!

The Hidden Cost: SQL Compute

Serverless with auto-pause is supposed to be the perfect SKU for a low utilized deployment like a dev environment.  It should also be good for a production internal site that won't be used much on weekends and after-hours.

The general idea of serverless SQL is that if the database isn't used for an hour (unfortunately 1 hour is the minimum), then the database will pause itself to reduce compute costs.

However, auto pause only works if there are literally zero requests hitting the database for an entire hour.  A single request, even at minute 59 will restart the timer for another hour.

Diagnosing why your database doesn't auto-pause can be challenging.  One way you can tell if your app has successfully stopped hitting the database when not in use by going to the Database -> Monitoring -> Metrics panel and pulling up "App CPU Billed".

The "CPU Billed" for my ABP Framework with nearly out of the box settings my looked like this:


While my CPU percentage looked like this:


Translation: my CPU Utilized was near zero while CPU billed was pegged.  That meant something was frequently and very lightly hitting the database.  To track the culprit down I turned to a familiar tool.

Running SQL server Query Analyzer in my local environment was the best way I found to determine what's going on.  


With that open it was clear that every 3-5 seconds ABP was polling the AbpBackgroundJobs table.

SELECTTOP...FROM[AbpBackgroundJobs]AS[a]WHERE...ORDERBY...

Culprit #1: Background Jobs

Background Jobs are a wonderful ABP feature that allow you to offload run long running jobs like e-mailing or report creation to a queue for execution on a dedicated background thread.  They have a lot of great features I could extol, but it's not strictly relevant, so I'll just encourage you to skim over the documentation.

On my project I'm not using background jobs yet so I just disabled them per the documentation like this:

private voidConfigureBackgroundJobs(){
    Configure<AbpBackgroundJobOptions>(options =>{// background jobs constantly poll the DB and run up Azure costs, so disable until we need this feature
        options.IsJobExecutionEnabled = false;});}

If you wanted to decrease the polling period you could alternately do something like this:

Configure<AbpBackgroundJobWorkerOptions>(options =>{// background jobs normally poll the database every 5 seconds, this//    updates it to every 6 hours
    options.JobPollPeriod =21_600_000;});#

Unfortunately, after I deployed that it didn't exactly solve all the cost problems.  After I let it run for several days, the costs decreased, but in odd, chunky, ways:

Here you can see it was now able to pause correctly sometimes, but after a hit to the site it would turn back on for days at a time.

Turning back to SQL Server Profiler, and running it for a long time, I eventually saw this:


The following SQL was hitting the database at 60 minute intervals, right when my database was about to take a well deserved nap.

SELECTTOP...FROM[OpenIddictAuthorizations]AS[o]LEFTJOIN(SELECT...FROM[OpenIddictTokens]AS[oO]WHERE...)

Culprit #2 OpenIdDict

Even though I disabled general purpose background workers, this OpenIddict background job was still running.  Digging into it further, it turned out the offending class is TokenCleanupService, which has the following description:

// Note: this background task is responsible of automatically removing orphaned tokens/authorizations// (i.e tokens that are no longer valid and ad-hoc authorizations that have no valid tokens associated).// Import: since tokens associated to ad-hoc authorizations are not removed as part of the same operation,// the tokens MUST be deleted before removing the ad-hoc authorizations that no longer have any token.

The class gets run hourly by TokenCleanupBackgroundWorker, which is registered by the AbpOpenIddictDomainModule module, which in turn is a dependency of the module [MyProject]DomainModule that was generated from the starter ABP template.  

Removing the AbpOpenIddictDomainModule dependency or disabling the job seems like a poor idea, since most projects, mine included, require oAuth authentication.

However, by digging through the code one can see how to turn down the frequency.  Because of ABP's excellent customizability it's actually quite easy.  Just add this inside of your main module:

public override voidPreConfigureServices(ServiceConfigurationContext context)...
    Configure<TokenCleanupOptions>(options =>{// The default OpenIdDict cleanup peariod is 3,600,000 ms aka 1 hr, however, this// is just short enough to disable the SQL Auto-pause delay and cause it to never shut down.// This changes it to every 6 hours or 4 times a day
        options.CleanupPeriod =21_600_000;});

And now, finally, auto-pause started working as expected.  It fired back up 4 times a day to run the cleanup job:


To reduce costs further I tried reducing CleanupPeriod to 86_400_000, or once per day.  That resulted in prices ranging from $1.33 all the way down to $0.50 for the database under light to no usage!

And for comparison purposes here's the cost of the deployment after running it for the same time period as earlier, but with the two configuration tweaks:


That's an overall reduction from $151 down to $21.  The majority of the savings were in the database costs, which went from $134 down to $7!

Summary

Azure SQL serverless can be a great, inexpensive option for certain usage scenarios like dev environments or apps not used on weekends and evenings.  If you've got one of those scenarios and you're using ABP though, you will need to adjust your background job and openiddict settings to maximize your cost savings.  I hope this post helps you to massively reduce your Azure costs.

My Battle with Docker Desktop: Solving "Failed to Resolve Reference" and Networking Issues

$
0
0

After hours of troubleshooting Docker Desktop on Windows, I finally resolved a series of frustrating issues caused by misconfigured network settings. Here’s a summary of my fight, with all the error messages for anyone else struggling with similar problems.

The Errors

docker pull nginx

This command ^ as well as docker status produced the following error

failed to resolve reference "docker.io/library/nginx:latest": failed to do request: Head "https://registry-1.docker.io/v2/library/nginx/manifests/latest": writing response to registry-1.docker.io:443: connecting to 127.0.0.1:8888: connectex: No connection could be made because the target machine actively refused it.

Docker Desktop

Wouldn't let me log in or search for containers.

WSL Ubuntu installation issues

When I tried to install Ubuntu from the command line it produced:

Failed to install Ubuntu from the Microsoft Store: A connection with the server could not be established.

Microsoft Store Errors

When I tried to install Ubuntu from the Store I got

Try again later something happened on our end


Networking Oddities: 

My network connections showed a "Network Bridge" I set up at some point and had forgotten about.  Removing it and rebooting didn't immediately solve the issue.

The Final Solution

Do This First

While it didn't solve the problem this article was extremely helpful:


After many attempts (including uninstalling Docker Desktop, resetting configurations, reinstalling WSL distributions, and failing to adjust my Docker proxy settings), these three commands finally fixed the problem
netsh int ip reset netsh winsock reset netsh winhttp reset proxy

Why this worked

The commands reset networking configurations, cleared stale settings for TCP/IP, Winsock. This allowed Docker Desktop, WSL, even the Microsoft Store to function correctly.

Takeaway

If you encounter similar Docker Desktop errors, particularly "failed to resolve reference" or "connecting to 127.0.0.1:8888," try these commands I hope it solves someone the hours of debugging I went through.

Please post in the comments or hit me up on Blue Sky if this solution works for you. 🚀